EasyManua.ls Logo

HP 1810-8 User Manual

HP 1810-8
5 pages
To Next Page IconTo Next Page
Page #1 background imageLoading...
Page #1 background image
1
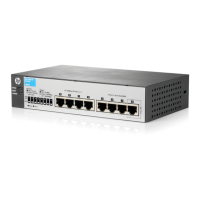
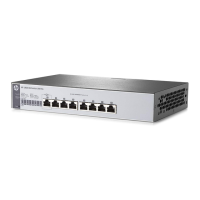
HP 1810-8 and 8G Switch Quick Start Guide
For more detailed instructions and information to set up your switch, view or download the Installation and Getting Started
Guide for your switch at www.hp.com/networking/support.
1. Unpack and check included parts. Documentation kit
Switch
Accessory kit (installation hardware)
Inline AC/DC adapter with power cord
or wall mount AC/DC adapter
2. Prepare for installation. To avoid personal injury or product damage, follow the “Safety Precautions” on
page 4.
3. Power on and verify that Self-Test completes normally. The switch does not have a power switch. It is powered on
by connecting the AC power adapter supplied with your switch, or by a PoE connection to Port 1 (8G Switch only).
After Self-Test:
Power LED = On
Fault LED = Off
4. Mount the switch. Unplug the AC power from the switch before mounting it.
Table or Desktop Mounting: Attach the four self-
adhesive pads (included in the accessory kit) to the bottom
corners of the switch.

Other manuals for HP 1810-8

Questions and Answers:

HP 1810-8 Specifications

General IconGeneral
BrandHP
Model1810-8
CategorySwitch
LanguageEnglish

Summary

Unpack and Check Included Parts

Installation and Mounting

Prepare for Installation

Prepare for installation by following safety precautions to avoid injury or product damage.

Mount the Switch

Mount the switch using table/desktop or wall mounting methods.

Power On and Configuration

Power On and Verify Self-Test

Power on the switch by connecting the AC adapter or PoE and verify the Self-Test.

Configure Switch Network Settings

Configure the switch for network operation with minimal settings via PC.

Initial Network Configuration Example

Example steps for configuring PC IP address and switch settings via web browser.

Connect Cables and Secure Switch

Connect Network Cables

Connect the network cables to the switch and network ports.

Optional Switch Locking

Physically secure the switch using a Kensington lock or similar device.

Safety Precautions

Related product manuals