This document is an instruction manual for the HRV Classic Home Ventilation System, detailing its controller functions, extra features, and frequently asked questions.
Function Description:
The HRV Classic Home Ventilation System is designed to improve indoor air quality and manage temperature and condensation within a home. It operates by drawing air from the roof cavity (or directly from outside via a Summer Kit accessory) and distributing it throughout the house. The system aims to achieve a user-defined ideal temperature, reduce condensation, and clear odors. It can operate in various modes, including heating, cooling, and ventilation, adjusting fan speeds and airflow direction based on internal and external conditions. The system also incorporates energy recovery features to minimize heat loss or gain.
Controller Features and Usage:
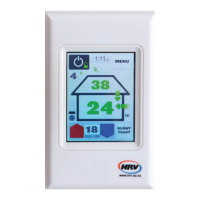
The system is controlled via a wall-mounted keypad with a digital display and several buttons.
- On/Off Button (1): This button turns the system on or off with a single press.
- Locking Icon (2): When the keypad is locked, this symbol appears. To engage or disengage the lock, press and hold the power button.
- Heating Icon (3): This symbol, along with red arrows and house temperature numbers, indicates that the system is actively trying to heat the house to the set temperature.
- Ventilation Icon (4): This symbol, accompanied by green arrows and numbers, signifies that the roof space temperature is insufficient for heating, and the system has reduced fan speeds to very low levels to ventilate the house. This ensures air movement for condensation and moisture control.
- Ventilation Setting (5): This displays the current ventilation level, ranging from 1 (less air) to 6 (more air). This setting can be adjusted to control the amount of air introduced into the home, balancing condensation clearing with the introduction of cold air. The manual suggests starting at level 6 in winter and lowering it until condensation appears, then raising it one level. For spring, summer, and autumn, lower levels (1-3) are recommended, while winter requires higher levels (3-6).
- Heat Exchange Symbol (6): This symbol indicates that the system is actively recovering energy from the house, suggesting an energy-efficient operation.
- Fan Speed Icon (7): This icon shows the current speed at which the fan is blowing air into the house.
- Ideal Temperature (8): This number represents the desired temperature the user wants to achieve inside the house. The system will attempt to reach this temperature using available heating or cooling from the roof space.
- Up and Down Arrow Buttons (9): These buttons are used to adjust the ideal (desired) temperature for the house.
- Menu Button (10): This button provides access to the system's sub-menus and additional functionalities.
- Cooling Icon (11): This symbol, along with blue arrows and house temperature numbers, indicates that the system is actively trying to cool the house to the ideal temperature.
- Filter Replacement Icon (12): This icon illuminates when the filter needs to be changed.
- House Arrows (13): These arrows indicate the direction of airflow into, out of, or around the house. Their color signifies the air temperature: red for warm, blue for cool, and green for very low-level ventilation.
- Roof Temperature (14): Displays the current temperature inside the roof cavity.
- Room Temperature (15): Displays the current temperature inside the house.
- Heat Transfer / HRV+ (HS) Arrow (16): This indicates when the Heat Exchanger or Heat Transfer system is active, moving air from the front to the back of the house.
- Summer Kit (17): This symbol appears when the optional Summer Kit accessory is activated. The Summer Kit brings cool air directly from outside into the house, bypassing the roof, when beneficial.
- Burnt Toast (18): This feature is used for specific purposes:
- Condensation: Clears extra condensation, especially behind curtains, by providing an extra boost of air into the house.
- Summer Time (Heat Dump): Purges cavity air in the early evening to reduce the temperature of the house and roof cavity sooner.
- Odors and Smells: Helps clear unwanted odors from the house.
Quick Guide to Navigation:
- Previous/Next Buttons: Located at the bottom of menu pages, these buttons navigate horizontally through sub-menus.
- Menu Button (Top of Screen): Pressing this button at any point allows vertical navigation up through the menu structure.
- Home Icon: This icon returns the user to the front main screen.
- Help Button (?): Located at the bottom right of each page, this button provides further help on specific features.
Accessed via the main menu button, these options provide advanced control:
- Burnt Toast: Advanced options for operating the Burnt Toast Mode.
- Quick Options: Access to three main options:
- Energy Saver Mode: Optimizes system operation for energy efficiency.
- Heat Transfer Unit On/Off: Controls the operation of the Heat Transfer unit.
- Summer Kit On/Off: Controls the operation of the Summer Kit accessory.
- Night Mode: Sets the ideal temperature to 18 degrees Celsius for 4 hours, cooling the house if the roof cavity temperature is lower than the interior. After 4 hours, it reverts to the original temperature setting.
- Ventilation Level: Allows adjustment of the ventilation setting (1-6) to manage condensation and air intake based on seasonal needs.
- Clock Settings: Allows adjustment of the system's clock.
- Display Settings: Adjusts minor screen modifications such as brightness and contrast.
- Advanced: Provides access to advanced user functions and information.
- About Your HRV: Displays information about the specific HRV system model.
Maintenance Features:
- Filter Replacement Icon (12): This icon indicates when the filter needs to be changed.
- Filter Replacement Recommendation: The manual recommends changing the filter every 2 years to ensure optimal system performance.
Important Technical Specifications (Implied):
- Temperature Sensors: The system utilizes sensors to monitor both roof cavity temperature (14) and room temperature (15) to make operational decisions.
- Fan Operation: The system controls fan speeds (7) to regulate airflow.
- Airflow Direction: The system can direct airflow into, out of, or around the house, indicated by the house arrows (13).
- Energy Recovery: The presence of the Heat Exchange symbol (6) implies an energy recovery mechanism.
- Optional Accessories: The system supports add-on products like the Summer Kit (17) and Heat Transfer system (16).
Troubleshooting and FAQs:
- Black Ring Around Outlet Vent: This can be caused by a static charge attracting household dust. Wiping the ring with a dry cloth and slightly opening the diffuser plate can help. If persistent, contact customer service.
- 'Replace Filter' Light On: This indicates an approximate timeline for service and filter change. Filters should be replaced every two years with genuine HRV filters.
- Ventilation Levels: The manual explains the purpose of different ventilation levels (1-6) for managing condensation and air intake across seasons.
- Persistent Condensation: While HRV systems significantly reduce condensation, some misty windows may still occur in very cold or damp conditions. The system aims to minimize condensation as much as possible.
- Customer Support: For more information or assistance, customers can contact HRV customer service at 0800 HRV 123 (0800 478 123) or visit their website.