lp-666 Rev. 003 Rel. 001 Date 2.25.20
5
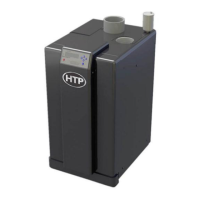
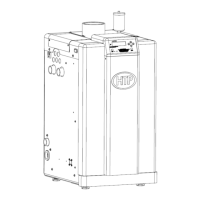
Part 1 - General Safety Information
This boiler is approved for indoor installations only and is not intended
for use as a pool heater. Clearance to combustible materials: 0” top,
bottom, sides, and back. Boiler must have room for service: 24” front,
24” right side, and 18” left side are minimum recommended service
clearances. (A combustible door or removable panel is acceptable front
clearance.) 400 - 1000 Models have been approved for installation on
combustible ooring. Do not install on carpeting. 1500 - 2000 MODELS
ARE NOT APPROVED FOR INSTALLATION ON COMBUSTIBLE FLOORING.
Install the boiler in a location where temperature and pressure relief
valve discharge or a leak will not result in damage to the surrounding
area. If such a location is not available, install an auxiliary catch pan.
Use only Category IV vent systems.
Installer - Read all instructions in this manual before installing.
Perform steps in the given order.
User - This manual is for use only by a qualied heating installer /
service technician. Have this boiler serviced / inspected annually by
a qualied service technician.
FAILURE TO ADHERE TO THE GUIDELINES ON THIS PAGE
CAN RESULT IN SUBSTANTIAL PROPERTY DAMAGE, SEVERE
PERSONAL INJURY, OR DEATH.
DO NOT USE THIS BOILER IF ANY PART HAS BEEN SUBMERGED
IN WATER. Immediately call a qualied service technician. The
boiler MUST BE replaced if it has been submerged. Attempting to
operate a boiler that has been submerged could create numerous
harmful conditions, such as a potential gas leakage causing a re
and/or explosion, or the release of mold, bacteria, or other harmful
particulates into the air. Operating a previously submerged boiler
could result in property damage, severe personal injury, or death.
NOTE: Boiler damage due to ood or submersion is considered an
Act of God, and IS NOT covered under product warranty.
NOTE: Obey all local codes. Obtain all applicable permits before
installing the boiler.
NOTE: Install all system components and piping in such a manner
that does not reduce the performance of any re rated assembly.
NOTE: If the boiler is exposed to the following, do not operate.
Immediately call a qualied service technician.
1. Fire
2. Damage
3. Water
Failure to follow this information could result in property damage,
severe personal injury, or death.
Altering any HTP boiler with parts not manufactured by HTP WILL
INSTANTLY VOID the boiler warranty and could result in property
damage, personal injury, or death.
C. Line Voltage Wiring for Standard Boiler 31
D. Alarm Connections 31
E. Low Voltage Connections for Standard Boiler 31
F. Thermostat 31
G. Outdoor Sensor 31
H. Indirect Sensor 31
I. UL 353 Internal Low Water Cut-O (Factory Installed) 31
J. Wiring of Cascade System Communication Bus 31
K. Cascade Master System Pump and Sensor Wiring 32
L. Cascade Follower Pump and Sensor Wiring 32
M. Variable Speed Pumping 32
N. Optional 0-10 Volt Building Control Signal 33
O. Optional High Gas Pressure Switch 33
P. Optional Low Gas Pressure Switch 33
Q. Optional High Limit Manual Reset 33
Part 8 - Wiring - 2000 Models 37
A. Installation Must Comply With 37
B. Field Wiring 37
C. Line Voltage Wiring for Standard Boiler 37
D. Alarm Connections 37
E. Low Voltage Connections for Standard Boiler 38
F. Thermostat 38
G. Outdoor Sensor 38
H. Indirect Sensor 38
I. UL 353 Internal Low Water Cut-O (Factory Installed) 38
J. Wiring of Cascade System Communication Bus 38
K. Cascade Master Pump and Sensor Wiring 38
L. Cascade Follower Pump and Sensor Wiring 39
M. Variable Speed Pumping 39
N. Optional 0-10 Volt Building Control Signal 39
O. Optional High Gas Pressure Switch 39
P. Optional Low Gas Pressure Switch 40
Q. Optional High Limit Manual Reset 40
Part 9 - Gas Connections 44
A. Gas Piping 44
B. Gas Table 44
C. Check Inlet Gas Pressure 45
D. Boiler Gas Valve 46
Part 10 - Start-Up Preparation 47
A. Check / Control Water Chemistry 47
B. Check for Gas Leaks 47
C. Freeze Protection (When Used) 47
D. Fill and Test Water System 47
E. Check Thermostat Circuit(s) 48
F. Condensate Removal 48
G. Final Checks Before Starting Boiler 48
Part 11 - Start-Up Procedure 48
A. Control Overview 48
B. Navigation of the Touch Screen Display 49
C. Purge Air from the System 50
D. Single Boiler Initial Start-Up and Operation 50
E. Cascaded System Initial Start-Up and Operation 50
F. Lockout Condition - Cascade System 50
G. Cascade System Programming 51
H. Operating Instructions 51
I. Programming User Settings 52
J. Programming Installer Settings 54
K. Resetting the Maintenance Schedule 58
L. Service Mode - Setting and Verifying the Combustion Setting -
Testing the Internal LWCO 58
Part 12 - Boiler Monitoring 59
A. Status Screens 59
B. History Screens 62
C. Graphics Screen 64
D. Cascade Screen 64
Part 13 - Troubleshooting 66
A. Blocking 66
B. Fault (Lockout) 66
C. User Interface Display 66
Part 14 - Maintenance 72
A. Procedures 72
B. Combustion Chamber Coil Cleaning Instructions 72
Part 15 - Shutdown 74
A. Shutdown Procedure 74
B. Failure to Operate 74
Part 16 - Replacement Parts 75
Part 17 - Installation Checklist 82
Part 18 - Maintenance Report 82
ELX Boiler Limited Warranty 84
Maintenance Notes 86
Customer Installation Record Form 87
 Loading...