nt
r
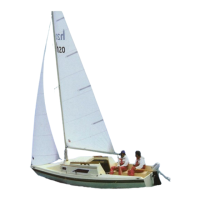
• Sails and Ri
in
12.
12.4 The Sails
As standard
our Hunter is equipped with a furlin
ib
sail and a drop down main sail. The mainsail is the sail
tt
h
t
th
ft tr
k
f th
m
t
n
h
i
t
with th
main hal
ard from the cockpit. The
ib sail is attached to
the
oresta
and like the mainsail hoisted with the
ib hal-
ard from the cockpit.
t H
nt
r
il
t
t
r
th
ntr
l
th
m
t
important sail controls from the cockpit. In addition to the
main and
ib hal
ard
ou will find a main sheet line with
a winch at the a
t ed
e o
the cockpit to
ether with the
van
and or outhaul control
some optional
. The
ib is
ontro
e
w
t
t
e
s
eet contro
nes
ea
ac
to t
e
ockpit comin
either side. In addition the
ib
urlin
line
located to the starboard side of the cockpit allows the
safe and eas
unfurlin
and furlin
in of the
ib sail
12.5 Reefin
Instruction
1. Run both reefin
lines as illustrated in the boom &
ree
la
out. The shorter ree
line will be used on the
irst
reef
Starboard Side, Green
. The lon
er reef line on the
second reef
Port Side, Red
.
2. R
i
th
m
in
il.
. Ease the mainsheet and van
4. Lower the main sail to approximatel
the first ree
position.
. Take u
the slack in the first reef line until the tack and
th
l
w
r
wn t
t 2”
v
th
m
. Ad
ust the main hal
ard so that the tack reef point is
not contactin
the
oose neck on the
ront o
the spar
and is appl
in
tension to the luff of the main above the
reef, not below. There will be approximatel
6”
150mm
stretch in the main lu
and main hal
ard when the ree
-
in
line is tensioned, so, make sure that this is allowed
for when ad
ustin
the main hal
ard to locate the tack
r
l
k
7. Confirm that the tack reef
oint is still clear of the tack
shackle and that onl
the main lu
above the ree
crin
le
is tensioned, not the luff between the crin
le and the top
stacked sail slide. Ease the reef line and read
ust the
hal
ard i
necessar
.
. Mark the hal
ard at the stopper with 1”
25mm
sin
le
band o
indelible marker ink. B
droppin
the hal
ard to
this mark ever
time, positionin
is made easier. The hal-
ard is automaticall
in the correct position for the reef
. Repeat the procedure
or the second ree
, usin
double
bands to mark the hal
ard in the correct position.
12.6 Reefin
Procedur
1. Head up into the wind.
2. Ease the mainsheet and van
. Check the toppin
lift for adequate boom support.
4. Lower the main hal
ard to the appropriate mark and
snub the line with the stopper.
. Tension the reefin
line with the self-tailin
winch until
the ree
clew is brou
ht down to the boom. Appl
stopper
and tension the main hal
ard back up, ease the toppin
lift
if needed
.
12.7 Shakin
Out a Reef
1. Head up into the wind.
2. Ease the mainsheet and van
. Release the tension on
the toppin
. Lift
if needed
. Release the line stopper and remove ree
line
rom
win
h.
4. Tension the main hal
ard to raise sail, makin
sure ree
lines run
reel
while sail is bein
raised. Appl
stopper
to main hal
ard.
. Re-tension van
and mainsheet, ease the toppin
li
t
if needed
.
12.8 Spinnaker
Optional
To set the optional spinnaker usin
the dedicated hal
ard,
first attach the hal
ard to the head rin
on the sail. Next,
t
e t
e tac
own
au
ne to t
e tac
r
n
,
ea
t t
rou
a
turnin
block on the deck near the bow, and run it a
t to the
ockpit. Set up the tack downhaul so the tack of the sail is
t fiv
in
h
v
th
k wh
n th
il i
h
i
t
.
Attach the spinnaker sheet to the clew rin
o
the spinna-
r
n
m
k
r
th
lin
i
l
ft
t
i
th
lif
lin
to a turnin
block on the toerail located
ust forward o
the stern pulpit. Then run it
orward to a winch allowin