This document is an operator's manual for a wheeled weed trimmer, providing comprehensive instructions for its assembly, operation, maintenance, and troubleshooting. The device is designed for trimming weeds and grass, particularly in areas where a handheld trimmer might be less efficient or more physically demanding.
Function Description
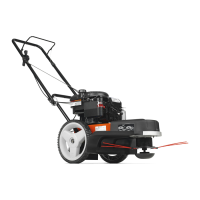
The wheeled weed trimmer is a motorized device designed to cut weeds and grass using rotating trimmer lines. Unlike handheld trimmers, it features wheels, allowing the operator to push it across the ground, similar to a lawnmower. This design reduces the physical strain on the operator, making it suitable for larger areas or for individuals who prefer not to carry a heavy trimmer. The engine powers a trimmer head, which spins the cutting lines at high speed to effectively cut vegetation. The device is equipped with controls for starting and stopping the engine, adjusting engine speed (fast or slow), and engaging/disengaging the trimmer head rotation. It also includes a primer for cold starts and a starter handle for manual engine ignition. The trimmer head's height can be adjusted to achieve different cutting heights, ranging from 1-1/2 inches to 3 inches, with a recommended average of 2 inches.
Usage Features
The manual emphasizes safety as a paramount concern, with a dedicated "Safety Rules" section. Operators are instructed to wear safety glasses or eye shields at all times to protect against thrown objects. The device should only be operated by responsible individuals familiar with the instructions. It is crucial to keep hands and feet away from rotating parts and the hot muffler. The trimming area must be cleared of objects like rocks, toys, and wire, which could be picked up and thrown. Children and pets should be kept away from the operating area, and the machine should be stopped if anyone enters. Appropriate clothing, including long sleeves, long trousers, work gloves, and sturdy footwear, is recommended. Loose clothing should be avoided.
When operating, the throttle control can be set to "FAST" for normal trimming or "SLOW" for light trimming and fuel economy. The trimmer head drive control bar must be held down to the handle to engage the trimmer head rotation; releasing it stops the head. For starting, the primer should be pushed three times for a cold engine, and the starter handle pulled quickly. The handle is adjustable to different height positions for operator comfort.
The trimmer is particularly useful for cutting tall and thick weeds or grass, where a slower walking speed is recommended. It is advised to use the ends of the line for cutting and to move slowly through dense vegetation for best results and longer line life. The left side of the trimmer is suggested for trimming along fences, walls, and flowerbeds. The manual explicitly warns against using the trimmer on slopes greater than 15 degrees and advises trimming across the face of slopes, never up and down. Extreme caution is necessary on slopes and near obstructions.
The device is shipped without oil or gasoline in the engine, requiring the operator to add these before the first use. Gasoline containing up to 10% ethanol (E10) is acceptable, but exceeding this percentage will void the product warranty. Overfilling the engine with oil should be avoided to prevent smoking on startup.
Maintenance Features
Regular maintenance is crucial for the trimmer's longevity and safe operation, as detailed in the "Maintenance Schedule." This includes checking for loose fasteners, cleaning the trimmer and under the engine cover, checking the drive belt/pulleys, and inspecting/replacing trimmer lines. Engine-specific maintenance involves checking the oil level before each use, changing the oil every 25 hours or annually, cleaning the air filter, inspecting the muffler, and cleaning/replacing the spark plug.
The manual provides specific instructions for replacing trimmer lines, emphasizing the use of the specified line diameter (.130 inch for 20" models, .155 inch for 22" models) and cutting it to the correct length (16-3/4 inches for 20" models, 18-3/4 inches for 22" models). It warns against using other materials like wire or rope, which can break off and become dangerous projectiles.
For engine oil changes, the trimmer should be tipped on its side to drain oil into a suitable container, and new oil added as per instructions. The air filter should be replaced every 100 hours or annually, and more often in dusty conditions. The spark plug should be changed annually for easier starting and better engine performance.
Cleaning the trimmer after each use is important to prevent grass and trash buildup, especially on the underside and around the engine, to ensure proper airflow and extend engine life. The manual advises against using a garden hose to clean the trimmer unless electrical components, muffler, air filter, and carburetor are covered to prevent water damage.
For storage, the trimmer should be thoroughly cleaned, and all nuts, bolts, screws, and pins securely fastened. The fuel system requires special attention: the fuel tank should be drained, and the engine run until fuel lines and carburetor are empty to prevent gum deposits and acid formation from alcohol-blended fuels. Alternatively, a fuel stabilizer can be used. Engine oil should be drained and replaced. For the cylinder, one ounce of oil should be poured into the spark plug hole, the starter handle pulled slowly a few times to distribute the oil, and a new spark plug installed. The trimmer should be stored in a clean, dry area, covered with a suitable protective cover that does not retain moisture (avoid plastic). It is critical not to store the trimmer with gasoline in the tank inside a building where fumes could reach an open flame or spark, and to allow the engine to cool before storing.