RCP3/RCA2 Actuator
Table Type
First Step Guide
Eighth Edition
Thank you for purchasing our product.
Make sure to read the Safety Guide and detailed Instruction Manual (CD/DVD) included with the product in addition to
this First Step Guide to ensure correct use.
This Instruction Manual is original.
• Using or copying all or part of this Instruction Manual without permission is prohibited.
• The company names, names of products and trademarks of each company shown in the sentences are registered
trademarks.
Product Check
This product is comprised of the following parts if it is of standard configuration.
If you find any fault in the contained model or any missing parts, contact us or our distributor.
1. Parts (The option is excluded.)
No. Part Name Model Quantity Remarks
1 Actuator Main Body Refer to “How to read the
model plate”, “How to read
the model No.”
1
Accessories
2
Motor · Encoder Cable
(Note 1)
1
3 Home Position Marking
Sticker
1 Enclosed to TA3C, TA4C,
TA5C, TA6C, TA7C, TA3R,
TA4R, TA5R, TA6R, TA7R
4 First Step Guide 1
5 Instruction Manual (CD/DVD) 1
6 Safety Guide 1
Note 1 Enclosed Motor · Encoder Cable differ depending on the applied controller.
Please refer to [Wiring] for the applicable cables.
2. How to read the model plate
3. How to read the model No.
3.1 RCP3 Actuator
Note 1 This may be displayed for the manufacturing reason.
(This is not to indicate the manufacturing model code.)
[Refer to the catalog or Instruction Manual (CD/DVD) for specification details.]
3.2 RCA2 Actuator
Note 1 This may be displayed for the manufacturing reason.
(This is not to indicate the manufacturing model
code.)
Note 2 TCA3N, TCA4N, TWA3N, TWA4N, TFA3N, TFA4N
are not applicable.
[Refer to the catalog or Instruction Manual (CD/DVD) for specification details.]
Precautions in Handling
Handle it with great care, and keep to the following instructions. Failure to do so may cause
damage to the product.
1. Handling of the Packed Product
Take the greatest care in transporting the product, not to bump or drop it.
• When setting down the packed actuator keep it horizontal.
• Do not step on the package.
• Do not place any heavy article on top of the package that may deform the package.
2. Handling of the Unpacked Product
Do not transport the actuator by holding the cable or move it by pulling the cable.
• When the actuator is taken out from the package and handled, hold the base section.
• When carrying the actuator, do not bump or drop the actuator or otherwise cause the actuator to
receive any impact or excessive force.
• Do not give any unnatural force to any of the sections in the actuator.
Installation Environment, Storage Environment
1. Installation Environment
An environment that satisfies the following conditions is required during installation.
Generally speaking, it should be an environment where a worker can work without any protective gear.
• There should be no direct sunlight.
• Any radiant heat from a large heat source such as heat treatment furnace should not be directed at the
machine main body.
• The ambient temperature should be 0 to 40°C.
• The relative humidity should be 85% or less. There should not be dew condensation.
• There should not be corrosive gas or flammable gas.
• It should be a normal assembling work environment where there is not too much dust.
• Oil mist or cutting liquid should not be directed at the machine.
• Chemical liquid should not be splashed on it.
• An impact or vibration should not be transmitted to it.
• There should not be strong electromagnetic waves, ultraviolet rays or radiation.
• The working space required for maintenance or inspection should be secured.
2. Storage and Preservation Environment
The storage and preservation environment should comply with the same standards as those for the
installation environment. In particular, when the machine is to be stored for a long time, pay close
attention to environmental conditions so that no condensation forms. Unless specially specified,
moisture absorbency protection is not included in the package when the machine is delivered. In the
case that the machine is to be stored and preserved in an environment where condensation is
anticipated, take the condensation preventive measures from outside of the entire package, or directly
after opening the package.
In the storage and preservation for up to 1 month, it can endure in the temperature at 60°C at maximum.
For the storage and preservation longer than that, keep the temperature at 50°C at maximum.
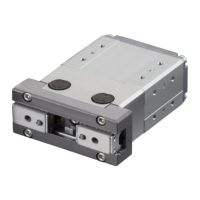
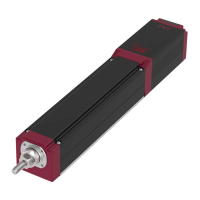
External Dimensions
1. Motor Unit Type
1.1 Motor Coupling Type
RCP3-TA3C, TA4C, TA5C, TA6C, TA7C
RCA2-TA4C, TA5C, TA6C, TA7C
1.2 Motor Reversing Type
RCP3-TA3R, TA4R, TA5R, TA6R, TA7R
RCA2-TA4R, TA5R, TA6R, TA7R
* Connector position in the figure above is that with no ejection direction change.
RCP3
-TA5C-I-35P-10-25-P1-P-B-**
Identification for IAI use only
(Note 1)
<Option>
B : Brake-equipped
CJT : Cable exit direction
changed (to top side)
CJR : Cable exit direction
changed (to right side)
CJL : Cable exit direction
changed (to left side)
CJB : Cable exit direction
changed (to bottom side)
CJO : Cable exit direction
changed (to end side)
NM : Reversed-Home Type
<Cable length>
N : None
P : 1m
S : 3m
M : 5m
X□□ : Specified Length
<Applicable Controller>
P1 : PSEL
PCON-C/CG
PCON-CY
PCON-SE
PCON-PL/PO
P3 : PMEC
PSEP
<Stroke>
<Series>
<Type>
Motor Coupling Type
TA3C [Thin and Small Type ROBO Cylinder]
TA4C [Thin and Small Type ROBO Cylinder]
TA5C
TA6C
TA7C
Motor Reversing Type
TA3R [Thin and Small Type ROBO Cylinder]
TA4R [Thin and Small Type ROBO Cylinder]
TA5R
TA6R
TA7R
<Encoder type>
I : Incremental
<Motor Type>
20P (20 □Size) : TA3C, TA3R
28P (28 □Size) : TA4C, TA4R
35P (35 □Size) : TA5C, TA5R
42P (42 □Size) : TA6C, TA6R,
TA7C, TA7R
<Lead>
TA3C, TA3R TA6C, TA6R
2/4/6 3/6/12
TA4C, TA4R TA7C, TA7R
2/4/6 3/6/12
TA5C, TA5R
2.5/5/10
RCA2-TA5C-I-20-10-25-A1-P-B
MODEL
SERIAL No. 600090254
MADE IN JAPAN
Model
Serial number
TCA3NA, TWA3NA,
TFA3NA
TCA3N, TWA3N,
TFA3N (Lead Screw)
1S/2S/4S
TCA3NA, TWA3NA,
TFA3NA
TCA3N, TWA3N,
TFA3N (Ball Screw)
1/2/4
RCA2-TA5C-I-20-10-25-
1 -P-B-**
Identification for IAI use only
(Note 1)
<Option>
B : Brake-equipped
(Note 2)
CJT : Cable exit direction changed
(to top side)
CJR : Cable exit direction changed
(to right side)
CJL : Cable exit direction changed
(to left side)
CJB : Cable exit direction changed
(to bottom side)
CJO : Cable exit direction changed
(to end side)
K2 : Connector Cable exit direction
changed
LA : Power Saving Type
NM : Reversed-Home Type
(
Except for TCA*, TWA* and TFA*
)
BG : Ball Guide Type
(Note) The model codes for the
option BG (ball guide type)
are to be those with old
codes such as TC3N.
<Cable length>
N : None
P : 1m
S : 3m
M : 5m
X□□ : Specified Length
<Applicable Controller>
A1 : ASEL
ACON-C/CG
ACON-CY
ACON-SE
ACON-PL/PO
A3 : AMEC
ASEP
<Stroke>
<Series>
<Type>
Motor Unit Type
Motor Coupling Type
TA4C [Thin and Small Type ROBO Cylinder]
TA5C
TA6C
TA7C
Motor Reversing Type
TA4R [Thin and Small Type ROBO Cylinder]
TA5R
TA6R
TA7R
Total Length Short Type
Compact Type
TCA3NA [Thin and Small Type ROBO Cylinder]
TCA4NA [Thin and Small Type ROBO Cylinder]
TCA3N [Thin and Small Type ROBO Cylinder]
TCA4N [Thin and Small Type ROBO Cylinder]
Wide Type
TWA3NA [Thin and Small Type ROBO Cylinder]
TWA4NA [Thin and Small Type ROBO Cylinder]
TWA3N [Thin and Small Type ROBO Cylinder]
TWA4N [Thin and Small Type ROBO Cylinder]
Flat Type
TFA3NA [Thin and Small Type ROBO Cylinder]
TFA4NA [Thin and Small Type ROBO Cylinder]
TFA3N [Thin and Small Type ROBO Cylinder]
TFA4N [Thin and Small Type ROBO Cylinder]
<Encoder type>
I : Incremental
<Motor Type>
10(10W) : TCA3NA, TWA3NA,
TFA3NA
TCA3N, TWA3N,
TFA3N
20(20W) : TCA4NA, TWA4NA,
TFA4NA
TCA4N, TWA4N,
TFA4N,
TA5C, TA5R,
TA6C, TA6R
30(30W) : TA7C, TA7R
<Lead>
TA3C, TA3R
2/4/6
TA4C, TA4R
2/4/6
TA5C, TA5R
2.5/5/10
TA6C, TA6R
3/6/12
TA7C, TA7R
3/6/12
Ball Screw Cover
Table
Motor Unit
Front Plate
Connector
Opposite Side
of the Motor
Motor Side
Right Side
Left Side
Reversing Bracket
Table
Motor Unit
Connector
Opposite Side
of the Motor
Motor Side
Right Side
Left Side
Ball Screw Cover
Front Plate
Warning : Operation of this equipment requires detailed installation and operation instructions which are
provided on the CD/DVD Manual included in the box this device was packaged in. It should be
retained with this device at all times.
A hard copy of Manual can be requested by contacting your nearest IAI Sales Office listed at
the back cove
of the Instruction Manual or on the First Step Guide.
TCA4NA, TWA4NA,
TFA4NA
TCA4N, TWA4N,
TFA4N (Lead Screw)
2S/4S/6S
TCA4NA, TWA4NA,
TFA4NA
TCA4N, TWA4N,
TFA4N (Ball Screw)
2/4/6