Input
Balanced
Risk of electrical shock
Do not open
Risque de shock electrique
Ne pas ouvrir
CAUTION
CAUTION: TO REDUCE THE RISK OF FIRE OR ELECTRIC SHOCK
DO NOT REMOVE BOTTOM COVER.
NON SERVICABLE PARTS INSIDE.
DO NOT EXPOSE THIS EQUIPEMNT TO RAIN OR MOISTURE.
REFER SERVICING TO QUALIFIER PERSONNEL
S/N
Flat
HOT
Rear panel may become too hot to touch. Leave
enough space for proper ventilation.
Warning
This equipment is capable of delivering sound
pressure levels considerably higher than 90dB,
which may cause permanent damage.
Hi-Pass
Balanced
Unbalanced
EQ
60
Hz
80
Hz
-2
HF
0 +2
2
PX-T5A
Pixels Series 5.5" Active Studio Monitor System
Min Max
Volume
N16549
MADE IN PRC
Ixels
ACTIVE STUDIO MONITOR
~115V T2AL 60Hz
~230V T1AL 50Hz
AC in
Voltage
Selector
220V
-2
LF
0 +2
-2
MF
0 +2
Power
ONOFF
5
3
4
1
2
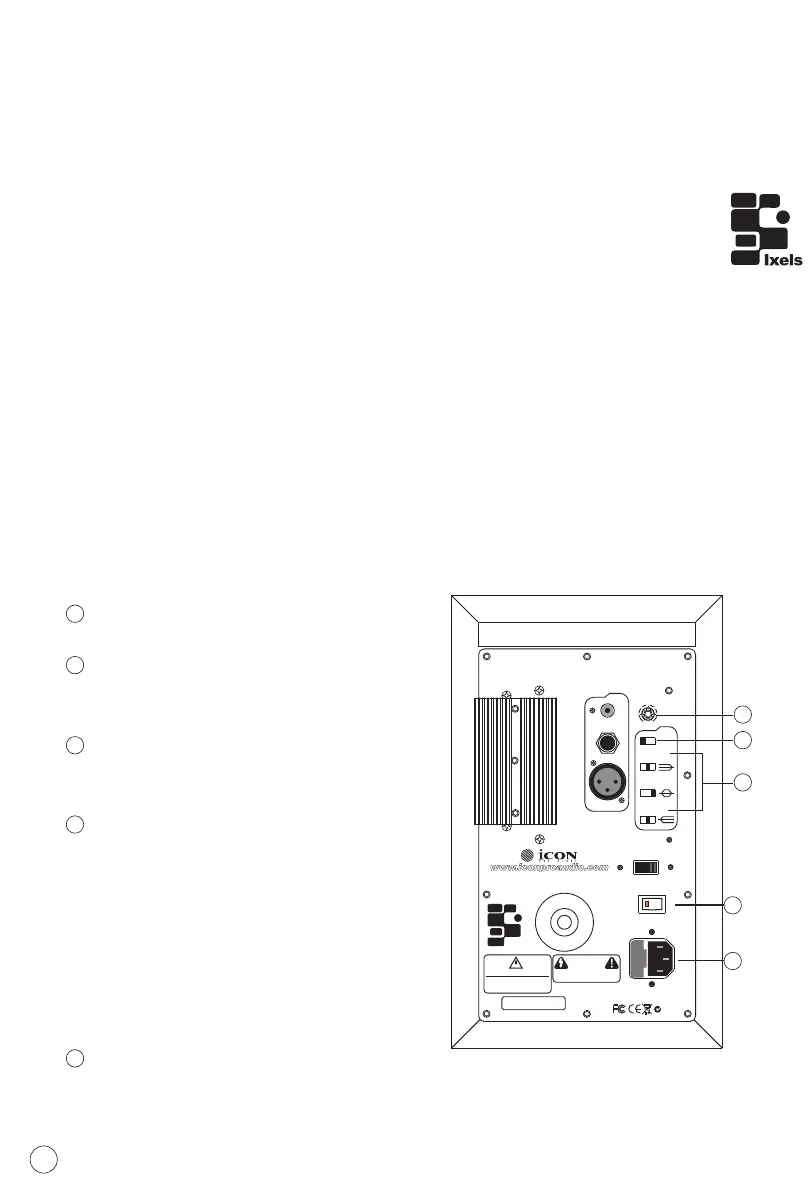
Operating your PX-T G2 Active Studio Monitor System
PX-T G2 Control & Connector Panels
The PX-T G2's rear panel is where you will make youe connections for
both AC power and audio signals. The rear panel is also contains the
controls to make adjustments to the overall volume and frequency
response curve. The following section details the rear panels controls
and connections.
Powering the PX-T G2 Active studio monitor system
Connect the unit to an AC power supply since the PX-T G2 is an active
stduio monitor with an on-board power amplifier. Make sure that the
main power switch is set to the off position and connect the supplied
IEC power cable into the AC inlet.
Things that go Hum!
When running power cables, be careful not to run the AC power cords
or AC extension cords in parallel to your input cable. This will help
reduce any AC hum that can be picked up. If you have to cross them at
a 90 degree angle for the least amount of induced hum. Using the
PX-T G2's balanced input connector will greatly protect against the
induced hum thanks to the common mode rejection (the induced hum is
phase cancelled) that is balanced inout circuit provides.
Power switch
Turn the unit on/off.
1
2
3
AC inlet
Connect the supplied IEC power
cable here.
Hi-Pass Filter control
Adjust the Hi-Pass filter from Flat,
60Hz and 80Hz.
4
LF, MF & HF controls
The PX-T G2's rear panel provides
three important controls for adjusting
the overall sound of the monitor's
bass, midrange and treble. Adjust
these controls to your preferable
position. If you take your monitors to
other studios you may find these
controls extremely useful in adjusting
the sound for the new room.
5
Volume control
The volume control is used to adjust the overall output level of the PX-T G2.
When operating the unit for the first time, start with the volume control set
all the way off. Slowly raise the volume control to reach a comfortable
listening level.
9