EasyManua.ls Logo

ICP NAC048AKA1 - User Manual

ICP NAC048AKA1
12 pages
Print Icon
To Next Page IconTo Next Page
Loading...
INSTALLATION INSTRUCTIONS
Split System
Premium Line
AC & HP Condensers
These instructions must be read and understood completely before attempting installation.
Installation / Startup Information & Warranty
Installation or repairs made by unqualified
persons can result in hazards to you and others.
Installation MUST conform with local building
codes or, in the absence of local codes, with the
the National Electrical Code NFPA 70/ANSI
C1-1999 or current edition and Canadian
Electrical Code Part 1 CSA C.22.1.
The information contained in this manual is
intended for use by a qualified service technician
familiar with safety procedures and equipped
with the proper tools and test instruments.
Failure to carefully read and follow all instruc-
tions in this manual can result in equipment
malfunction, property damage, personal injury
and/or death.
After uncrating unit, inspect thoroughly for hidden damage.
If damage is found, notify the transportation company im-
mediately and file a concealed damage claim.
Locating The Outdoor Unit:
CAUTION
Improper installation, adjustment, alteration, service or
maintenance can void the warranty.
The weight of the condensing unit requires caution and
proper handling procedures when lifting or moving to avoid
personal injury. Use care to avoid contact with sharp or
pointed edges.
Safety Precautions
1. Always wear safety eye wear and work gloves when
installing equipment.
2. Never assume electrical power is disconnected. Check
with meter and disconnect.
3. Keep hands out of fan areas when power is connected
to equipment.
4. R-22 causes frost-bite burns.
5. R-22 is toxic when burned.
NOTE TO INSTALLING DEALER: The Owners Instruc-
tions and Warranty are to be given to the owner or promi-
nently displayed near the indoor Furnace/Air Handler Unit.
Check local codes covering zoning, noise, platforms.
If practical, avoid locating next to fresh air intakes, vent or
bedroom windows. Noise may carry into the openings and
disturb people inside.
Placement of the unit should be in a well drained area or
unit must be supported high enough so runoffwill not enter
the unit.
Do not locate where heat, lint or exhaust fumes will be dis-
charged on unit (as from dryer vents).
Roof top installations are acceptable providing the roof will
support the unit and provisions are made for water drain-
age and the noise or vibration through the structure.
Do not install the unit in a recessed or confined area where
recirculation of discharge air may occur.
Heat Pumps Only: The top surface of platform must be
above average winter snow levels to prevent coil blockage.
Clearances:
Nominal operating clearances, where practical, are 48
inches (120 cm) above unit for discharge air and 18 inches
(40cm) around coil for intake air on three sides. Clearance
on one side (normally between unit and structure) may be
reduced to 6 inches (15cm). Nominal clearances are based
from a solid parallel object, wall, roof overhang, etc.
Do Not install under roof overhangs without guttering. A
minimum vertical clearance of 48" is required to overhang.
The clearance may be reduced from a single object with a
small surface area, such as the end of a wall, outside cor-
ner of a wall, fence section or a post, etc. As a general rule
the width ofthe object should equal the minimum clearance
from the unit. For example, a 4 inch (lOcm) fence post
could be 4 inches (lOcm) from the unit.
421 01 3202 02
Dec. 2004
Question and Answer IconNeed help?

Do you have a question about the ICP NAC048AKA1 and is the answer not in the manual?

Summary

Installation and Startup Information

Locating The Outdoor Unit

Guidelines for positioning the outdoor unit, considering local codes, noise, and drainage.

Clearances for Outdoor Unit

Specifies required air clearances around the unit for optimal operation and heat dissipation.

Unit Support and Installation

Unit Support Requirements

Details on proper leveling and support methods for the condensing unit to prevent vibration and stress.

Refrigerant Line Installation

Refrigerant Line Set Procedures

Brazing Connections

Recommended procedures and safety precautions for making brazed refrigerant line connections.

System Evacuation and Charging

Electrical Wiring and Connections

System Start-Up and Testing

Start-Up Procedure

Steps to follow for initial system energization and operation.

Checking Refrigerant Charge (Cooling)

Method for checking and adjusting refrigerant charge using superheat in cooling mode.

Heating System Operation and Adjustment

Checking Refrigerant Charge (Heating)

Method for checking and adjusting refrigerant charge in heating mode, typically by weight.

Adjusting Subcooling (Adjustable TXV)

Procedure for adjusting subcooling levels on models with an adjustable thermal expansion valve.

Overview

This document outlines the installation, startup, and maintenance procedures for Split System Premium Line AC & HP Condensers. It emphasizes safety, proper handling, and adherence to electrical and building codes to ensure optimal performance and longevity of the unit.

Function Description

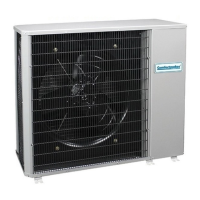
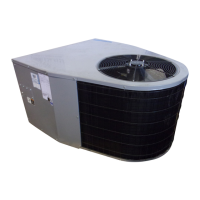
The Split System Premium Line AC & HP Condensers are outdoor units designed to work in conjunction with an indoor coil and furnace/air handler to provide heating and cooling for residential or commercial spaces. These units are precharged with refrigerant to handle a standard length of refrigerant line, with provisions for adjusting the charge for shorter or longer lines. The system utilizes a refrigerant cycle to transfer heat, either removing it from the indoor space for cooling or bringing it into the indoor space for heating (in the case of heat pumps).

For cooling operation, the condenser dissipates heat from the refrigerant to the outdoor air. For heat pump models, the unit can reverse its cycle to extract heat from the outdoor air and transfer it indoors. The system incorporates a defrost control mechanism, particularly for heat pump models, to prevent ice buildup on the outdoor coil during cold weather, ensuring efficient operation. This defrost system can be either time/temperature-based or demand-based, automatically initiating a defrost cycle when conditions warrant.

The unit's electrical system is designed for 208-230 volts, 60Hz single phase, and requires copper conductors for wiring. It includes a contactor for compressor control and, for heat pump models, a defrost control board that manages the defrost cycles and auxiliary heat. The system is designed to be grounded permanently in accordance with national and local electrical codes.

Usage Features

Installation of the condenser unit requires careful consideration of its location to minimize noise and ensure proper drainage. It should be placed on a level platform or pad, elevated above grade to prevent runoff from entering the unit. Clearances around the unit are critical for optimal airflow and serviceability, with specific recommendations for discharge air, coil intake air, and proximity to structures. Avoiding placement near fresh air intakes, bedroom windows, or areas where heat or exhaust fumes are discharged is advised to prevent disturbances.

Refrigerant line connections are made using brazing, with strict safety precautions to prevent fire hazards from refrigerant and oil mixtures. Nitrogen purging is recommended during brazing to prevent oxidation and scale formation inside the tubing. The unit comes with service valves that allow for evacuation of the refrigerant lines and indoor coil before releasing the factory charge into the system. Depending on the indoor coil match, a restrictor orifice may need to be installed or changed in the liquid line.

Startup procedures involve energizing the system, setting the thermostat, and operating the unit for a period to stabilize before checking and adjusting the refrigerant charge. For cooling-only models, the charge is typically adjusted using the superheat method, comparing actual superheat readings to recommended values based on outdoor ambient temperature. For heat pump models, both cooling and heating mode performance should be checked, with subcooling adjustment for models equipped with adjustable TXVs. Airflow across the indoor coil is a critical factor for proper system performance and should be established before making refrigerant charge adjustments.

The defrost system on heat pump models can be adjusted for time interval (for time/temperature type) or temperature termination (for demand type) to suit specific environmental conditions and ensure complete ice removal from the outdoor coil. Functional checks of the defrost cycle are also outlined to verify proper operation.

Maintenance Features

Regular maintenance is crucial for the efficient and long-term operation of the Split System Premium Line AC & HP Condensers. Key maintenance activities include:

  • Condensate Drain Check: During the cooling season, the condensate drain should be checked monthly to ensure free flow and cleaned if necessary to prevent blockages.
  • Coil Cleanliness: Maintaining free airflow around the outdoor coil is essential. This involves keeping fences, shrubs, snow drifts, and other obstructions at least two feet away from the coil air inlets. The coil should also be kept free of grass clippings, weeds, and other debris.
  • Coil Cleaning: When cleaning the coil, it is important to ensure the coil is cold. Only an alkaline-based cleaner should be used, as acid-based cleaners can damage the paint on the fins and potentially clog the coil. Cleaning a hot coil is also discouraged. Before any cleaning, the electrical power to the unit must be shut off to prevent electrical shock hazards.
  • Weather Covers: If a weather cover is used, it must be a ventilated type or made of breathable fabric that allows moisture to evaporate rapidly. Non-breathable covers can trap moisture, leading to rust buildup and damage to the unit.

These maintenance practices help ensure the unit operates efficiently, prolong its lifespan, and prevent potential issues that could lead to equipment malfunction or void the warranty.

ICP NAC048AKA1 Specifications

General IconGeneral
Heating Seasonal Performance Factor (HSPF)9.0
Phase1
RefrigerantR-410A
TypeAir Conditioner
Cooling Capacity48000 BTU/h
Heating Capacity48000 BTU/h
Seasonal Energy Efficiency Ratio (SEER)16
Voltage208/230V

Related product manuals