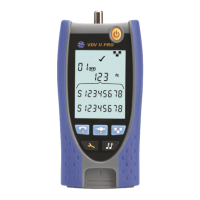
158802.02 VDV II Pro 4
Indicator
Indicator
selected
selected
selected
Low
POWER
To remove / insert the battery:
• Remove the battery cover screw and the
battery cover from the back of the tester.
• Remove / insert the battery, taking care to
connect correctly and not to trap the cable.
• Replace the battery cover and screw.
tch the tester ON:
• Press the ON/OFF button.
o The display shows the selected port
(VOICE, VIDEO or DATA).
o If the Battery Low Indicator is shown,
the battery should be replaced with a
new 9V battery.
To control the backlight:
• Press the TOOLS button repeatedly until the Backlight Indicator flashes and the backlight
timeout (seconds) is shown.
• Press or to adjust the backlight timeout.
o If zero, the display shows
. The backlight will not come on.
o If non-zero, the display shows
. The backlight will come on whenever any button is
pressed and after the timeout will first be dimmed and then go off to maximise
battery life.
• Press the TOOLS button repeatedly until the Setting Indicator disappears.
OFF:
• Press the ON/OFF button.
The Dual Port Remote Unit can be stored in the bottom end of the Tester, with the jacks
either inside for protection or outside for testing patch cables without rem
oving it from the
Tester, and provides internal storage for the Coax Remote Unit.
Number
Indicator
Unit
Indicator
CONNECTIONS
To connect to a cable and to confirm correct connection:
• Use the correct port (VOICE, VIDEO or DATA) according to the
cable connector type. (Use VOICE for RJ11, RJ12, RJ14 or RJ25
cables, VIDEO for
F 75 Ω Coax or DATA for RJ45).
• Press the corresponding port button (VOICE, VIDEO or DATA).
o The display shows the selected port.
• Connect one end of the cable to the selected port on the tester
and the other end to a Remote Unit for cable identification and
testing or to an Identifier for cable identification only.
o The display shows the type of termination (Remote Unit
or Identifier) and its Number to assist identification when
a number of different terminations are in use.
# 1 (Standard)
# 1 (Standard)
# 1 to 12 (Optional -
# 1 to 12 (Optional -
# 1 to 24 (Optional -
screw
 Loading...