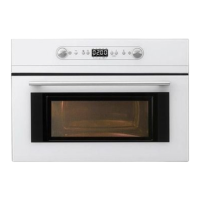
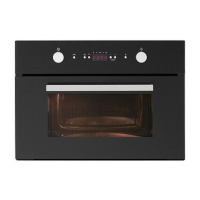
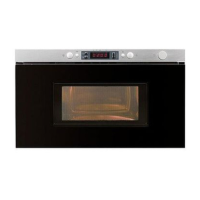
EXTRACCIÓN SUPERIOR EXTERNA
(conducto vertica)
A
•
•
DESCRIPCIÓN GENERAL DE LA
INSTALACIÓN
A1. Montaje de la placa de instalación en la pared.
A2. Preparación del gabinete superior.
A3. Ajuste del ventilador del microondas para la
extracción superior externa.
A4. Verificación del funcionamiento del
regulador de extracción.
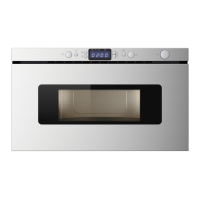
A5. Instalación del horno microondas.
A6. Ajuste del adaptador de extracción.
A7. Acoplamiento del sistema de conductos.
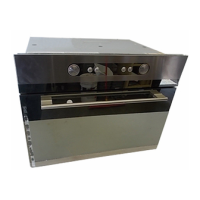
NOTAS IMPORTANTES:
Asegúrese de que los tornillos
del-motor del ventilador y la placa
del ventilador queden firmemente
apretados al volver a instalarlos.
Esto ayudará a prevenir el exceso
de vibraciones.
Asegúrese de que el cableado del
motor quede debidamente orientado
y asegurado, y que los cables no
queden atrapados.
3/
8"
TO
EDG
E
NOTE: IT IS VERY
I
MPORTANT TO
READ AND FO
LLO
W
THE
DIRECTIO
N
S
IN THE INSTALLAT
ION INSTRU
CTI
O
N
S
BE
FO
RE PR
O
CEEDING
WITH T
H
IS
REAR W
A
LL TEM
PLA
TE.
Th
i
s
R
ea
r
Wa
ll Te
mpl
a
te
se
r
v
e
s to p
os
itio
n
th
e
b
o
tto
m
mou
ntin
g pl
a
tea
nd
to l
oc
ate th
e hor
i
z
on
tal ex
h
au
st
out
let.
1
. Us
e a l
evel
to
c
h
eck
th
at the
t
emplate
i
s
p
o
s
it
ioned
a
ccu
r
ately.
2. L
oc
ate
a
nd
mark
a
t leas
t o
nestud
on th
e
le
ft o
r
r
ight
s
id
e
o
f the c
en
te
rl
i
n
e.
It is imp
ort
ant to u
s
e a
t le
as
t
one
wood
sc
re
w
mo
unted
fi
r
mly
i
n a
s
tud
to supp
or
t the w
eight
of
the mic
r
ow
a
v
e.
M
a
r
k
t
w
o
a
ddi
ti
on
a
l, evenlyspa
c
ed
loc
a
t
io
ns
f
o
r the
s
uppl
ied to
g
gle bol
t
s.
3. Dr
i
ll h
oles in
th
e marke
d lo
c
atio
ns
.Where t
h
er
e is
a
s
tud,
dr
il
l
a 3/16"
h
ol
e fo
r
woo
d sc
r
ew
s
.
F
or
h
oles
th
at
do
n
o
t lin
e upw
ith
a s
tu
d, d
r
il
l 5
/8
"
h
oles
fo
r
to
gg
l
e bolts
.
DO
NOT
IN
S
T
AL
L
T
HE
MO
U
NTI
NG PL
ATE
AT
T
HIS
T
IME.
4. Re
mov
e th
e templa
te
fr
o
m
the rear
wal
l.
5.
Re
v
iewth
e In
s
ta
ll
a
ti
on
Inst
r
ucti
o
n book
for
y
ou
r
in
sta
llatio
n si
tua
ti
on
.
Locate and mar
k holes
to align with holes
in t
he
mounting
p
l
ate.
IMPO
RTANT
:
LO
CA
TE
AT LEA
ST
O
N
E
STUD
O
N EI
T
HERSI
D
E O
F
THE
CENT
E
R
LI
N
E
.
MARK
T
HE LOCATION
F
O
R 2 ADDIT
IONAL, EV
ENLY
SPACE
D TO
GGLE
BOLTS IN THE MOUN
TING
PLATE
AREA
.
Locate and mar
k holes
to
ali
gn with holes
in t
he
mounting
plate.
IMP
ORTANT:
LO
CA
T
E AT LEA
ST O
NE
STUD
O
N EI
THER SI
DE OF
TH
E
CENT
E
R
LI
N
E
.
MARKT
HE LO
CATIO
N
FO
R 2 ADDITION
A
L, EVENLY
SP
AC
ED
TOG
GLE BO
LTS IN
THE MO
UN
TING
PLATE
AREA
.
Trim the r
e
ar
wall tem
plat
e along
the do
tt
ed line.
Trim the rear
wal
l t
empla
t
e alongthe dotted lin
e.
12"
4"
Da
r
le
v
uelt
aa
la
ho
ja
pa
r
a
c
o
ns
u
l
ta
rla
v
er
s
ió
n
e
nE
s
pañol.
24"
ES
 Loading...