© Inter IKEA Systems B.V. 2004
N
ot
e
:
L
e
g
s
c
a
n
b
e
s
h
ared
b
y
t
w
o
cab
i
n
e
t
s, s
ee t
h
e
i
nst
ru
ct
i
on
s
.
P
l
ac
e
th
e
cor
n
e
r
cab
i
n
et
ag
ai
n
st
t
h
e
w
al
l
s
o
t
h
at
i
t
s
bac
k
ed
g
e
i
s
res
t
i
n
g
on
t
h
e
s
u
p
p
or
t
b
oard
.
T
h
ro
u
g
h
th
e
h
oles
a
t
t
h
e
t
op
bac
k
co
rn
ers
of
t
h
e
ca
bi
n
et
,
m
ark
w
h
er
e
t
o
d
r
i
l
l
f
or
t
h
e
f
i
x
i
n
g
s
c
rew
.
S
et
t
h
e
cab
-
i
n
et
as
i
d
e
.
N
ot
e: I
f
t
h
er
e´
s
n
o
corn
er
c
a
bi
n
et
,
i
nst
a
l
l
t
he
cab
i
n
et
t
h
at
w
i
l
l
f
i
t
ag
ainst
t
h
e
bac
k
an
d
s
i
de
w
al
l
s
,
al
l
ow
i
n
g
t
he
f
i
l
l
er
sp
ace
sh
ow
n
on
y
ou
r
pl
a
n
.
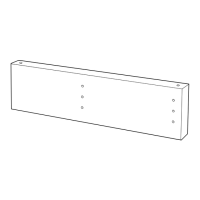
3
.
S
e
c
u
r
e
t
h
e
s
u
p
p
o
rt
b
o
a
r
d
A
l
i
g
n
t
h
e
t
op
e
d
g
e
of
t
h
e
s
up
p
or
t
b
oar
d
w
i
t
h
t
h
e
l
ev
el
l
i
ne
y
ou
m
arked
a
t
4
5
/
1
6
”
.
Sec
u
r
e
i
t
t
o
t
h
e
st
u
d
s. S
hou
l
d
t
h
e
en
d
of
t
h
e
s
u
p
por
t
board
f
al
l
b
et
w
een
st
u
d
s
,
sec
u
re
i
t
t
o
t
h
e
w
al
l
w
i
t
h
a
h
ea
v
y
-
d
u
t
y
a
n
c
h
or
.
2
.
C
u
t
b
a
s
e
c
a
b
i
n
e
t
s
u
p
p
o
r
t
b
o
a
r
d
s
Meas
u
re
t
he
l
en
g
th
of
t
h
e
bas
e
an
d
h
i
g
h
ca
bi
n
e
t
s
t
o
be
i
n
st
a
l
l
ed.
D
o
no
t
i
n
c
l
ud
e
t
h
e
w
al
l
s
p
a
ce
beh
i
n
d
app
l
i
-
an
ces
.C
ut
t
he
bas
e
cabi
net
s
u
p
p
ort
b
oar
d
i
n
t
o
m
eas
u
re
d
l
e
n
g
t
h
s
.
C
u
t
t
h
e
board
1
1
/
2
”sh
ort
er
w
h
er
e
a
s
i
d
e
t
oeki
c
k
i
s
p
l
an
n
ed
.
9
.
D
r
i
l
l
t
h
r
o
u
g
h
t
h
e
c
a
b
i
ne
t
w
a
l
l
s
F
or
a
l
l
doors
ex
ce
p
t
U
L
R
I
K
S
D
A
L
u
se a
3
/
1
6
"
d
ri
l
l
bi
t
t
o
d
ri
l
l
t
hr
o
u
g
h
th
e
f
ou
rt
h
h
o
l
es
f
rom
t
h
e
t
op
a
nd
b
ot
t
om
e
d
g
es
.
F
or
U
LR
I
K
S
D
A
L
d
o
o
r
,
d
ri
l
l
t
h
r
ou
g
h
t
h
e
se
c
on
d
h
ol
es
f
rom
t
h
e
t
op
/
bot
t
om
.
W
h
e
n
i
n
s
ta
l
l
i
n
g
a
d
ra
w
er
c
abi
n
et
,
d
r
i
l
l
t
h
r
ou
g
h
t
h
e
f
i
f
t
h
h
ol
e
f
rom
t
h
e
t
op.
8
.
I
n
s
t
all
t
h
e
n
e
x
t
b
a
s
e
c
a
b
i
n
e
t
M
a
rk
,d
ri
l
l
,a
n
d
i
n
s
er
t
t
h
e
sc
rew
s
f
or
t
he
n
ex
t
ca
b
i
n
et
.
L
i
f
t
t
h
e
cabi
n
et
i
n
t
o
p
l
ac
e
, caref
ul
l
y
al
i
g
n
i
n
g
i
t
w
i
t
h
t
h
e
p
rev
i
ou
s
c
a
bi
n
et
an
d
s
ecu
ri
n
g
t
h
em
tog
et
h
e
r
w
i
t
h
a
c
l
a
m
p.
7.
S
e
c
u
r
e
t
h
e
c
a
b
i
n
e
t
t
o
t
h
e
w
a
l
l
T
i
g
hten
t
h
e
s
cr
ew
s
,
bu
t
n
ot
com
p
l
ete
l
y
.
A
ss
u
re
t
ha
t
t
h
e
c
abi
n
et
i
s
l
ev
el
f
ron
t
-
to
-
bac
k
a
n
d
si
d
e-
t
o-
s
i
d
e
.
H
i
n
t
:
I
nst
al
l
i
n
g
t
h
e
L
A
Z
Y
S
U
S
A
N
i
s
eas
i
er
n
ow
t
h
a
n
af
t
er
t
h
e
co
u
n
t
ertops
a
re
i
n
p
l
ac
e
.
6
.
I
n
s
t
a
l
l
t
h
e
c
o
r
n
e
r
c
a
bin
e
t
L
i
f
t
t
h
e
co
rn
er
c
abi
net
bac
k
i
nt
o
p
l
a
c
e
an
d
ad
j
u
s
t
t
h
e
l
eg
s
s
o
t
h
at
i
t
st
a
n
d
s
l
ev
el
.
5
.
D
r
i
l
l
,
a
n
c
h
o
r
a
n
d
s
c
r
e
w
U
si
n
g
t
h
e
ap
p
r
op
ri
at
e
d
ri
l
l
bi
t
an
d
t
y
p
e
of
s
c
rew
f
or
y
ou
r
w
al
l
m
at
eri
al
,
d
r
i
l
l
h
ol
es
at
t
h
e
s
p
ot
s
y
ou
’
v
e
m
a
r
k
ed.
I
f
t
h
ere’s
n
o
st
u
d
,
i
n
s
ert
a
h
ea
v
y
-
d
u
t
y
an
c
h
o
r
t
h
en
t
h
e
s
c
rew
an
d
t
i
g
ht
en
h
a
l
f
w
a
y
.
12
.
T
i
g
ht
e
n
a
l
l
t
h
e
s
c
r
e
w
s
W
h
e
n
al
l
b
as
e
c
abi
n
et
s
h
a
v
e
been
m
ou
nt
e
d
a
nd
a
l
i
g
n
ed,
t
i
g
h
t
e
n
a
l
l
s
cr
ew
s
i
n
t
o
t
h
e
w
al
l
.N
ow
t
h
e
h
i
g
h
c
abi
n
et
i
s
i
n
p
l
a
ce
,
m
a
k
e
t
h
e
f
i
n
a
l
ad
j
us
t
m
en
t
s
t
o
t
h
e
w
al
l
cabi
n
et
s
an
d
t
i
g
h
t
en
al
l
t
h
e
sc
rew
s
.
1
1
.
I
n
s
t
al
l
t
h
e
h
i
g
h
c
a
b
i
n
e
t
T
h
e
h
i
g
h
c
abi
ne
t
s
hou
l
d
be
i
nst
a
l
l
ed
th
e
s
am
e
w
a
y
y
ou
i
n
s
t
a
l
l
ed
t
h
e
b
as
e
cabi
n
et
s
.
If
y
ou
´
re
u
s
i
n
g
a
cov
er
p
an
el
o
n
on
e
s
i
d
e
,
m
ou
n
t
t
h
i
s
be
f
ore
i
ns
t
al
l
-
i
n
g
th
e
ca
b
i
n
et
us
i
n
g
t
h
e
en
c
l
os
ed
i
n
st
ru
ct
i
on
s
1
0
.
F
as
t
e
n
c
a
b
i
n
e
t
s
t
o
g
e
t
h
e
r
P
l
a
ce
t
he con
n
ec
t
i
on
s
crew
s
en
cl
os
ed
w
i
t
h
t
h
e
cabi
net
f
ram
es
i
n
to
t
h
e
h
ol
e
s
a
n
d
t
i
g
h
t
e
n
.
C
on
t
i
nu
e
i
n
t
h
i
s
f
as
h
i
on
w
i
t
h
t
h
e
rem
ai
n
i
n
g
bas
e
cabi
n
et
s
Step 4. Install the base and high cabinets
Hang these
instructions on
the wall so you’ll
have your
hands free
W
h
en
y
ou’
v
e
com
p
l
et
ed
S
t
ep
4, al
l
of
t
h
e
cabi
net
f
r
a
m
es
w
i
l
l
b
e
i
n
p
l
ace
.
1
8
.
T
h
e
f
i
n
i
s
h
i
n
g
t
o
uc
h
D
ab
y
ou
r
f
i
n
g
er
i
n
t
o
a
3-
i
n
-
1
o
i
l
t
o
p
re-
v
en
t
t
h
e
cau
l
k
f
r
om
s
t
i
c
k
i
n
g
,
t
hen
ru
n
y
ou
r
f
i
n
g
e
r
a
l
on
g
t
h
e
ca
u
l
k
,
f
or
ci
n
g
i
t
i
n
t
o
t
h
e
crev
i
c
e
.R
em
ov
e
t
he
t
ape
f
or
a
n
ai
rt
i
g
h
t
s
e
a
l
an
d
a
s
t
r
a
i
g
h
t
e
d
g
e
.
1
7
.
P
r
e
p
a
r
e
t
h
e
a
r
e
a
t
o
be
c
a
u
l
k
e
d
T
o
p
rod
u
ce
a
n
ai
r
t
i
g
h
t
sea
l
b
et
w
e
en
t
h
e
w
al
l
an
d
t
h
e
cabi
n
et
,
y
o
u
’
ll
n
eed
to
cau
l
k
a
ro
u
n
d
t
h
e
f
i
l
l
er
p
i
eces
.C
h
oos
e
a
w
el
l
m
ad
e
l
at
ex
br
a
n
d
(
i
t
d
oes
n
’
t
n
eed
t
o
b
e
w
at
erp
ro
of
.
)
Tap
e
al
on
g
s
i
d
e
t
he
area
t
o
b
e
cau
l
k
ed
.
A
p
p
l
y
a
bead
of
cau
l
k
i
n
t
o
t
h
e
cr
ev
i
c
e
.
15
.
I
n
s
t
a
l
l
fi
l
l
e
r
p
i
e
c
e
s
P
u
t
t
h
e
f
i
l
l
er
p
i
ec
e
i
n
pl
a
c
e
w
i
t
h
t
h
e
cu
t
ed
g
e
ag
ai
n
st
t
h
e
w
a
l
l
.
A
tt
ac
h
b
y
d
ri
l
l
i
n
g
a
s
c
r
ew
t
h
ro
u
g
h
t
h
e
p
red
r
i
l
l
ed
h
ol
es
f
r
om
t
h
e
i
ns
i
d
e
of
t
h
e
cabi
n
et
.
In
s
t
al
l
ot
h
er
f
i
l
l
er
p
i
eces
i
n
t
h
e
s
a
m
e
way
.
W
h
e
n
y
ou
’v
e
f
i
n
i
sh
ed
i
n
st
all
i
n
g
a
l
l
f
i
l
l
er
p
i
ece
s
,
g
o
t
o
p
i
ct
u
re
17.
C
u
t
t
h
e
t
e
m
p
l
a
t
e
m
a
t
e
r
i
a
l
s
o
t
h
at
i
t
’
s
t
h
e
s
a
m
e
h
e
i
gh
t
a
s
t
h
e
c
a
b
i
ne
t
.
H
o
ld
i
t
i
n
p
l
a
c
e
w
h
er
e
t
h
e
f
i
l
l
e
r
w
i
l
l
be
i
n
s
t
a
l
l
e
d
.
O
p
e
n
t
h
e
c
o
m
p
a
s
s
a
c
o
u
p
l
e
o
f
i
n
c
h
e
s
a
n
d
p
l
a
c
e
t
h
e
p
o
i
n
t
a
g
a
i
n
s
t
t
h
e
w
a
l
l
.
H
o
l
d
i
n
g
t
h
e
c
o
m
p
a
s
s
h
o
r
i
zo
nt
a
l
a
n
d
l
e
v
e
l
,
f
o
l
lo
w
t
h
e
l
in
e
o
f
t
h
e
w
a
l
l
s
o
t
h
a
t
t
h
e
p
en
c
i
l
t
r
a
c
e
s
a
c
l
e
a
r
l
i
n
e
o
n
t
h
e
t
e
m
p
l
a
t
e
.T
o
c
u
t
t
h
e
t
e
m
p
l
a
t
e
t
o
t
h
e
c
o
r
-
r
ec
t
w
i
d
t
h,
m
ea
s
u
r
e
t
h
e
d
i
s
t
a
n
c
e
f
r
om
t
h
e
f
a
r
t
h
e
s
t
p
o
i
n
t
o
n
t
h
e
w
a
l
l
t
o
t
h
e
c
a
b
-
i
n
e
t
.
F
i
n
d
t
h
e
s
a
m
e
p
o
i
n
t
o
n
t
h
e
t
e
m
-
p
l
a
t
e
a
n
d
m
a
r
k
i
t
.
D
r
a
w
a
s
t
r
a
i
g
h
t
l
i
n
e
f
r
o
m
t
h
i
s
p
o
i
n
t
t
o
t
h
e
t
op
a
n
d
b
o
t
t
o
m
o
f
t
h
e
t
e
m
p
l
a
t
e
t
o
f
o
r
m
t
h
e
f
l
a
t
ed
g
e
t
h
a
t
w
i
l
l
f
i
t
a
g
a
i
n
s
t
t
h
e
c
a
b
i
n
e
t
.
C
u
t
t
h
e
t
e
m
-
p
l
a
t
e
a
n
d
c
h
e
c
k
t
h
a
t
i
t
f
i
t
s
,
t
h
e
n
t
r
a
c
e
t
h
e
s
h
a
p
e
o
n
t
o
t
h
e
f
l
l
e
r
a
n
d
f
ol
l
o
w
t
h
e
c
u
t
t
i
n
g
d
ir
e
c
t
i
on
s
i
n
p
i
c
t
u
r
e
1
4
.
1
6
.
I
f
t
h
e
w
a
l
l
i
s
u
n
e
v
e
n
I
f
t
h
e
w
al
l
i
s
n
o
t
l
e
v
e
l
a
n
d
f
l
a
t
,
t
h
e
f
i
l
l
e
r
m
u
s
t
b
e
c
u
t
t
o
c
o
n
f
o
r
m
t
o
t
h
e
wa
l
l
’
s
s
h
a
p
e
.T
o
d
o
t
h
i
s
,
y
o
u
’
l
l
n
ee
d
t
o
m
a
k
e
a
t
e
m
p
l
a
t
e
f
o
r
t
r
ac
i
n
g
t
h
e
wa
l
l
’s
s
h
a
p
e
o
n
t
o
t
h
e
f
i
l
l
e
r
.
A
p
i
e
c
e
o
f
t
h
i
n
p
l
y
w
o
od
o
r
h
e
a
v
y
c
a
r
d
b
o
a
r
d
m
a
k
e
s
a
s
u
i
t
a
b
l
e
t
e
m
-
p
l
a
t
e
.Y
o
u
’
l
l
a
l
s
o
n
e
e
d
a
m
e
a
s
u
r
i
n
g
t
a
p
e
,
p
e
n
c
i
l
a
n
d
c
o
m
p
a
s
s.
©
I
n
te
r
I
K
E
A
Sy
s
t
e
m
s
B
.V
.
2
0
0
4
.
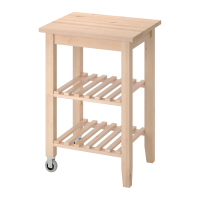
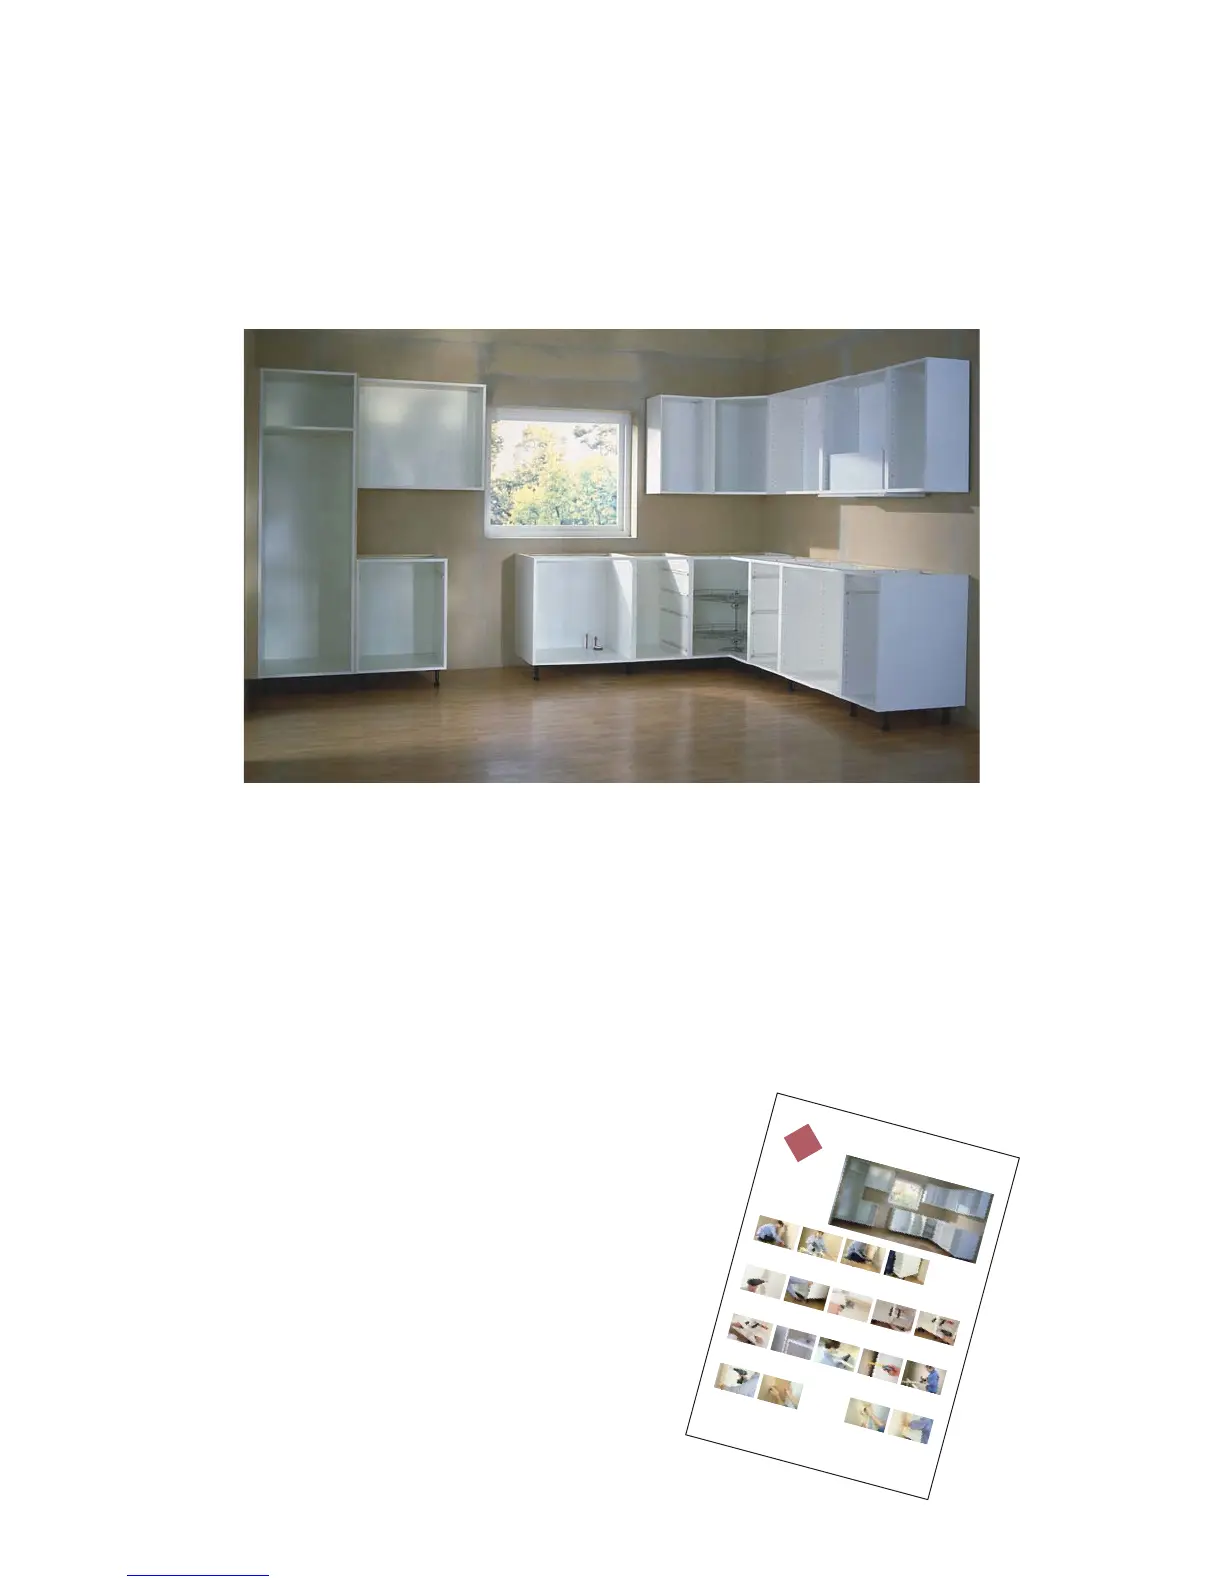
N
ext, it’s tim
e for the base and high
cabinets. Before you begin, note all plum
b-
ing
,pow
er sources and other utilities.
M
easure these locations carefully,and,
using a hole saw
, cut the approp
riate
op
enings before each cabinet is installed.
In the follow
ing steps, you
’ll install
the legs at the front of the cabinets, and
secure a cabinet su
pport boa
rd to the w
all.
This is a length
of particleboard packed
together with the toe-kick panels. If you
prefer, you can use legs on the back of the
cabin
ets in lieu of the support board.
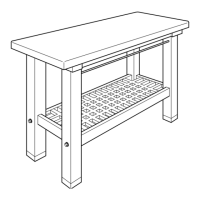
4
.
S
t
a
r
t
w
i
t
h
t
h
e
c
o
r
ne
r
c
ab
i
n
e
t
A
t
t
ac
h
l
eg
s
to
t
he f
ron
t
ed
g
es
of
t
h
e
cab
i
net
s
ac
co
rd
i
ng
t
o
p
ac
k
ag
e
i
n
s
t
ru
c
-
t
i
on
s
.
I
f
y
ou
are
n
ot
u
s
i
n
g
th
e
s
u
p
p
or
t
b
o
ard
,at
t
ac
h
b
a
c
k
l
eg
s
as
w
el
l
.
A
l
w
ay
s
u
se
a
bac
k
leg
at
t
h
e
en
d
of
t
h
e
ru
n
,
as
t
h
i
s
m
ak
es
a
t
t
a
c
h
i
n
g
t
h
e
s
i
d
e
t
oe-
k
i
c
k
eas
i
er
.
14
.
Cu
t
f
i
l
l
e
r
p
i
e
c
e
s
W
i
t
h
a
h
a
n
d
s
a
w
:d
ra
w
a
l
i
n
e
c
on
n
e
cti
n
g
th
e
t
op
a
nd
b
ot
t
om
m
a
r
k
s
on
t
h
e
f
ron
t
s
i
de
of
t
h
e f
i
l
l
er
,and
cut
i
t
w
i
t
h
t
h
e
f
a
c
e
si
d
e
u
p. Ji
g
sa
w
:
m
ark
bot
h
s
i
des
of
t
h
e
f
i
l
l
er
.
P
u
t
m
as
k
i
n
g
t
ap
e
ov
er
t
h
e
l
i
n
e
on
t
h
e
f
ron
t
si
d
e
t
o
p
rev
e
n
t
c
h
i
p
p
i
ng
.
C
ut
i
t
f
rom
t
h
e
bac
k
s
i
d
e
.
1
.
M
ark
i
n
g
t
h
e
l
ev
e
l
l
i
n
e
s
U
s
i
n
g
t
h
e
hig
h
p
oi
n
t
of
t
h
e
f
l
oor
t
h
at
y
ou
m
a
r
k
ed
ea
r
l
i
er
,
m
ea
s
u
r
e
u
p
4
5
/
1
6
”
.
U
s
e
a
4
f
oot
l
e
v
el
t
o
d
r
aw
a
l
i
n
e
on
t
h
e
w
a
l
l
a
t
t
h
i
s
h
e
i
g
h
t.
N
o
w
m
ea
s
u
r
e 34
1
/
2
”
f
rom
t
h
e
sam
e
p
oi
nt
on
t
h
e
f
l
oor
a
n
d
d
ra
w
a
n
o
t
h
er
l
ev
el
l
i
n
e
.
T
h
i
s
w
i
l
l
h
el
p
y
ou
l
ev
el
the
t
op
of
t
h
e
b
as
e
cab
i
n
et
s
.
1
3
.
Me
a
s
ur
e
f
i
l
l
e
r
p
i
e
c
e
s
C
he
c
k
th
e
w
a
l
l
w
i
t
h
y
ou
r
l
ev
el
t
o
see
i
f
i
t
i
s
ev
en
a
n
d
f
l
at
.
If
s
o
,
m
eas
u
r
e
t
h
e
d
i
s
t
an
ce
f
r
om
t
he
w
al
l
t
o
t
he
cabi
n
e
t
a
n
d
m
ark
t
h
i
s
di
s
t
an
ce
at
t
h
e
t
op
an
d
bot
t
om
of
t
h
e
f
i
l
l
er
p
i
ece
.
N
ot
e:
I
f
t
h
e
w
all
i
s
u
n
ev
en
,
sk
i
p
t
o
pi
ct
u
re
16
.
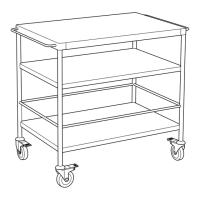
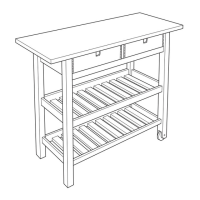
The Step 4 poster will guide you through the
process of installing base cabinets and high cabi-
nets. These cabinets are designed with sturdy,
adjustable legs for easy levelling on uneven
floors. This step includes:
• Mounting the base cabinet wall strip
• Attaching cabinet legs
• Installing base cabinets
• Installing a high cabinet
• Levelling cabinets
• Securing cabinets together
• Installing filler pieces
• Installing a corner lazy-susan
IMPORTANT!
Before putting in any of these cabinets, be sure
to measure, mark and cut openings for plumbing,
power sources and other utilities.
Getting started
As with the wall cabinets, you’ll start by
installing the corner cabinet first. If your plan
doesn’t include a corner cabinet, start with the
cabinet that fits at the start of the run against
both the back and side walls.
Step 4. Install base
and high cabinets
Hang the
poster on
the wall
for Step 4
7
 Loading...