РУССКИЙ 18
• Надежно затяните заливной шланг на резьбе патрубка и
откройте кран.
Если заливной шланг слишком короткий, обратитесь в
специализированный магазин или к уполномоченному
специалисту.
Давление в водопроводе должно находиться в пределах,
указанных в таблице технических данных — иначе
посудомоечная машина может работать неверно.
Убедитесь, что шланг не заломан и не сдавлен.
Спецификацииподключениякводопроводу
Типводоснабжения холодная или горячая вода
(до 60°C)
Входдляводы 3/4"
Мощностьподачиводы
Давление
0,05 – 1МПа (0,5 – 10бар)
7,25 – 145 psi
Заливнойшланг:
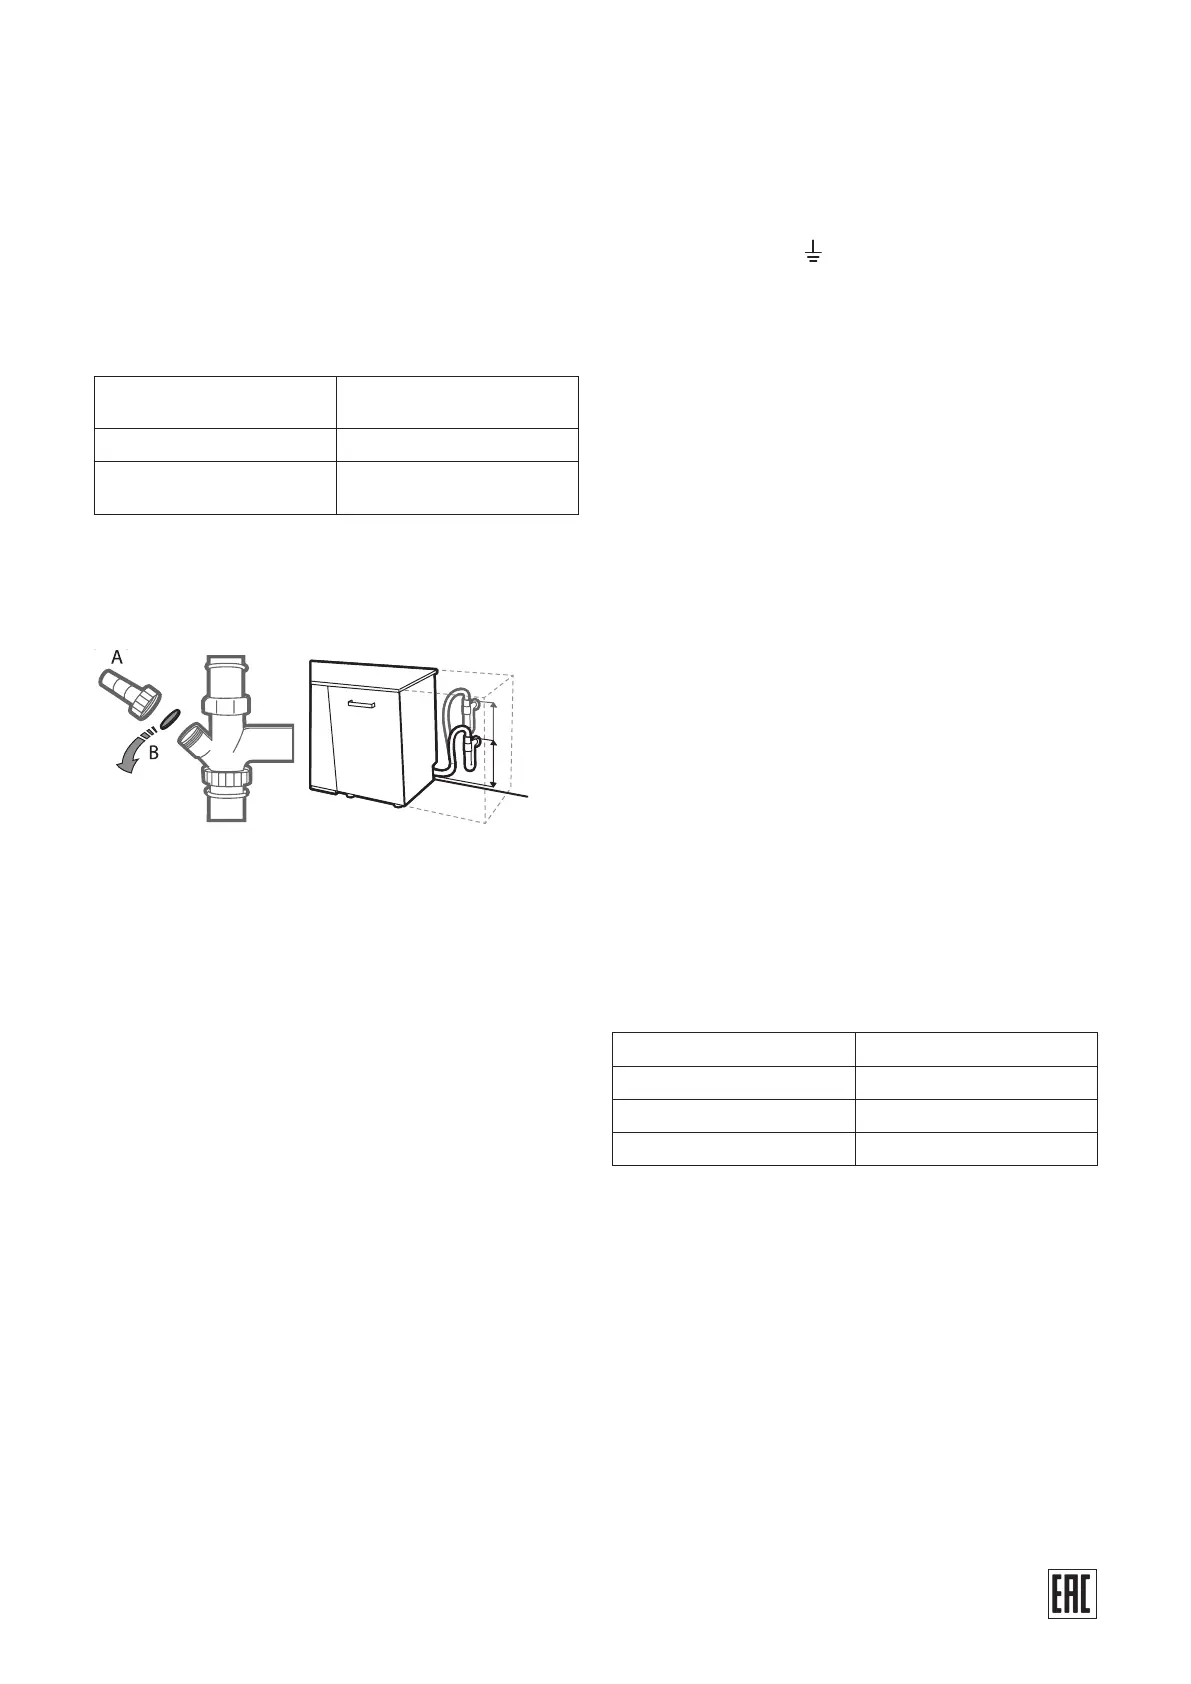
Подсоединениесливногошланга
Подсоедините сливной шланг к выходу канализации с диаметром
не менее 2смA.
INSTALLATION
ENGLISH
ATTENTION: If the appliance must be moved at any time, keep it
in an upright position; if absolutely necessary, it may be tilted onto
its back.
CONNECTING THE WATER SUPPLY
Adaptation of the water supply for installation should only be
performed by a qualified technician
The water inlet and outlet hoses may be positioned towards the
right or the left in order to achieve the best possible installation.
Make sure the dishwasher does not bend or squash the hoses.
CONNECTING THE WATER INLET HOSE
• Run the water until it is perfectly clear.
• Screw the inlet hose tightly into position and turn on the tap.
If the inlet hose is not long enough, contact a specialist store or
an authorised technician.
The water pressure must be within the values indicated in the
Technical Data table - otherwise the dishwasher may be function
properly.
Make sure the hose is not bent or compressed.
SPECIFICATIONS FOR THE CONNECTION OF THE WATER
SUPPLY HOSE:
CONNECTING THE WATER OUTLET HOSE
Connect the outlet hose to a drain duct with a minimum diameter
of 2 cm A.
The outlet hose connection must be at a height ranging from
40 to 80 cm from the floor or surface where the dishwasher rests
Before connecting the water outlet hose to the sink drain, remove
the plastic plug B.
ANTI-FLOODING PROTECTION
Anti-flooding protection. To ensure floods do not occu , the dishwasher
is provided with a special system which blocks the water supply in
the event of anomalies or leaks from inside the appliance.
Some models are also equipped with the supplementary safety
device New Aqua Stop, which guarantees anti-flooding protectio
even in the event of a supply hose rupture.
Under no circumstances should the water inlet hose be cut as it
contains live electrical parts.
ELECTRICAL CONNECTION
WARNING: Under no circumstances should the water inlet
hose be cut as it contains live electrical parts.
Before inserting the plug into the electrical socket, make sure that:
• The socket is earth and complies with current regulations;
• The socket can withstand the maximum load of the applian-
ce as shown on the data plate located on the inside of the door
(see PRODUCT DESCRIPTION).
• The power supply voltage falls within the values indicated on
the data plate on the inside of the door.
• The socket is compatible with the plug of the appliance.
If this is not the case, ask an authorised technician to replace the
plug (see AFTER-SALES SERVICE). Do not use extension ca-
bles or multiple sockets. Once the appliance has been installed,
the power supply cable and the electrical socket should be easily
accessible.
The cable should not be bent or compressed.
If the power supply cable is damaged, have it replaced by the
manufacturer or its authorised Technical Assistance Service in
order to prevent all potential hazards.
The Company shall not be held responsible for any incidents, if
these regulations are not observed.
POSITIONING AND LEVELLING
1.
2.
Position the dishwasher on a level sturdy floo . If the floor i
uneven, the front feet of the appliance may be adjusted until
it reaches a horizontal position. If the appliance is levelled
correctly, it will be more stable and much less likely to move or
cause vibrations and noise while it is operating.
Before recessing the dishwasher, stick the adhesive transparent
strip under the wooden shelf in order to protect it from any con-
densation which may form.
3.
4.
Place the dishwasher so that its sides or back panel are in
contact with the adjacent cabinets or the wall. This appliance
can also be recessed under a single worktop.
To adjust the height of the rear foot, turn the red hexagonal
bushing on the lower central part at the front of the dishwasher
using a hexagonal spanner with an opening of 8 mm. Turn the
spanner in a clockwise direction to increase the height and in
an anticlockwise direction to decrease it.
DIMENSIONS AND CAPACITY:
MIN 40 cm
MAX 80 cm
WATER SUPPLY cold or hot (max. 60°C)
WATER INTAKE 3/4”
POWER OF WATER
PRESSURE
0.05 ÷ 1 MPa (0.5 ÷ 10 bar)
7.25 – 145 psi
WIDTH 598 mm
HEIGHT 820 mm
DEPTH 555 mm
CAPACITY 13 standard place-settings
Место подсоединения сливного шланга должно находиться
на высоте от 40 до 80см от пола или поверхности, на которой
установлена посудомоечная машина. Перед подсоединением
сливного шланга к сифону мойки снимите пластиковую пробку B.
Защитаотпротечек
Защита от протечек. Во избежание протечек посудомоечная
машина оснащена системой, перекрывающей подачу воды в
случае отклонений или утечек из прибора.
Некоторые модели также оснащены дополнительным защитным
устройством New Aqua Stop, обеспечивающим защиту от
затопления даже в случае разрыва заливного шланга.
Данная модель оснащена системой защиты от протечек Aquastop
Категорически запрещается разрезать заливной шланг, так как в
нем содержатся части под напряжением.
Подключениекэлектрическойсети
ВНИМАНИЕ:Категорическизапрещаетсяразрезатьзаливной
шланг,таккаквнемсодержатсячастиподнапряжением.
Перед тем, как вставлять вилку в электрическую розетку
убедитесь, что:
• розетка заземлена и соответствует действующим нормам;
• розетка рассчитана на
INSTALLATION
ENGLISH
ATTENTION: If the appliance must be moved at any time, keep it
in an upright position; if absolutely necessary, it may be tilted onto
its back.
CONNECTING THE WATER SUPPLY
Adaptation of the water supply for installation should only be
performed by a qualified technician
The water inlet and outlet hoses may be positioned towards the
right or the left in order to achieve the best possible installation.
Make sure the dishwasher does not bend or squash the hoses.
CONNECTING THE WATER INLET HOSE
• Run the water until it is perfectly clear.
• Screw the inlet hose tightly into position and turn on the tap.
If the inlet hose is not long enough, contact a specialist store or
an authorised technician.
The water pressure must be within the values indicated in the
Technical Data table - otherwise the dishwasher may be function
properly.
Make sure the hose is not bent or compressed.
SPECIFICATIONS FOR THE CONNECTION OF THE WATER
SUPPLY HOSE:
CONNECTING THE WATER OUTLET HOSE
Connect the outlet hose to a drain duct with a minimum diameter
of 2 cm A.
The outlet hose connection must be at a height ranging from
40 to 80 cm from the floor or surface where the dishwasher rests
Before connecting the water outlet hose to the sink drain, remove
the plastic plug B.
ANTI-FLOODING PROTECTION
Anti-flooding protection. To ensure floods do not occu , the dishwasher
is provided with a special system which blocks the water supply in
the event of anomalies or leaks from inside the appliance.
Some models are also equipped with the supplementary safety
device New Aqua Stop, which guarantees anti-flooding protectio
even in the event of a supply hose rupture.
Under no circumstances should the water inlet hose be cut as it
contains live electrical parts.
ELECTRICAL CONNECTION
WARNING: Under no circumstances should the water inlet
hose be cut as it contains live electrical parts.
Before inserting the plug into the electrical socket, make sure that:
• The socket is earth and complies with current regulations;
• The socket can
withstand the maximum load of the applian-
ce as shown on the data plate located on the inside of the door
(see PRODUCT DESCRIPTION).
• The power supply voltage falls within the values indicated on
the data plate on the inside of the door.
• The socket is compatible with the plug of the appliance.
If this is not the case, ask an authorised technician to replace the
plug (see AFTER-SALES SERVICE). Do not use extension ca-
bles or multiple sockets. Once the appliance has been installed,
the power supply cable and the electrical socket should be easily
accessible.
The cable should not be bent or compressed.
If the power supply cable is damaged, have it replaced by the
manufacturer or its authorised Technical Assistance Service in
order to prevent all potential hazards.
The Company shall not be held responsible for any incidents, if
these regulations are not observed.
POSITIONING AND LEVELLING
1.
2.
Position the dishwasher on a level sturdy floo . If the floor i
uneven, the front feet of the appliance may be adjusted until
it reaches a horizontal position. If the appliance is levelled
correctly, it will be more stable and much less likely to move or
cause vibrations and noise while it is operating.
Before recessing the dishwasher, stick the adhesive transparent
strip under the wooden shelf in order to protect it from any con-
densation which may form.
3.
4.
Place the dishwasher so that its sides or back panel are in
contact with the adjacent cabinets or the wall. This appliance
can also be recessed under a single worktop.
To adjust the height of the rear foot, turn the red hexagonal
bushing on the lower central part at the front of the dishwasher
using a hexagonal spanner with an opening of 8 mm. Turn the
spanner in a clockwise direction to increase the height and in
an anticlockwise direction to decrease it.
DIMENSIONS AND CAPACITY:
MIN 40 cm
MAX 80 cm
WATER SUPPLY cold or hot (max. 60°C)
WATER INTAKE 3/4”
POWER OF WATER
PRESSURE
0.05 ÷ 1 MPa (0.5 ÷ 10 bar)
7.25 – 145 psi
WIDTH 598 mm
HEIGHT 820 mm
DEPTH 555 mm
CAPACITY 13 standard place-settings
максимальную потребляемую
мощность прибора, указанную на паспортной табличке,
расположенной с внутренней стороны дверцы (см.
«ОПИСАНИЕ ИЗДЕЛИЯ»);
• напряжение электросети соответствует данным паспортной
таблички, расположенной с внутренней стороны дверцы;
• розетка подходит к вилке прибора.
В противном случае обратитесь к уполномоченному специалисту
для замены вилки (см. «СЕРВИСНОЕ ОБСЛУЖИВАНИЕ»). Не
используйте удлинители и разветвители. Прибор должен быть
установлен таким образом, чтобы сетевой шнур и розетка были
легко доступны.
Сетевой шнур не должен быть заломан или раздавлен.
Если сетевой шнур был поврежден, обратитесь для его замены
к изготовителю или в авторизованный сервисный центр, чтобы
избежать возможных опасностей.
Изготовитель не несет ответственности за последствия
несоблюдения данных требований.
Размещениеивыравнивание
1. Размещайте посудомоечную машину на ровном прочном
полу. Если пол недостаточно ровный, отрегулируйте высоту
передних ножек так, чтобы прибор принял горизонтальное
положение. Правильное выравнивание повышает
устойчивость прибора и снижает вероятность его смещения,
вибрации и шума во время работы.
2. Перед встраиванием посудомоечной машины в шкаф
наклейте прозрачную самоклеящуюся ленту на нижнюю часть
деревянной полки для ее защиты от конденсата.
3. Размещайте посудомоечную машину так, чтобы ее задняя или
боковые стороны прилегали к соседним кухонным модулям
или к стене. Прибор можно также встроить под сплошную
столешницу.
4. Для регулировки высоты задней ножки вращайте красную
шестигранную втулку, расположенную внизу по центру
лицевой стороны посудомоечной машины, шестигранным
ключом на 8 мм. При вращении ключа по часовой
стрелке высота увеличивается, против часовой стрелки —
уменьшается.
Размерыивместимость:
ширина 448 mm
Высота 820 mm
глубина 555 mm
Вместимость 10 стандартных мест
Производитель:
ИКЕАофСвиденАБ,
а/я 702, 343 81, Эльмхульт, Швеция
Завод
Whirlpool Company Polska Sp z o.o.
Address: Ul. A. Merloniego 4 97-500 Radomsko – Poland
Импортериуполномоченноеизготовителемлицо:
Импортёр: ООО “ИКЕА ТОРГ”, Россия, 141400, Московская
область, г. Химки, Микрорайон «ИКЕА», корп. 1; тел.: +7 (495)
737-5301, факс: +7 (495) 737-5324.
Данный прибор разработан, изготовлен, продан в
соответствии с нормами технических регламентов
таможенного союза и локальными нормативно-правовыми
документами.
Лицо, уполномоченное изготовителем на действия при
оценке соответствия продукции: ООО “Вирлпул РУС”,
Российская Федерация, 127018, г. Москва,
ул. Двинцев, д. 12, корпус 1 литера В, этаж 5;
тел.: +7 (495) 961-29-00.
Сделано в польше
По вопросам качества товаров ИКЕА обращайтесь к продавцу:
ООО “ИКЕА ДОМ”, Россия, 141400, Московская область, г.
Химки, Микрорайон «ИКЕА», корп. 1;
тел.: +7 (495) 666-2929, www.ikea.ru
Срок службы: 10 лет
После окончания срока службы ваше изделие может
стать опасным. Поэтому после окончания срока службы,
а также если вы решили прекратить пользоваться
изделием досрочно, обратитесь в соответствующие
государственные органы для уничтожения прибора
согласно законодательству.
 Loading...