РУССКИЙ 14
ВНИМАНИЕ:Перед любыми действиями по чистке и
обслуживанию прибора отключите его от электросети. Не
используйте легковоспламеняющиеся жидкости для чистки
машины.
Чисткапосудомоечноймашины
Любые следы на внутренних поверхностях прибора можно
удалить тканью, смоченной в слабом растворе уксуса.
Внешние поверхности машины и панель управления можно
чистить неабразивной салфеткой, смоченной водой. Не
используйте растворители и абразивные средства.
Предотвращениенеприятныхзапахов
Всегда держите дверцу прибора слегка приоткрытой, чтобы
предотвратить образование конденсата в моечной камере.
Регулярно протирайте уплотнители дверцы и дозаторы
моющего средства влажной губкой. Это исключит накопление
остатков пищи на уплотнителях, что является основной
причиной неприятных запахов.
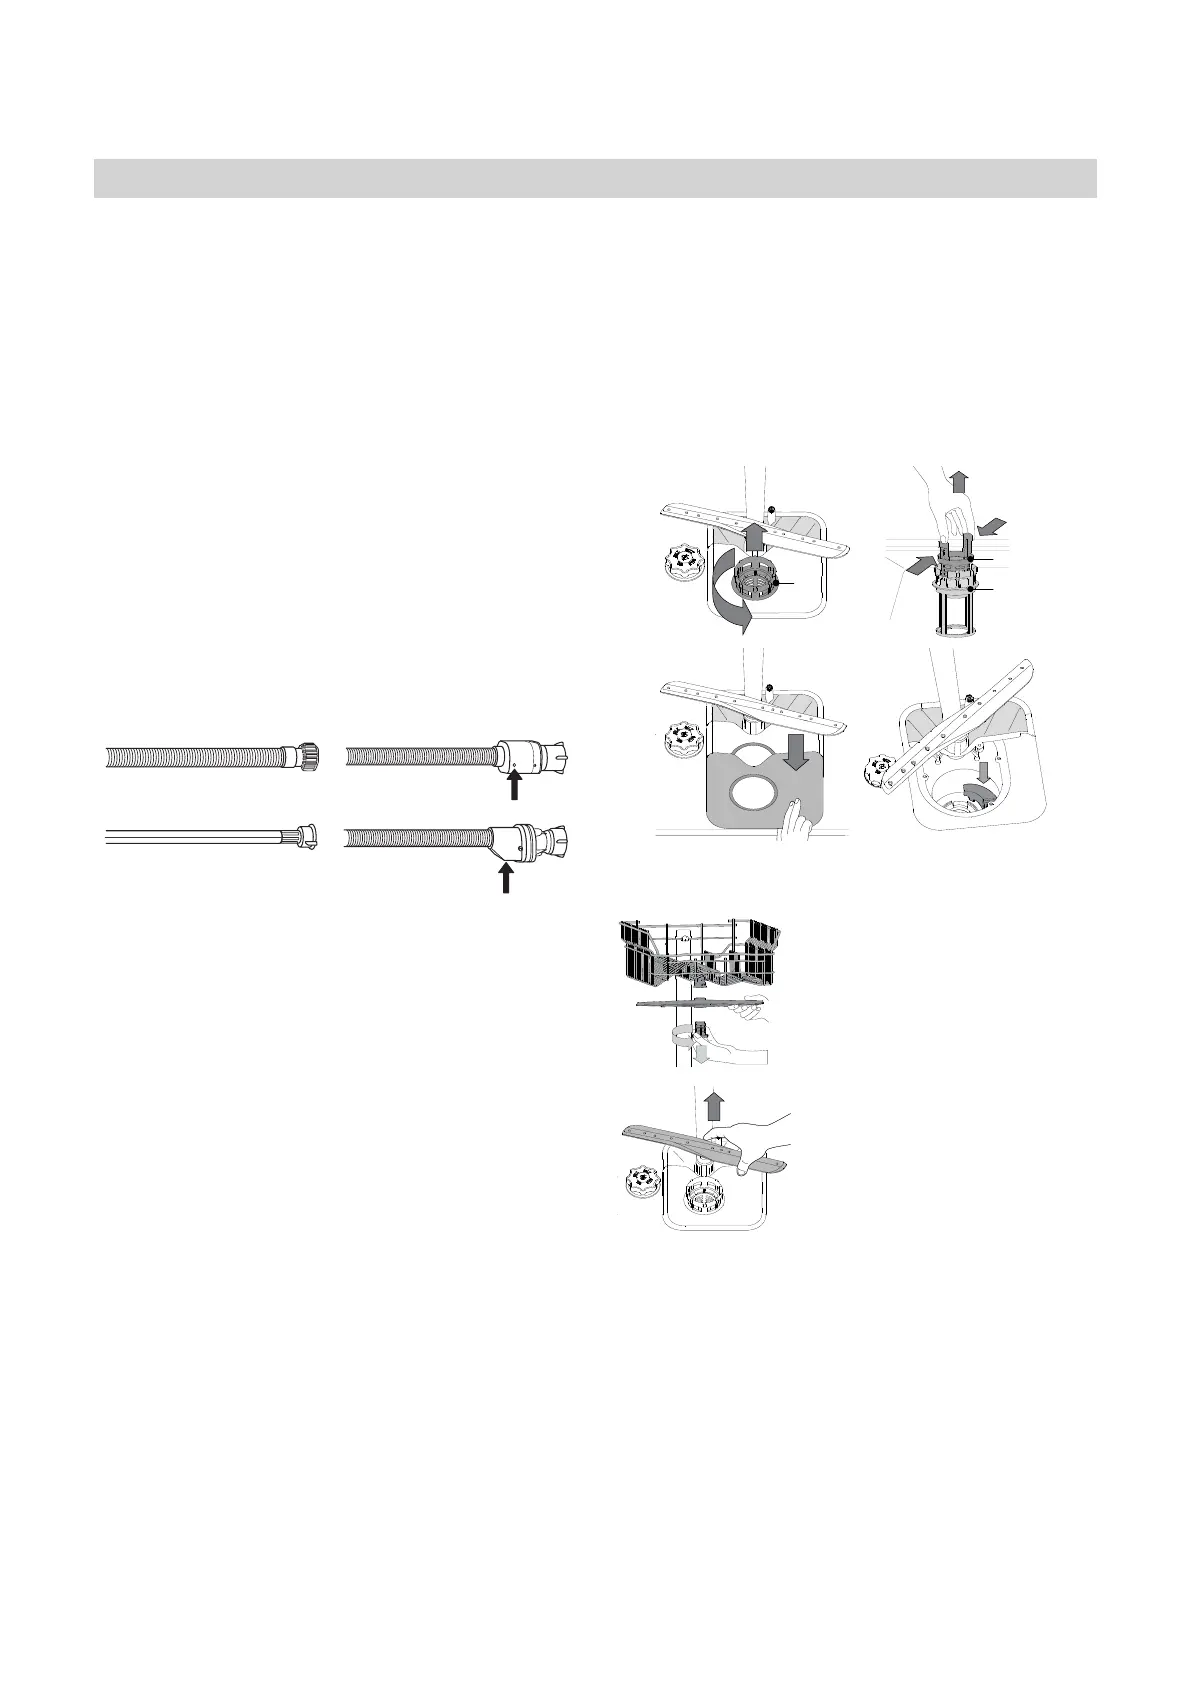
Проверказаливногошланга
Регулярно проверяйте заливной шланг на предмет трещин
и потери эластичности. В случае обнаружения повреждений
замените поврежденный шланг новым — его можно
приобрести в сервисном центре или у специализированного
дилера. Могут использоваться шланги различных типов:
ENGLISH
10
Cleaning and maintenance
ATTENTION: Always unplug the appliance when cleaning it
and when performing maintenance work. Do not use flammable
liquids to clean the machine.
CLEANING THE DISHWASHER
Any marks on the inside of the appliance may be
removed using a cloth dampened with water and
a little vinegar.
The external surfaces of the machine and the
control panel can be cleaned using a non-abrasive
cloth which has been dampened with water. Do
not use solvents or abrasive products.
PREVENTING UNPLEASANT ODOURS
Always keep the door of the appliance ajar in order to avoid mo-
isture from forming and being trapped inside the machine.
Clean the seals around the door and detergent dispensers regu-
larly using a damp sponge. This will avoid food becoming trapped
in the seals, which is the main cause behind the formation of
unpleasant odours.
CHEKING THE WATER SUPPLY HOSE
Check the inlet hose regularly for brittleness and cracks. If dama-
ged, replace it by a new hose available through our After-Sales
Service or your specialist dealer. Depending on the hose type:
If the inlet hose has a transparent coating, periodically check if
the colour intensifies locall . If yes, the hose may have a leak and
should be replaced.
For water stop hoses: check the small safety valve inspection
window (see arrow). If it is red, the water stop function was trig-
gered, and the hose must be replaced by a new one.
For unscrewing this hose, press the release button while unscre-
wing the hose.
CLEANING THE WATER INLET HOSE
If the water hoses are new or have not been used for an exten-
ded period of time, let the water run to make sure it is clear and
free of impurities before performing the necessary connections. If
this precaution is not taken, the water inlet could become blocked
and damage the dishwasher.
CLEANING THE FILTER ASSEMBLY
Regularly clean the filter assembly so that the filters do not clo
and that the waste water flows away correctl .
Using dishwasher with clogged lters or foreign objects inside l-
tration system or sprayarms may cause unit malfunction resulting
in lose of performance, noisy work or higher resources usage.
The filter assembly consists of three filters which remove foo
residues from the washing water and then recirculate the water:
to obtain the best washing results, you need to keep them clean.
The dishwasher must not be used without lters or if the
lter is loose.
At least once per month or after each 30 cycles, check the filter
assembly and if necessary clean it thoroughly under running
water, using a non-metallic brush and following the instructions
below:
1. Turn the cylindrical filter A in an anti-clockwise direction and
pull it out (Fig 1).
2. Remove the cup filter B by exerting a slight pressure on the
side flaps (Fig 2).
3. Slide out the stainless-steel plate filter C (Fig 3).
4. In case you find foreign objects (such as broken glass, porc -
lain, bones, fruit seeds etc.) please remove them carefully.
5. Inspect the trap and remove any food residues. NEVER RE-
MOVE the wash-cycle pump protection (black detail) (Fig 4).
After cleaning the filters, replace the filter assembly and fix it
position correctly; this is essential for maintaining the efficient
operation of the dishwasher.
CLEANING THE SPRAY ARMS
On occasions, food residue may
become encrusted onto the
spray arms and block the holes
used to spray the water. It is
therefore recommended that you
check the arms from time to time
and clean them with a small
non-metallic brush.
To remove the upper spray arm,
turn the plastic locking ring in an
anti-clockwise direction.
The upper spray arm should be
replaced so that the side with
the greater number of holes is
facing upwards.
The lower spray arm may be
removed by pulling it upwards.
WATER SOFTENING SYSTEM
Water softener automatically reduces water hardness, conse-
quently preventing scale buildup on heater, contributing also to
better cleaning efficienc . This system regenerates itself with salt,
therefore it is required to refill salt container when empt . Frequen-
cy
of regeneration depends on water hardness level setting - by
default regeneration takes place once per 5 Eco cycles with water
hardness level set to 3. Regeneration process starts in final rins
and finishes in drying phase, before cycle ends
Single regeneration consumes: ~3.5L of water; takes up to 5 addi-
tional minutes for the cycle; consumes below 0.005kWh of energy.
A
A
B
C
12
34
Если заливной шланг имеет прозрачное покрытие, следите за
тем, чтобы на нем не было пятен. Их наличие может указывать
на утечку. В этом случае шланг следует заменить.
Для шлангов с защитой «аквастоп» : регулярно проверяйте
состояние защитного клапана через маленькое смотровое
окошко (показано стрелкой). Если в нем виден красный цвет,
сработала функция защиты от протечки — шланг необходимо
заменить. Чтобы открутить шланг, нажмите и удерживайте
кнопку фиксатора.
Чистказаливногошланга
Если шланги новые или не использовались в течение долгого
времени, промойте их водой от возможных загрязнений
перед подсоединением. Несоблюдение данной меры
предосторожности может привести к засору заливного
патрубка и повреждению посудомоечной машины.
Чисткафильтрующегоузла
Регулярно очищайте фильтрующий узел, чтобы предотвратить
засорение фильтров и затруднения при отводе воды.
Использование посудомоечной машины с засоренными
фильтрами или посторонними предметами внутри системы
фильтрации или разбрызгивателей может привести к
неисправности прибора, что влечет за собой снижение
производительности, повышение уровня шума при работе и
более интенсивное потребление ресурсов.
Фильтрующий узел состоит из трех фильтров, которые удаляют
остатки пищи из воды перед ее повторной подачей в моечную
камеру. Для достижения качественных результатов мойки
поддерживайте их в чистоте.
Неиспользуйтепосудомоечнуюмашинубезфильтров
илисослабленнымкреплениемфильтров.
Не реже раза в месяц или после каждых 30 циклов проверяйте
фильтрующий узел и при необходимости тщательно очищайте
его под проточной водой, используя неметаллическую щетку.
При этом действуйте согласно следующим инструкциям:
1. Поверните против часовой стрелки цилиндрический
фильтр A и выньте его (рис. 1).
2. Выньте стакан фильтра B, слегка нажав на боковые
язычки (рис. 2).
3. Выньте плоский фильтр из нержавеющей стали C
(рис. 3).
4. При обнаружении посторонних предметов (осколков
стекла, фарфора, костей, семян фруктов и пр.)
аккуратноизвлекитеих.
5. Осмотрите отстойник и удалите из него любые остатки
пищи. НИКОГДАНЕУДАЛЯЙТЕзащиту рабочего насоса
(деталь черного цвета) (рис. 4).
EN
13
CLEANING THE FILTER ASSEMBLY
Regularly clean the lter assembly so that the lters do not clog
and that the waste water ows away correctly.
Using dishwasher with clogged lters or foreign objects inside l-
tration system or sprayarms may cause unit malfunction resulting
in lose of performance, noisy work or higher resources usage.
The lter assembly consists of three lters which remove food
residues from the washing water and then recirculate the water:
to obtain the best washing results, you need to keep them clean.
The dishwasher must not be used without lters or if the
lter is loose.
At least once per month or after each 30 cycles, check the lter
assembly and if necessary clean it thoroughly under running water,
using a non-metallic brush and following the instructions below:
1. Turn the cylindrical lter A in an anti-clockwise direction and
pull it out (Fig 1).
2. Remove the cup lter B by exerting a slight pressure on the
side aps (Fig 2).
3. Slide out the stainless-steel plate lter C (Fig 3).
4. In case you nd foreign objects (such as broken glass, porce-
lain, bones, fruit seeds etc.) please remove them carefully.
5. Inspect the trap and remove any food residues. NEVER
REMOVE the wash-cycle pump protection (black detail) (Fig 4).
After cleaning the lters, re-place the lter assembly and x it in
position correctly; this is essential for maintaining the efcient
operation of the dishwasher.
CLEANING THE SPRAY ARMS
On occasions, food residue may
become encrusted onto the spray
arms and block the holes used
to spray the water. It is therefore
recommended that you check the
arms from time to time and clean
them with a small non-metallic
brush.
To remove the upper spray arm,
turn the plastic locking ring in an
anti-clockwise direction.
The upper spray arm should be replaced so that the side with the
greater number of holes is facing upwards.
The lower spray arm may be
removed by pulling it upwards.
WATER SOFTENING SYSTEM
Water softener automatically reduces water hardness, conse-
quently preventing scale buildup on heater, contributing also to
better cleaning efciency. This system regenerates itself with
salt,
therefore it is required to rell salt container when empty.
Frequency
of regeneration depends on water hardness level set-
ting - by default regeneration takes place once per 5 Eco cycles
with water hardness level set to 3. Regeneration process starts in
nal rinse and nishes in drying phase, before cycle ends.
• Single regeneration consumes: ~3.5L of water;
• Takes up to 5 additional minutes for the cycle;
• Consumes below 0.005kWh of energy.
1 2
3 4
A
A
B
C
TROUBLESHOOTING
In case your dishwasher doesn’t work properly, check if the problem can be solved by going through the following list.
For other errors or issues please contact authorized After-sales Service which contact details can be found in the warranty
booklet. The manufacturer ensures the availability of spare parts for at least 10 years after production date of this appliance.
PROBLEMS POSSIBLE CAUSES SOLUTIONS
Salt indicator is lit
Salt reservoir is empty. (After rell
the salt indicator may remain lit for
several wash cycles).
Rell reservoir with salt (for more information - see page 8).
Adjust water hardness - see table, page 8.
Rinse aid indicator is lit
Rinse aid dispenser is empty. (After
rell the rinse aid indicator may
remain lit for several wash cycles).
Rell dispenser with rinse aid (for more information - see page 8).
The dishwasher won’t start or
does not respond to com-
mands.
The appliance has not been
plugged in properly.
Insert the plug into the socket.
Power outage. The dishwasher starts automatically when the power returns.
The dishwasher door is not closed. Vigorously push the door until you hear the “click”.
It does not respond to commands.
Display shows: 9 or 12 and
On/Off LED is blinking rapidly.
Switch off the appliance by pressing the ON/OFF button, switch it back
on after approximately one minute and reset the program.
If problem persists, unplug the appliance for 1 minute, then plug it back in.
По окончании очистки фильтров установите узел фильтров
на место и зафиксируйте в правильном положении. Это
важно для исправной работы посудомоечной машины.
EN
13
CLEANING THE FILTER ASSEMBLY
Regularly clean the lter assembly so that the lters do not clog
and that the waste water ows away correctly.
Using dishwasher with clogged lters or foreign objects inside l-
tration system or sprayarms may cause unit malfunction resulting
in lose of performance, noisy work or higher resources usage.
The lter assembly consists of three lters which remove food
residues from the washing water and then recirculate the water:
to obtain the best washing results, you need to keep them clean.
The dishwasher must not be used without lters or if the
lter is loose.
At least once per month or after each 30 cycles, check the lter
assembly and if necessary clean it thoroughly under running water,
using a non-metallic brush and following the instructions below:
1. Turn the cylindrical lter A in an anti-clockwise direction and
pull it out (Fig 1).
2. Remove the cup lter B by exerting a slight pressure on the
side aps (Fig 2).
3. Slide out the stainless-steel plate lter C (Fig 3).
4. In case you nd foreign objects (such as broken glass, porce-
lain, bones, fruit seeds etc.) please remove them carefully.
5. Inspect the trap and remove any food residues. NEVER
REMOVE the wash-cycle pump protection (black detail) (Fig 4).
After cleaning the lters, re-place the lter assembly and x it in
position correctly; this is essential for maintaining the efcient
operation of the dishwasher.
CLEANING THE SPRAY ARMS
On occasions, food residue may
become encrusted onto the spray
arms and block the holes used
to spray the water. It is therefore
recommended that you check the
arms from time to time and clean
them with a small non-metallic
brush.
To remove the upper spray arm,
turn the plastic locking ring in an
anti-clockwise direction.
The upper spray arm should be replaced so that the side with the
greater number of holes is facing upwards.
The lower spray arm may be
removed by pulling it upwards.
WATER SOFTENING SYSTEM
Water softener automatically reduces water hardness, conse-
quently preventing scale buildup on heater, contributing also to
better cleaning efciency. This system regenerates itself with
salt,
therefore it is required to rell salt container when empty.
Frequency
of regeneration depends on water hardness level set-
ting - by default regeneration takes place once per 5 Eco cycles
with water hardness level set to 3. Regeneration process starts in
nal rinse and nishes in drying phase, before cycle ends.
• Single regeneration consumes: ~3.5L of water;
• Takes up to 5 additional minutes for the cycle;
• Consumes below 0.005kWh of energy.
1 2
3 4
A
A
B
C
TROUBLESHOOTING
In case your dishwasher doesn’t work properly, check if the problem can be solved by going through the following list.
For other errors or issues please contact authorized After-sales Service which contact details can be found in the warranty
booklet. The manufacturer ensures the availability of spare parts for at least 10 years after production date of this appliance.
PROBLEMS POSSIBLE CAUSES SOLUTIONS
Salt indicator is lit
Salt reservoir is empty. (After rell
the salt indicator may remain lit for
several wash cycles).
Rell reservoir with salt (for more information - see page 8).
Adjust water hardness - see table, page 8.
Rinse aid indicator is lit
Rinse aid dispenser is empty. (After
rell the rinse aid indicator may
remain lit for several wash cycles).
Rell dispenser with rinse aid (for more information - see page 8).
The dishwasher won’t start or
does not respond to com-
mands.
The appliance has not been
plugged in properly.
Insert the plug into the socket.
Power outage. The dishwasher starts automatically when the power returns.
The dishwasher door is not closed. Vigorously push the door until you hear the “click”.
It does not respond to commands.
Display shows: 9 or 12 and
On/Off LED is blinking rapidly.
Switch off the appliance by pressing the ON/OFF button, switch it back
on after approximately one minute and reset the program.
If problem persists, unplug the appliance for 1 minute, then plug it back in.
Чисткалопастей-
разбрызгивателей
Иногда остатки пищи
могут попадать на лопасти-
разбрызгиватели и блокировать
отверстия подачи воды. По этой
причине рекомендуется время от
времени проверять и очищать
лопасти при помощи маленькой
неметаллической щетки.
Для снятия верхней лопасти
поверните пластмассовое
удерживающее кольцо против
часовой стрелки. Устанавливайте
верхнюю лопасть так, чтобы сторона
с большим количеством отверстий
была обращена вверх.
Нижнюю лопасть можно снять, потянув ее вверх.
Системаумягченияводы
Умягчитель воды автоматически снижает жесткость воды,
предотвращая образование накипи на нагревательном
элементе, что также способствует повышению
эффективности очистки. Система осуществляет
регенерацию с помощью соли, поэтому необходимо
наполнять контейнер для соли по мере его опорожнения.
Частота регенераций зависит от установленного уровня
жесткости воды, по умолчанию регенерация происходит
один раз в 5 циклов Eco, если установлен уровень
жесткости воды 3. Процесс регенерации начинается во
время завершающего ополаскивания и заканчивается на
этапе сушки до окончания цикла. Для одной регенерации
требуется:
- ~3,5 л воды;
- 5 дополнительных минут ко времени цикла;
- расход электроэнергии менее 0,005 кВт.
Чисткаиуход
 Loading...