8
9. Slide the Butterfly Front Leg (3) onto the indicated
5/16” x 2 1/2” Carriage Bolts (92) in the Butterfly Base
(4). Hand tighten two 5/16” Nylon Locknuts (64) onto
the Bolts. Do not tighten the Nylon Locknuts yet.
9
64
3
92
4
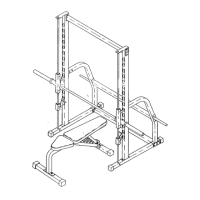
8. Attach the Right Support Frame (33) and the Left
Support Frame (97) to the Weight Upright (9) with two
5/16” x 2 3/4” Bolts (89) and two 5/16” Nylon
L
ocknuts (64). Tighten all Nylon Locknuts used in
steps 6 through 8.
8
89
97
64
33
89
64
9
10. Thread an Adjustment Handle (85) into the indicated
hole in the Butterfly Seat Frame (14).
Attach the Butterfly Seat Frame (14) to the Butterfly
Front Leg (3) with two 5/16” x 2 3/4” Bolts (89), two
5/16” Washers (36), and two 5/16” Nylon Locknuts
(64). Do not tighten the Nylon Locknuts yet.
Attach the Butterfly Seat Frame (14) to the Butterfly
Upright (1) with two 5/16” x 3 3/4” Bolts (66), two
5/16” Washers (36), and two 5/16” Nylon Locknuts
(64). Tighten all Nylon Locknuts used in steps 9
and 10.
10
36
36
1
66
64
36
89
64
14
3
64
85