This document provides instructions for use of the Indesit RI 261 X glass ceramic hob. It covers important safety information, installation guidelines, electrical connections, energy-saving tips, environmental safeguarding, care and maintenance, troubleshooting, after-sales service, and a product description sheet.
Function Description
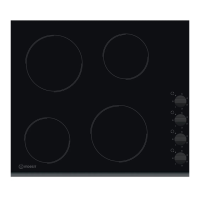
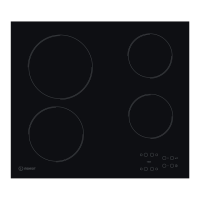
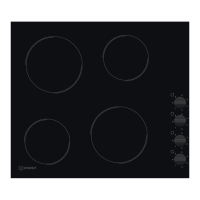
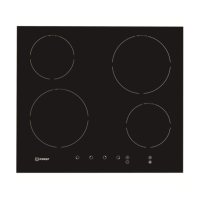
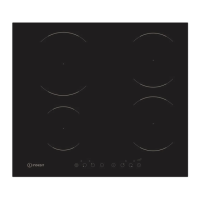
The Indesit RI 261 X is a glass ceramic hob designed for domestic use for cooking food. It features four radiant cooking zones of varying diameters and a display for control. The hob includes a timer function, a key lock function, and a residual heat indicator.
Important Technical Specifications
- Cooktop Installation: Must be set into a worktop between 20 mm and 50 mm deep.
- Clearance: Minimum 20 mm between the lower face of the hob and the cupboard/separating panel. Minimum 100 mm from the edge of the cooktop to the side of a column unit if installed next to one.
- Electrical Connection:
- Voltage: 220-240V~ + (3 x 4 mm²), 230-240V~ + (Australia only, 3 x 4 mm²), 220-240V 3~+ (4 x 1.5 mm²), 380-415V 3N~ + (5 x 1.5 mm²), 380-425V 2N~ + (4 x 1.5 mm²).
- Requires an all-pole disconnect switch with a minimum contact gap of 3 mm.
- The power supply cable (H05RR-F type) must be long enough to allow removal from the worktop and positioned to avoid damage or overheating.
- The yellow/green earth wire must be connected to the terminal with the symbol and be longer than other wires.
- Cooking Zones:
- Radiant cooking zone Ø 145 (x2)
- Radiant cooking zone Ø 180 (x1)
- Radiant cooking zone Ø 210 (x1)
- Dimensions (Hob): 580 mm x 510 mm (overall), 552 mm x 482 mm (cut-out).
- Dimensions (Installation):
- R = Min. 6.5 mm, Max. 8 mm (for 560+2 mm x 490+2 mm cut-out)
- R = 11.5 mm, R = Min. 6.5 mm (for 583+2 mm x 513+2 mm cut-out)
- Min. 70 mm clearance from rear wall.
- Min. 20 mm clearance from front.
- Min. 5 mm clearance from sides.
- Min. 40 cm clearance above hob.
- Min. 10 cm clearance below hob.
- Min. 7 cm clearance from front edge of worktop to hob.
Usage Features
- Control Panel: Features an On/Off button (A), Cooking zone and timer selection button (B), Heat setting increase and decrease buttons (C-E), Key lock button (D), and Multiple zone Activation/Deactivation button (F).
- Initial Setup: Upon first installation, the control panel performs a functional test and then switches to "Key lock" function. To deactivate, press and hold button "D".
- Switching On/Off: Press button "A" for approximately 2 seconds to switch on. The hob automatically switches off if no cooking zones are activated within 20 seconds.
- Selecting Cooking Zones and Heat Settings: Press button "B" corresponding to the desired zone, then use buttons "E" or "C" to select a heat setting from 1 to 9. Pressing "+" at level 9 activates the "Booster" function, indicated by "A" on the display.
- Changing Heat Settings: The control is deactivated 10 seconds after a heat setting is selected. To change it, press "B" again, then use "E" or "C".
- Multiple Zone Function: Activated by pressing "F" after selecting a zone and setting its level (if the cooking zone supports it and power level > 0). An indicator above button "F" turns on. To deactivate, press "B" of the desired zone, then "F" again.
- Timer Function: Select the desired cooking zone and power setting, then press the cooking zone key (B) again. A luminous dot appears on the display, and "00" blinks. Use "C" or "E" to set the time from 1 to 99 minutes. The timer display will show the power setting of other cooking zones after 10 seconds. To view remaining cooking time, press the timer-controlled cooking zone key twice.
- Key Lock Function: Activated by holding button "D" until a dot lights up. It locks all hob functions except the On/Off button "A". It remains active even after the hob is switched off and on. Deactivate by pressing "D" again until the dot disappears.
- Residual Heat Indicator: "H" or flashing "0" indicates residual heat after a cooking zone is switched off, until the temperature returns to safety levels.
- Automatic Switch-off: The hob includes an automatic switch-off function for prolonged use of the same heat setting (e.g., after about 1 hour at maximum heat setting).
Maintenance Features
- Cleaning:
- Clean the cooktop when cool after each use to prevent dirt build-up.
- Avoid high-pressure water or steam cleaning.
- Use a clean cloth, absorbent kitchen wipes, washing-up liquid, or a specific glass ceramic cleaner.
- Remove baked-on dirt with a special scraper tool (if provided) and specific cleaning products.
- Clean food spills immediately before they bake onto the surface.
- Immediately remove foods with high sugar content (toffee, fruit juice, jam, etc.) that boil over or spatter, using a scraper.
- Do not use abrasive products, bleach, oven-cleaner spray, or pan scourers.
- Treat periodically with a proprietary brand of protective wax for glass-ceramic hobs.
- Troubleshooting Guide:
- Check if instructions for "Using the hob" were followed.
- Check for power failure.
- Ensure the hob was dried carefully after cleaning.
- If "F" or "ER" followed by a number appears on the display, contact After Sales Service.
- If the hob stops working after intensive use, it may be due to high internal temperature; wait a few minutes for it to cool down.
- After-Sales Service:
- Before contacting, attempt to solve the problem using the troubleshooting guide.
- Turn off and restart the appliance to see if the fault persists.
- If the fault continues, provide a short description of the fault, the precise type and model of the appliance, and the service number (found on the data plate under the hob or on the Product Description Sheet).
- Contact an authorized After-sales Service for repairs. Insist on original spare parts and certification of the job carried out.