03540598_ed12 21
NOTICE
During eld orientation do not change the relationship between
the o set housing (28) and the intermediate housings (13). It
is important that the cut out section of the bearing boss on the
intermediate housing (13) aligns with the drive gear (29).
13
28
(Dwg. TPD1746)
15. Install the Rear Gear Case O-ring (14) in the groove at the rear of
the Intermediate Gear Case and the Front Gear Case B-Ring (15) in
the groove at the front of the Intermediate Gear Case. Coat both
O-Rings with O-Ring lubricant
16. Before installing the Motor Assembly, coat the O-Rings on the
Motor Assembly and the inside of the Cylinder with O-Ring
lubricant Install the Motor Assembly through the rear of the
Motor Housing with the geared end of the rotor toward the front.
Refer to Dwg. TPD1161.
12A
12A
12B
12
12B
(Dwg. TPD1161)
17. Align the punch marks on the Motor Housing with the punch
marks on the Intermediate Gear Case and using a plastic
hammer, tap the Motor Housing until it seats on the rear of the
Intermediate Gear Case. Refer to Dwg. TPD1747.
8
13
28
(Dwg. TPD1747)
Assembly of the Directional Housing Exhaust Cover
1. Coat the Exhaust Cover Seal (2) with o-ring lubricant and install in
the groove in the Directional Housing Exhaust Cover (1).
2. Install Directional Housing Exhaust Cover on the rear of the Motor
Housing in the desired orientation and using a plastic hammer,
tap the Directional Housing Exhaust Cover until it seats.
3. Secure the Directional Housing Exhaust Cover on the rear of the
Motor Housing using the Starter Assembly Cap Screws and Cap
Screw Washers. Using an 8 mm hex-head wrench, tighten each
Cap Screw a little at a time to a nal torque of 55 ft-lb (74.5 Nm) in
20 ft-Ib (27 Nm) increments. Refer to Dwg. TPD1748.
8
1
7
6
(Dwg. TPD1748)
4. Lubricate Exhaust Adapter Seal (71) with O-Ring lubricant and
install in groove in Exhaust Flange (67).
5. Install Exhaust Flange with Exhaust Adapter Seal down on
Directional Housing Exhaust Cover. Align holes and secure
Adapter with Cap Screws (69) and Lock Washers (70). Tighten
each Cap Screw a little a time to a nal torque of 48 ft-lb (65 Nm
torque) in 20 ft-lb (27 Nm) increments.
NOTICE
Whenever assembling the Exhaust Cover to the starter, be sure
to add 15ml of Dexron®**II Automatic Transmission Fluid to the
pipe plug hole marked “OIL HERE”.
Use Ingersoll Rand SMB-441 Pipe Sealant on all plugs.
6. Install the bottom Housing Plug (10) and the Housing Plug Inlet
Boss (11). Put the Starter on its side with the side plug hole
upward. Add 175 ml (approximately 1/3 pint) of Dexron®** II
Automatic Transmission Fluid through the side plug hole in the
Motor Housing (8).
Turbine Module Change-Out
NOTICE
These instructions will ensure a successful change-out of a
turbine module (Motor Assembly) on an Ingersoll Rand starter.
These instructions will cover starters with and without
Directional Housing Exhaust and cover mechanical components,
plumbing, lubrication and disposition of leftover components.
De nitions
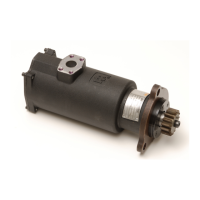
1. Turbine Module. The turbine module consists of the Motor Rotor
Assembly (12), Exhaust Kit (1 or 72), the Motor Housing (8), the
Intermediate Gear Case (13) and included parts.
2. Gear Case (28). The Gear Case is of an o set shape and has four
long socket head Cap Screws (6). The heads of the Cap Screws are
seen from the rear of the starter.
3. Drive Housing Kit, The Drive Housing Kit contains the 3-bolt
Flange (44C) that attaches the starter to the engine or the drive
housing (40) and included parts.
4. Housing Exhaust Cover Assembly (72). The Housing Exhaust
Cover Assembly consists of the Cover and its associated parts
found on the rear end of starters.
5. Directional Housing Exhaust Cover (1). The Directional Housing
Exhaust Cover consists of a 90, 3-1/2 inch anged elbow located
on the rear end of starters equipped with the Housing Exhaust
Cover Assembly.
6. Starter Assembly Cap Screw (6). The Starter Assembly Cap
Screws are 1.5 x 10 mm socket head cap screws. Four Cap Screws
are required on each starter.
Procedure
For Starters Without Directional Housing Exhaust:
1.
Tag o the starter control to prevent inadvertent use of the starter.
2. Remove the four Cap Screws (66) that attach the Inlet Flange (66)
to the side of the Motor Housing (8). Save the O-Ring (66) found
under the Inlet Flange.
 Loading...