22 03540598_ed12
3. Remove the four Starter Assembly Cap Screws (6) found on the
rear end of the starter.
4. Remove the turbine module and the Housing Exhaust Cover
Assembly (72) as a unit from the Gear Case (28) and set aside.
5. Insert the replacement turbine module into the Gear Case
making sure that the cutout portion of the front of the turbine
module is facing the large Drive Gear (29) inside the Gear Case.
6. Install the four Starter Assembly Cap Screws and torque them
each to 45-50 ft-lb torque in 20 ft-lb increments.
7. Apply some grease to the O-Ring saved from the Inlet Flange.
Push the O-Ring into the groove on the Inlet Flange and reinstall
the Flange. Remove the tag from the starter control and test the
starter.
8. Place the leftover turbine module into the box and ship it to
Ingersoll Rand using the return goods authorization and
shipping label provided with the replacement turbine module.
For Starters with Directional Housing Exhaust:
1. Tag o the starter control to prevent inadvertent use of the
starter.
2. Remove the four Cap Screws (66) that attach the Inlet Flange (66)
to the side of the Motor Housing (8). Save the O-Ring (66) found
under the Inlet Flange.
3. Remove the four Starter Assembly Cap Screws (6) found on the
rear end of the starter.
4. Disconnect the Directional Housing Exhaust Cover (1) from the
exhaust piping.
5. Remove the turbine module and Directional Housing Exhaust
Cover as a unit from the Gear Case (28). Remove the Directional
Housing Exhaust Cover from the turbine module. Set the turbine
module aside.
6. Remove the Directional Housing Exhaust Cover Assembly from
the replacement turbine module.
NOTICE
Hold the turbine module in the vertical position (with the
gear end down) to save the Dexron®** II covering the rear
turbine bearing.
Replenish the Dexron®** II if necessary. Install the Directional
Housing Exhaust Cover (1) onto the turbine module.
7. Install the turbine module and Directional Housing Exhaust Cover
as a unit into the Gear Case. Make sure that the cutout portion on
the front of the turbine module is facing the large Drive Gear (29)
inside of the Gear Case ( gure 1).
8. Install the four Starter Assembly Cap screws and torque them
to 55 ft-lb torque in 20 ft-lb increments Apply some grease to the
O-Ring saved from the Inlet Flange. Push it into the groove on
the Inlet Flange and reinstall the Flange. Attach the Directional
Housing Exhaust Cover to the exhaust piping.
9. Remove the tag from the starter control and test the starter.
10. Place the leftover turbine module and Directional Housing
Exhaust Cover Assembly into the box and ship it to
Ingersoll Rand using the return goods authorization and
shipping label provided with the replacement turbine module.
Completion of Turbine Module Change-Out
NOTICE
Before connecting the gas supply connection to the side of the
turbine module (Motor Assembly), make sure that no loose
solids are inside the supply piping.
1. No loose solids should be inside the supply piping. If it is possible
to blow out the disconnected gas supply line without exposing
the work space to free natural gas, tap the line with a metal
hammer to dislodge loose material. Apply around 50 psig partial
pressure to the gas supply line to sweep out dislodged material. If
not already in use, install a 100 micron lter (Ingersoll Rand Part
No. ST900-267-24) in the gas supply line immediately before the
turbine module supply inlet.
2. Finish connecting the turbine module (Motor Assembly) gas
supply connections.
NOTICE
Before returning starter to service, make sure that the rear
bearing of the turbine (Motor Assembly) has an adequate
amount (15 mm) of Dexron®** II lubricant.
For Starters without the Directional Housing Exhaust Cover:
1. Remove the De ector Return Screw (75) at the center of the
Splash De ector (75) at the rear of the starter.
2. Using a lube injector, squirt some Dexron®** II into the Cap Screw
hole. Reinstall the De ector Return Screw.
For Starters with the Directional Housing Exhaust Cover:
1. Remove the l/4 inch Plug on the outside and back of the
Directional Housing Exhaust Cover.
2. Using a lube injector, squirt Dexron®** II into the hole until it
begins to ow back out. Reinstall the Plug. Before the job is
completed, verify that the starter is receiving the proper gas
supply pressure while running. The desired pressure is printed
on the nameplate of the starter. Measurement of this pressure
should be taken at the motor inlet of the starter. Before turning
on the starter, a 0-160 psig gage may be connected to the inlet
of the starter by rst removing a 1/4 inch NPT plug at the starter
motor inlet Return the starter to operation and adjust gas supply
to proper pressure.
CAUTION
Do not over ll. Install the side Housing Plug (10) and tighten all
plugs to 5 to 10 ft-lb (6.8 to 13.6 Nm) torque.
Test and Inspection Procedure
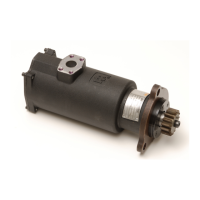
1. Clutch Ratcheting: Turn the Drive Shaft Pinion (63) by hand
in the direction of Starter rotation. The clutch should ratchet
smoothly with a slight clicking action.
2. Motor and Gearing Freeness: Turn the Drive Shaft Pinion (63)
opposite the direction of Starter rotation. The Drive Shaft Pinion
should turn by hand.
3. Motor Action: Secure Starter in a vise and apply 90 psig
(6.2 bar/620 kPa) pressure using a 3/8” (9 mm) supply line to the
inlet of the motor. Starter should run smoothly.
4. Motor Seals: Plug the exhaust and slowly apply 20 psig (1.38
bar/138 kPa) pressure to the inlet of the motor. Immerse the
Starter for 30 seconds in a non ammable, bubble-producing
liquid. If the Starter is properly sealed, no bubbles will appear.
5. Gear Case Seals: Plug the exhaust and slowly apply 20 psig
(1.38 bar/138 kPa) pressure to the inlet of the motor. Immerse
the Starter for 30 seconds in a non ammable, bubble-producing
liquid. There should be no leakage in the housing joints in the
Gear Case area or in the shaft seal in the Intermediate Gear
System. If the Starter is properly sealed, no bubbles will appear.
6. Con rm Motor Adjustment: Remove Housing Plug (10). Use
a l/4” hex drive to rotate the motor to verify proper motor
adjustment Motor should rotate freely.
7. Orientation: Drive Housing must be assembled to customer
orientation or per engineering drawing. If orientation is not
speci ed by customer, standard orientation will be supplied
Check dimension prints on pages 4, 5, and 6.
8. Con rm Drive Rotation: Apply low pressure to motor and
observe rotation. Drive Pinion (63) must rotate in the direction
stamped on the nameplate. Chamfer on pinion teeth should be
on trailing edge of gear tooth.
9. Bendix Drive Function - Inertia Models Only: Install Starter
on testing xture. Apply low pressure air to motor. Bendix must
engage according to speci ed rotation.
10.
Drive Housing Function - Pre-Engaged Models Only:
Apply 120 psig (8.2 bar/827 kPa) to “IN” port of Drive Housing (40).
Cycle ve times. Air should exhaust through “OUT” port during
each cycle.
11.
Exhaust De ector Operation: Install the Starter on testing
xture. Apply low air pressure to motor and observe. The De ector
must return to its normal position after operation of the Starter.
 Loading...