03540598_ed12 23
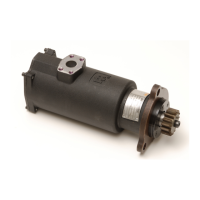
12. Concentricity and Squareness of Shaft to Housing “D” Ratio
Only: Assemble indicator on shaft Indicate pilot diameter. Check
squareness of face at mounting surface. Pilot diameter must be
concentric with .008 max. T.I.R Mounting face must be square
with shaft within .004 T.I.R max.
13. Drive Housing Leakage - Pm-Engage Models Only: Plug Drive
Housing (40) “OUT” port and apply 150 psig (3.45 bar/344 kPa) to
“IN” port to extend Drive Shaft (57). There should be no leakage.
14. Test Pinion Engagement - Pm-Engaged Models Only: Plug
“OUT” port in Drive Housing (40). Apply 50 psig (3.45 bar/344 kPa)
as needed. In its normal position, the distance from the mounting
ange to the end of the Drive Shaft (57) should he 1-3/4”. In its
extended position, the distance from the mounting ange to
the end of the Drive Shaft should be 2-7/8”. While the Drive Shaft
is extended, push the Drive Pinion (63) back on helical splined
shaft. Rear face of Drive Pinion must move back .47” +/- .035”.
Troubleshooting Guide
Trouble Probable Cause Solution
Motor will not run No air supply. Check for blockage or damage to air supply lines or tank.
Damaged Motor Assembly Inspect Motor Assembly and power train and repair or replace if
necessary.
Foreign material in Motor and/or piping Remove Motor Assembly and/or piping and remove blockage.
Blocked exhaust system. Remove Housing Exhaust Cover and check for blockage.
Defective Control Valve or Relay Valve. Replace Control Valve or Relay Valve.
Loss of Power Low air pressure to Starter. Check air supply.
Restricted air supply line. Check for blockage or damage to air lines.
Relay Valve malfunctioning. Clean or replace lines or Relay Valve. Lube Relay Valve.
Exhaust ow restricted. Check for blocked or damaged piping. Clean or replace piping.
Check for dirt or foreign material and clean or remove. Check for ice
build-up. Melt ice and reduce moisture build-up to Starter.
Damaged Motor Assembly. Replace Motor Assembly.
For Models with Inertia Drive:
Trouble Probable Cause Solution
Drive will not engage Foreign material in Starter Drive. Remove obstruction.
Damaged or worn Drive parts. Check Drive components and replace if necessary.
For Models with Pre-Engaged Drive:
Trouble Probable Cause Solution
Drive will not engage No pressure to Drive Housing port. Check air supply.
Internal Drive Housing ports blocked Remove blockage.
Fluid in drive unit components. Remove uid.
Damaged or worn Piston Assembly,
O-Rings or seals.
Replace damaged or worn parts.
O-Rings and seals dry. Re-lube O-Rings and seals.
Motor runs, Pinion engages, but
does not rotate ywheel
Damaged or broken drive train. Disassemble drive train and replace worn or
damaged parts.
Excessive butt engagement Damaged Drive Pinion or ywheel. Inspect Drive Pinion and ywheel and replace if necessary.
Damaged Starter Drive or components. Inspect Drive components and replace worn or damaged parts.
Low air pressure. Check air supply
Wrong Drive Pinion Replace with proper Drive Pinion.
Oil blowing out of exhaust Oil in air supply line. Inspect air line and remove source of oil.
Splash De ector Retaining Screw or pipe
plug missing.
Install Splash De ector Retaining Screw or pipe plug.
Worn or damaged rotor seals or static
O-Rings.
Replace static seals on outside of Motor or send Motor to
Ingersoll Rand to be rebuilt.
Oil leaking from Gear Case Worn or damaged O-Rings. Replace O-Rings.
Loose joints. Make sure that joints t properly and that Starter Assembly Cap
Screws are tightened to 60 ft-lb (81 Nm). Make sure that all seals
and O-Rings t and seal properly at their perimeters. If they do
not, replace with new seals and O-Rings.
Excessive high-speed operation. Operate according to recommendations.
High number of start cycles. Replace worn components.
Loose or leaking Pipe Plugs. Tighten or replace Pipe plugs using Ingersoll Rand SMB-441
Pipe Sealant.
Splash De ector Retaining Screw or pipe
plug missing.
Tighten Splash De ector Retaining Screw or replace pipe plug.
Air or gas leakage Loose Joints. Make sure that joints t properly and that Starter Assembly Cap
Screws are tightened to 60 ft-lb (81 Nm.) torque. Make sure that
all seals and O-Rings t and seal properly at their perimeters. If
they do not, replace with new seals and O-Rings.
Excessive high-speed operation Operate according to recommendations.
High number of start cycles Replace worn components.
Loose or leaking Pipe Plugs Tighten or replace pipe plugs.
Splash De ector Retaining Screw loose or
Pipe Plug missing
Tighten Splash De ector Retaining Screw or replace pipe plug.
 Loading...