03540598_ed12 3
3. After the Drive Housing is properly oriented relative to the Gear
Case, determine if the inlet port will be favorably located for
hose installation. If either or both of these members must be
reoriented, use an 8 mm hex-head wrench to remove the four
motor housing cover capscrews, and rotate the motor housing
and/or motor housing cover to its desired position.
NOTICE
Do not separate the Motor Housing from the Intermediate Gear
case as gear lubrication oil will be lost.
Reinstall the motor housing cover cap screws and alternately
tighten them to 60 ft-lb (81.4 Nm).
Mounting the Air Starter
1. Study the appropriate piping diagrams and install as indicated.
2. The air receiver tank for a starter installation must have a working
pressure rating equal to or greater than the maximum pressure at
which the starter will be operated.
3. When connecting the starter to a receiver tank that is already in
service, bleed o the air pressure in the tank prior to installing the
starter.
WARNING
Bleed o the air pressure through a valve or petcock. Do not
remove a plug from the tank while the tank is still pressurized.
Drain o any water that may have accumulated in the bottom of
the tank.
4. Using a 1.1/2” short nipple, install the SRV 150 Starter Relay Valve
on the end of the receiver tank as shown in the piping diagram.
NOTICE
Make certain the connection is made to the inlet side of the Relay
Valve indicated by the word “IN”, cast on the valve body.
5.
For air installations, install the Starter Control Valve (SMB-618)
on the dash panel (for vehicular installations) or some other
appropriate panel (for stationary installations). An optional control
circuit utilizing an electric solenoid control valve and a panel
mounted switch are available. Mount the 12V Solenoid Valve
(150-BMP-1051B) securely and preferably in a vertical position
away from any concentration of heat, vibration or contamination.
Connect the leads to the operator’s starting switch which should
be located on the dashboard or control panel.
6. Attach Starter Instruction Label (TA-STR-100) to the control panel
adjacent to the Starter Control Valve.
7. Mount the Air Pressure Gauge (150BMP-1064) on or adjacent to
the control panel. It should be located where it is readily visible to
the operator.
8. Connect the Starter Control Valve to the Relay Valve with 1/4”
hose. Install a tee in this line with a short feeder hose to the
Pressure Gauge.
NOTICE
Make certain the hose is connected to the supply side (marked
“SUMP”) of the Starter Control Valve.
9. To determine the exact length of 1.1/2” air hose required, run a
piece of heavy duty hose or some other exible tubing of the
same diameter from the Real Valve on the receiver to the starter
location on the engine.
10. Attach the 1.1/2” air hose to the outlet side of the Relay Valve, and
run the hose through the frame, etc. to its nal position at the
starter location.
11. At this point determine whether or not it is feasible or practical to
attach the hose to the starter before or after the starter is actually
mounted. In many cases it may be necessary to attach the hose to
the starter before mounting.
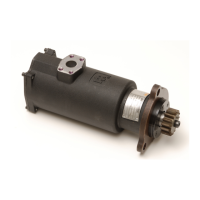
12. If possible, liberally grease the teeth on the ring gear with a good
quality sticky gear grease. This will help promote the life of the
ring gear and the starter Pinion.
13. Move the starter into position, and mount it on the ywheel
housing. Tighten the mounting bolts to 100 ft-lb (136 Nm) of
torque.
14. For Pre-Engaged Models only, Install a 1/4” hose line from
the delivery side (marked “DEL”) of the starter Control Valve or
Solenoid Valve to the “IN” port on the Starter Drive Housing.
15. Install a 1/4” hose line from the “OUT” port on the Starter Drive
Housing to the small pipe tapped portion top of the Starter Relay
Valve or Solenoid Valve.
16. If the exhaust is to be piped away, remove the standard Splash
De ector which is located at the rear of the Housing Exhaust
Cover and replace the Assembly with the 1/4” N.P.T. pipe plug
supplied with the starter.
17. Pressurize the complete starting system and check every
connection with a soap bubble test. There must be no leaks in
the live air lines or other connections.
Barring Over the Engine
Occasionally, for setting injectors and/or for timing purposes, it may
be desirable to bar over the engine in such a manner that any given
piston can be stopped at any given location. This is very easily done
with a Series ST900 Turbine Starter.
1. Remove the 1/4” pipe plug located on the exhaust.
2. Manually rotate the Motor Assembly until the engine is cranked
to the desired position.
For Pre-Engaged Models
1. Disconnect the 1/4” hose at the “OUT” port on the Drive Housing,
and plug the hole in the Drive Housing with a 1/4” pipe plug.
2. Engage the Drive Pinion with the ywheel by applying a
minimum of 70 psig (4.8 bar/483 kPa) to the “IN” port on the Drive
Housing.
3. Using a 6” long hex wrench, manually rotate the Motor Assembly
until the engine is cranked to the desired position.
 Loading...