This document provides assembly instructions for the April Accent Bench, a piece of furniture designed for seating and decorative purposes. The bench is composed of a bench top, two right legs, two left legs, and two stretchers, which are joined together using various hardware components.
Function Description:
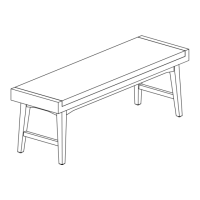
The April Accent Bench serves as a functional and decorative seating option for various indoor settings. Its primary function is to provide a stable and comfortable surface for sitting. The design, featuring a bench top supported by four legs and reinforced by stretchers, ensures structural integrity and durability for everyday use. The assembly process involves securing the legs to the bench top and connecting them with stretchers to create a robust frame. Once assembled, the bench can be placed in living rooms, entryways, bedrooms, or other areas where additional seating or a decorative accent is desired.
Important Technical Specifications:
The bench assembly requires a specific set of parts and hardware, detailed in the provided lists.
-
Parts List:
- P1: Bench Top (Quantity: 1) - This is the main seating surface of the bench.
- P2: Right Leg (Quantity: 2) - These are two of the four supporting legs for the bench.
- P3: Left Leg (Quantity: 2) - These are the other two supporting legs for the bench.
- P4: Stretcher (Quantity: 2) - These components connect the legs, providing additional stability and rigidity to the structure.
-
Hardware List:
- H1: Bolts Ø5/16"*2-3/8" (Quantity: 8) - These bolts are crucial for attaching the legs to the bench top and securing the stretchers.
- H2: Lock Washer Ø5/16" (Quantity: 8) - Lock washers help prevent the bolts from loosening over time due to vibrations or movement, ensuring a secure connection.
- H3: Flat Washer Ø5/16"*3/4" (Quantity: 8) - Flat washers distribute the load of the fastener, preventing damage to the material and providing a larger bearing surface.
- H4: Allen Wrench 4mm (Quantity: 1) - This tool is provided for tightening the H1 bolts.
- H5: Screws M4*1-1/2" (Quantity: 4) - These screws are used for specific connections, likely for securing the stretchers to the legs.
- H6: Screwdriver (Not provided) (Quantity: 1) - A screwdriver is required for tightening the H5 screws but is not included in the package. Users must provide their own.
The dimensions of the bolts and washers (e.g., Ø5/16", 2-3/8", 3/4") indicate the specific sizes and types of fasteners needed for a proper fit and secure assembly. The inclusion of an Allen wrench (H4) suggests that the H1 bolts have an internal hex drive.
Usage Features:
The assembly instructions emphasize several usage features to ensure safety and proper construction:
- Two-Person Assembly Recommended: For safety and ease, assembly by two or more adults is recommended. This suggests that some parts may be heavy or awkward to handle alone, and an extra set of hands can prevent accidents and simplify the process.
- Careful Reading of Instructions: Users are advised to carefully read all instructions before assembling to ensure a smooth and correct build.
- Pre-assembly Guidelines:
- Do not discard contents prematurely: It is crucial not to discard any contents until after assembly is complete. This prevents accidental disposal of small parts or hardware, which could halt the assembly process.
- Remove all parts and hardware: All components should be removed from the box, including any plastic protective packaging, to ensure everything is accounted for before starting.
- Assembly Surface: Step 1 advises assembling the bench on a flat, soft surface such as a carpet or cloth. This prevents scratching the finish of the furniture during the assembly process, preserving its aesthetic quality.
- Progressive Tightening: The instructions for Step 1 explicitly state, "Do not tighten Bolts" when attaching the legs to the bench top initially. This indicates a progressive tightening approach, where fasteners are left slightly loose during initial assembly to allow for adjustment and alignment of parts, and then fully tightened later. This is a common practice in furniture assembly to ensure all components fit together correctly before final securing.
- Sequential Assembly Steps: The assembly is broken down into clear, sequential steps (Step 1, Step 2, Step 3, Step 4) to guide the user through the process logically.
- Visual Aids: The manual includes diagrams for each step, illustrating how parts and hardware connect. These visual aids are essential for understanding the orientation and placement of components, especially for users who may find written instructions challenging. For example, the diagrams show the placement of H1, H2, H3, and H4 in Step 1, and the connection of P4 to P2 and P3 in Step 2.
- Final Orientation: Step 4 instructs the user to "Turn the Bench over and place it upright on a level surface" once assembly is complete. This is the final step to prepare the bench for use.
Maintenance Features:
The manual includes a critical "ADDITIONAL NOTE ABOUT SAFETY" that highlights important maintenance aspects:
- Periodic Inspection and Re-tightening: "BOLTS MAY LOOSEN DURING NORMAL EVERYDAY USE. THEY SHOULD BE PERIODICALLY INSPECTED AND RE-TIGHTENED TO PREVENT DAMAGE OR INJURY. ALWAYS CHECK TO BE SURE THAT ALL HARDWARE IS KEPT TIGHTENED." This is a crucial maintenance instruction. It acknowledges that fasteners can loosen over time due to regular use, movement, or environmental factors. Regular inspection and re-tightening of all hardware are essential to maintain the structural integrity of the bench, prevent wobbling, ensure user safety, and prolong the lifespan of the furniture. Neglecting this maintenance could lead to instability, damage to the bench, or potential injury to users.
- Disclaimer: The "DISCLAIMER" section states, "WHEN PROPERLY ASSEMBLED, THIS ITEM IS SAFE FOR INTENDED USE. SELLER IS NOT LIABLE FOR ANY ANY DAMAGES RESULTING FROM ITEM BEING IMPROPERLY ASSEMBLED AFTER PURCHASE." This emphasizes the importance of correct assembly for the item's safety and intended use. It also serves as a legal notice, placing responsibility on the user for proper assembly and implying that improper assembly voids the seller's liability for subsequent damages. This reinforces the need to follow all instructions carefully.
In summary, the April Accent Bench is a self-assembled furniture item designed for seating, requiring careful adherence to detailed instructions and periodic maintenance to ensure safety and longevity. The manual provides comprehensive guidance on assembly, including parts and hardware lists, step-by-step procedures, and crucial safety and maintenance tips.