The provided document outlines the assembly instructions for a "Rocket Coffee Table."
Function Description
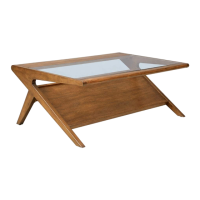
The Rocket Coffee Table is a piece of furniture designed for use in living spaces. It features a glass top, a lower shelf, and a distinctive leg design, suggesting a modern or contemporary aesthetic. Its primary function is to provide a surface for placing items such as drinks, books, or decorative objects, and additional storage space on its lower shelf.
Important Technical Specifications
The table's construction involves several components and hardware, indicating a sturdy design.
Parts List:
- P1: Table Top Frame 1 (Qty: 1)
- P2: Table Top Frame 2 (Qty: 1)
- P3: Left Leg (Qty: 1) - Labeled "L" for identification during assembly.
- P4: Right Leg (Qty: 1) - Labeled "R" for identification during assembly.
- P5: Shelf (Qty: 1)
- P6: Shelf Side Panel (Qty: 1)
- P7: Glass (Qty: 1) - This is the tabletop surface.
Hardware List:
- H1: Short Bolts (Ø1/4"x1-1/4") (Qty: 18) - Used for various connections, including attaching the shelf side panel to the shelf, and securing the table frame and shelf to the legs.
- H2: Long Bolts (Ø1/4"x3-1/2") (Qty: 2) - Specifically used for attaching the top frame to the legs.
- H3: Lock Washers (1/4") (Qty: 20) - Used in conjunction with bolts to prevent loosening.
- H4: Flat Washers (1/4") (Qty: 18) - Used with bolts to distribute pressure and protect surfaces.
- H5: Allen Wrench (1/4") (Qty: 1) - The primary tool for tightening bolts during assembly.
- H6: Half Round Washers (1/4") (Qty: 2) - Used in specific connections, particularly with the long bolts.
- H7: Nuts (1/4") (Qty: 2) - Used with the long bolts for secure fastening.
- H8: Open Spanner (1/4") (Qty: 1) - Used for tightening nuts.
- H9: Clear plastic Pads (Qty: 4) - Placed on the table top frame to cushion and secure the glass top.
The dimensions of the bolts and washers (e.g., Ø1/4", 1/4") indicate standard sizing for furniture hardware. The use of both an Allen wrench and an open spanner suggests that different types of fasteners are employed, requiring specific tools for proper assembly.
Usage Features
The coffee table is designed for indoor use in a home or office setting.
- Glass Top (P7): Provides a smooth, easy-to-clean surface for various items. The use of clear plastic pads (H9) ensures the glass is securely placed and protected from direct contact with the frame.
- Lower Shelf (P5 & P6): Offers additional storage or display space, enhancing the table's utility.
- Distinctive Leg Design (P3 & P4): The "Rocket" in the name likely refers to the unique, angled design of the legs, which contributes to the table's aesthetic appeal. The legs are clearly marked "L" and "R" to facilitate correct orientation during assembly.
- Dowel Connections: The diagrams show dowels being used in the leg and frame connections, which are common in furniture for alignment and added stability.
- Assembly by Two or More Adults: This recommendation highlights that the table components might be bulky or require coordinated effort for safe and efficient assembly, particularly when handling the glass top.
Maintenance Features
The manual provides crucial information regarding the maintenance of the assembled table to ensure its longevity and safety.
- Periodic Inspection and Re-tightening of Bolts: The "ADDITIONAL NOTE ABOUT SAFETY" explicitly states that "BOLTS MAY LOOSEN DURING NORMAL EVERYDAY USE. THEY SHOULD BE PERIODICALLY INSPECTED AND RE-TIGHTENED TO PREVENT DAMAGE OR INJURY. ALWAYS CHECK TO ENSURE THAT ALL HARDWARE IS KEPT TIGHTENED." This is a critical maintenance instruction to prevent structural instability and potential hazards.
- Careful Handling of Glass Top: The instruction to "Carefully take the glass out from its carton, then gently lay the glass top on the table top frame" implies that the glass is a delicate component requiring careful handling to prevent damage during assembly and subsequent use.
- Assembly on Soft Surface: The recommendation to "Assemble the table on a flat, soft surface such as a carpet or cloth to prevent scratching the finish" indicates a concern for preserving the aesthetic quality of the furniture, suggesting that the finish might be susceptible to scratches if not handled properly during assembly.
- Proper Assembly for Intended Use: The "DISCLAIMER" states, "WHEN PROPERLY ASSEMBLED, THIS ITEM IS SAFE FOR INTENDED USE. SELLER IS NOT LIABLE FOR ANY DAMAGES RESULTING FROM ITEM BEING IMPROPERLY ASSEMBLED AFTER PURCHASE." This emphasizes that correct assembly is a prerequisite for the table's safe and intended function, and implies that improper assembly could lead to damage or injury.
- Do Not Over-tighten Bolts: Instructions like "Securely tighten all bolts by Allen wrench (H5), but do not over tighten the bolts" are important for preventing damage to the components (e.g., stripping screws, cracking wood) and ensuring the structural integrity of the table.