Do you have a question about the INK+IVY Kelly and is the answer not in the manual?
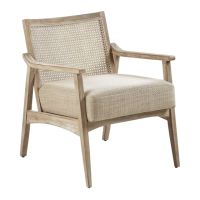
Step-by-step guide for assembling the Kelly Lounge Chair.
Attach seat cushion (P1) to the left arm (P3) and loosely tighten bolts.
Connect left arm (P3) to seat cushion (P1) and back frame (P2).
Connect right arm (P4) to seat cushion (P1) using hardware.
Connect right arm (P4) to seat cushion (P1) and back frame (P2).
Securely tighten all bolts and attach wooden plugs (H6) to cover exposed bolt holes.
This document provides assembly instructions for the "Kelly Lounge Chair," manufactured by INKHVY. It is a piece of furniture designed for seating, specifically a lounge chair.
The Kelly Lounge Chair is designed to provide comfortable seating for one person. Its construction involves a seat cushion, a back frame, and two arms, which are assembled using various bolts, washers, and an Allen wrench. Once assembled, it serves as a stationary lounge chair suitable for indoor or covered outdoor use, depending on the material specifications (not detailed in this document but implied by the wooden plugs for bolt holes).
The chair's assembly relies on specific hardware components:
The main components of the chair are:
The chair's dimensions are not explicitly stated, but the hardware specifications indicate a robust construction suitable for furniture. The use of an Allen wrench suggests a hex-head bolt system for secure fastening.
The assembly process is designed to be straightforward, though it is recommended for two or more adults to facilitate ease and safety. The instructions emphasize the importance of assembling the chair on a flat, soft surface (like a carpet or cloth) to prevent scratching the finish during construction. The assembly involves a sequence of attaching the seat cushion, back frame, and arms using the specified bolts and washers, initially loosely, and then tightening all connections in the final step. Labels on the arms (P3 and P4) guide correct placement.
A key usage feature is the initial loose tightening of bolts, which allows for minor adjustments and alignment of components before final secure fastening. This helps prevent misalignment during assembly. Once all bolts are securely tightened, wooden plugs (H6) are inserted into exposed bolt holes. This serves both an aesthetic purpose, concealing the hardware, and a protective function, preventing damage to the wooden plug finish by recommending the use of a soft cloth between the plug and a rubber hammer during insertion.
The document highlights crucial maintenance aspects to ensure the longevity and safety of the lounge chair:
The "Important safety instructions" section also implicitly covers maintenance by advising users to keep instructions for future reference, which would include these maintenance guidelines. The disclaimer explicitly states that the seller is not liable for damages resulting from improper assembly after purchase, underscoring the user's responsibility for correct initial assembly and ongoing maintenance. The use of wooden plugs, while primarily aesthetic, also protects the bolt heads from dust and potential corrosion, contributing to the chair's overall durability.
| Brand | INK+IVY |
|---|---|
| Model | Kelly |
| Category | Indoor Furnishing |
| Language | English |