EasyManua.ls Logo

INK+IVY MILA - User Manual

Default Icon
2 pages
Print Icon
To Next Page IconTo Next Page
Loading...
Assembly Procedures:
Pre-assembly:
Take out all parts and hardware from box.
Do not discard any content until assembly is complete to avoid accidentally discarding small parts or hardware.
Important safety instructions:
Please read carefully all instructions before assembly.
For your safety and ease, assembly by two or more adults is recommended.
Keep instructions for future use.
P2
P1
Item
Parts List
Metal Legs
Table Top
Description
4
1
QTY
Adjustable Levelers 1/4"
H5
H2
Flat Washers 1/4"
Lock Washers 1/4"
Bolts 1/4"x 5/8"L
Allen Wrench
H4
H3
H1
Item
Description
Hardware List
4
1
16
16
16
QTY
Step 1: Assemble the table on a flat, soft surface such as a carpet or cloth to prevent
scratching the finish. Assemble Metal Leg (P2) to Metal Leg (P2) as shown below. Do the
same way for two rest Metal Legs.
(H1)x8
(H2)x8
(H3)x8
(H4)x1
Allen Wrench
Bolts 1/4"x 5/8''L
Lock Washers 1/4"
Flat Washers 1/4"
Step 2: Assemble Metal Leg Frames assembled in Step 1 together as shown below.
Attention: Assemble one end first,
then continue with the rest end.
Attention: Assemble one end first,
then continue with the rest end.
Question and Answer IconNeed help?

Do you have a question about the INK+IVY MILA and is the answer not in the manual?

Summary

Important Safety Instructions

Pre-Assembly Steps

Parts and Hardware Identification

Assembly Procedures

Step 1: Assemble Metal Legs

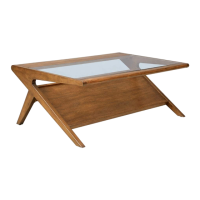
Assemble Metal Legs (P2) to each other on a soft surface as shown.

Step 2: Connect Leg Frames

Connect the assembled Metal Leg frames from Step 1 together.

Step 3: Attach Legs to Table Top

Attach the assembled Metal Legs (P2) to the table top (P1) using hardware.

Step 4: Install Adjustable Levelers

Assemble the Adjustable Levelers (H5) by screwing them into the legs.

Step 5: Final Setup and Leveling

Turn the table upright and adjust levelers to ensure stability.

Overview

This document provides assembly instructions for the Mila Coffee Table, a piece of furniture designed for general household use. The table's primary function is to serve as a surface for various items in a living space.

Technical Specifications (based on parts list):

  • Main Components:
    • Table Top (P1): 1 unit
    • Metal Legs (P2): 4 units
  • Hardware:
    • Bolts (H1): 1/4" x 5/8"L (16 units for leg assembly, 8 units for attaching legs to tabletop)
    • Lock Washers (H2): 1/4" (16 units for leg assembly, 8 units for attaching legs to tabletop)
    • Flat Washers (H3): 1/4" (16 units for leg assembly, 8 units for attaching legs to tabletop)
    • Allen Wrench (H4): 1 unit (for tightening bolts)
    • Adjustable Levelers (H5): 1/4" (4 units)

Usage Features:

  • Assembly: The table requires assembly by the user. The instructions recommend assembly by two or more adults for safety and ease.
  • Stability: The design incorporates adjustable levelers (H5) to ensure the table can be made stable on uneven floors, preventing wobbling.
  • Construction: The table features a table top (P1) supported by a frame constructed from four metal legs (P2). The legs are interconnected to form a sturdy base.

Maintenance Features:

  • Periodic Inspection: The manual explicitly states that bolts may loosen during normal everyday use. Users are advised to periodically inspect and re-tighten all hardware to prevent damage or injury. This is a crucial maintenance step to ensure the long-term safety and stability of the table.
  • Cleaning: While not explicitly detailed, the "scratching the finish" warning during assembly implies that the table has a finished surface that should be protected. General furniture cleaning practices would likely apply.

Assembly Process Overview:

The assembly process is broken down into five distinct steps:

  1. Leg Frame Assembly (Step 1): Two pairs of metal legs (P2) are assembled together to form two separate leg frames. This step involves connecting two P2 units using bolts (H1), lock washers (H2), and flat washers (H3). The instructions emphasize assembling one end first before proceeding to the other.
  2. Connecting Leg Frames (Step 2): The two leg frames created in Step 1 are then connected to each other to form the complete base structure. This step uses additional bolts (H1), lock washers (H2), and flat washers (H3). Again, the "assemble one end first" advice is repeated.
  3. Attaching Legs to Table Top (Step 3): The assembled metal leg structure is attached to the underside of the table top (P1). This step utilizes the remaining bolts (H1), lock washers (H2), and flat washers (H3).
  4. Installing Adjustable Levelers (Step 4): The four adjustable levelers (H5) are screwed into the bottom of the table's legs. These levelers are crucial for stabilizing the table on uneven surfaces.
  5. Final Adjustments and Completion (Step 5):
    • The table is turned upright.
    • The adjustable levelers (H5) are adjusted as needed to eliminate any gaps between the legs and the floor, ensuring the table is level and stable.
    • Once leveled, the assembly is considered complete.

Important Safety and Pre-Assembly Instructions:

  • Read Instructions: Users are instructed to read all instructions carefully before beginning assembly.
  • Two-Person Assembly: Assembly by two or more adults is recommended for safety and ease.
  • Retain Instructions: Users should keep the instructions for future reference, particularly for maintenance.
  • Do Not Discard Contents: All packaging contents should be kept until assembly is complete to avoid accidentally discarding small parts or hardware.
  • Unpack Carefully: All parts and hardware should be taken out of the box before starting.
  • Soft Surface Assembly: Assembly should be performed on a flat, soft surface (e.g., carpet or cloth) to prevent scratching the table's finish.

The Mila Coffee Table is designed as a user-assembled piece of furniture, emphasizing ease of assembly with clear, step-by-step instructions and a focus on stability through adjustable levelers. Regular maintenance, specifically re-tightening bolts, is highlighted as essential for safety and longevity.

INK+IVY MILA Specifications

General IconGeneral
BrandINK+IVY
ModelMILA
CategoryIndoor Furnishing
LanguageEnglish

Related product manuals