FIND YOUR USER GUIDE ONLINE!
Go to www.insigniaproducts.com, then click
Support & Service.
Enter NS-HBTSS116 in the box under Manual,
Firmware, Drivers & Product Information, then click ►.
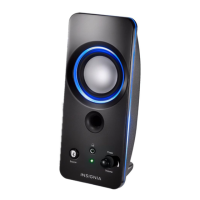
QUICK SETUP GUIDE
Bluetooth
Shelf
Speakers
NSHBTSS116
Remote control
CONNECT THE SPEAKERS
Connect the power cable
Plug the power cable into a power outlet or surge
protector.
Connect the speakers
Speakers are connected using the speaker wire that is
provided. Connect the red wire to the red (+) terminals
and the black wire to the black (-) terminals. Use enough
wire to position the speakers where you want them.
21. The battery (battery or batteries of battery pack) shall not be exposed to excessive
heat such as sunshine, re or the like.
22.
WARNING
DO NOT INGEST BATTERY, CHEMICAL BURN HAZARD
[The remote control supplied with] This product contains a coin/button cell battery. If
the coin/button cell battery is swallowed, it can cause severe internal burns in just 2
hours and can lead to death.
Keep new and used batteries away from children. If the battery compartment does not
close securely, stop using the product and keep it away from children.
If you think batteries might have been swallowed or placed inside any part of the
body, seek immediate medical attention.
PACKAGE CONTENTS
• Speakers (2)
• 3.5 mm cable (included)
• RCA input cable
• Speaker Wire
• Remote control with batteries
• Output Power (RMS): 25 W x 2
• Quick Setup Guide
FEATURES
• Wirelessly stream from any Bluetooth device
• Volume, treble, and bass controls on the side panel
• NFC for easy Bluetooth paring
• High ecient energy saving design for low power
consumption
IMPORTANT SAFETY INSTRUCTIONS
1. Read these instructions – All the safety and operating instructions should be read
before this product is operated.
2. Keep these instructions – The safety and operating instructions should be retained
for future reference.
3. Heed all warnings – All warnings on the appliance and in the operating instructions
should be adhered to.
4. Follow all instructions – All operating and use instructions should be followed.
5. Do not use this apparatus near water – The appliance should not be used near water
or moisture – for example, in a wet basement or near a swimming pool, and the like.
6. Clean only with dry cloth.
7. Do not block any ventilation openings. Install in accordance with the manufacture’s
instructions.
8. Do not install near any heat sources such as radiators, heat registers, stoves, or other
apparatus (including ampliers) that produce heat.
9. Do not defeat the safety purpose of the polarized or grounding plug. A polarized plug
has two blades with one wider than the other. A grounding plug has two blades and
a third grounding prong. The wide blade or the third prong is provided for your safety.
If the provided plug does not t into your outlet, consult an electrician for
replacement of the obsolete outlet.
10. Protect the power cord from being walked on or pinched particularly at the plugs,
convenience receptacles, and at the point where they exit from the apparatus.
11. Only use attachments/accessories specied by the manufacturer.
12. Use only with the cart, stand, tripod, bracket, or table specied by
the manufacturer, or sold with the apparatus. When a cart or rack is
used, use caution when moving the cart/apparatus combination to
avoid injury from tip-over.
13. Unplug the apparatus during lightning storms or when unused for long periods of
time.
14. Refer all servicing to qualied personnel. Servicing is required when the apparatus
has been damaged in any way, such as power supply cord or plug is damaged, liquid
has been spilled or objects have fallen into the apparatus has been exposed to rain or
moisture, does not operate normally, or has been dropped.
• Never expose the product to re as this could result in personal injury.
• Do not store the product in an extremely cold or warm environment.
• Never dismantle the product.
• Never let children play with the product.
• Do not expose the product to dampness or moisture.
• The product should not be exposed to dripping or splashing.
15. Do not install this equipment in a conned or building-in space such as a book case or
similar unit, and remain a well ventilation conditions. The ventilation should not be
impeded by covering the ventilation openings with items such as newspaper,
table-cloths, curtains etc.
16. WARNING: To reduce the risk of re or electric shock, do not expose this apparatus to
rain or moisture. The apparatus shall not be exposed to dripping or splashing and that
objects lled with liquids, such as vases, shall not be placed on apparatus.
17. WARNING: The mains plug is used as disconnect device, the disconnect device shall
remain readily operable.
18. This equipment is a Class II or double insulated electrical appliance.
It has been designed in such a way that it does not require a safety
connection to electrical earth.
19. This lightning ash with arrowhead symbol within an equilateral triangle is intended
to alert the user to the presence of non-insulated “dangerous voltage” within the
product’s enclosure that may be of sucient magnitude to constitute a risk of electric
shock.
- Warning: To reduce the risk of electric shock, do not remove cover (or back) as there
are no user-serviceable parts inside. Refer servicing to qualied personnel.
- The exclamation point within an equilateral triangle is intended to alert the user to
the presence of important operating and maintenance instructions in the literature
accompanying the appliance.
20. The equipment shall be used at maximum 35 degree C ambient temperature.
# ITEM
1 Volume/Source knob
2 Treble knob
3 Bass knob
4 On/O switch
5 Indicator LED
DESCRIPTION
Switch mode and control the volume.
Press repeatedly to cycle through the available
modes (AUX [default], RCA, and Bluetooth).
Hold down to turn on standby mode.
Adjusts the treble level.
Adjusts the bass level.
Turns the power on or o.
Indicates the mode (Standby, AUX, and RCA) and
pairing status of the speakers.
POWER
MUTE
VOL
AUX
RCA
SOURCE
Before using your new product, please read
these instructions to prevent any damage.
# ITEM
1 POWER
2 AUX
3 Previous
4 MUTE
5 RCA
6 Bluetooth mode
7 Next
8 Play/Pause
9 VOL +
10 VOL -
DESCRIPTION
Press to turn on standby mode.
Press to enter AUX mode. The green LED indicator
light blinks slowly.
Press to select the previous song while in Bluetooth
mode.
Press to mute or unmute the sound.
Press to enter RCA mode. The green LED indicator
lights solid.
Press to enter Bluetooth mode. The blue LED
indicator turns on. When in Bluetooth mode, press
and hold to enter pairing mode.
Press to select next song while in Bluetooth mode.
Press to play/pause while in Bluetooth mode.
Turns the volume up.
Turns the volume down.
Power cable
Speaker Wire
USB 5V 1A
120V~ 60Hz
0.6A
INPUT
L SPEAKER
OUTPUT
AUX
OUTPUT
SUB
L
R
RCA
NSHBTSS116RC
Standby/source
CAUTION
RISK OF ELECTRIC SHOCK
DO NOT OPEN
WARNING: SHOCK HAZARD. DO NOT OPEN
AVIS:RISQUE DE CHOCELECTRIQUE, NEPAS OUVRIR