An imminently hazardous situation, which, if not avoided, will result in death or serious injury.
A potentially hazardous situation, which, if not avoided, could result in death or serious injury.
A potentially hazardous situation, which, if not avoided, may result in minor or moderate injury.
B
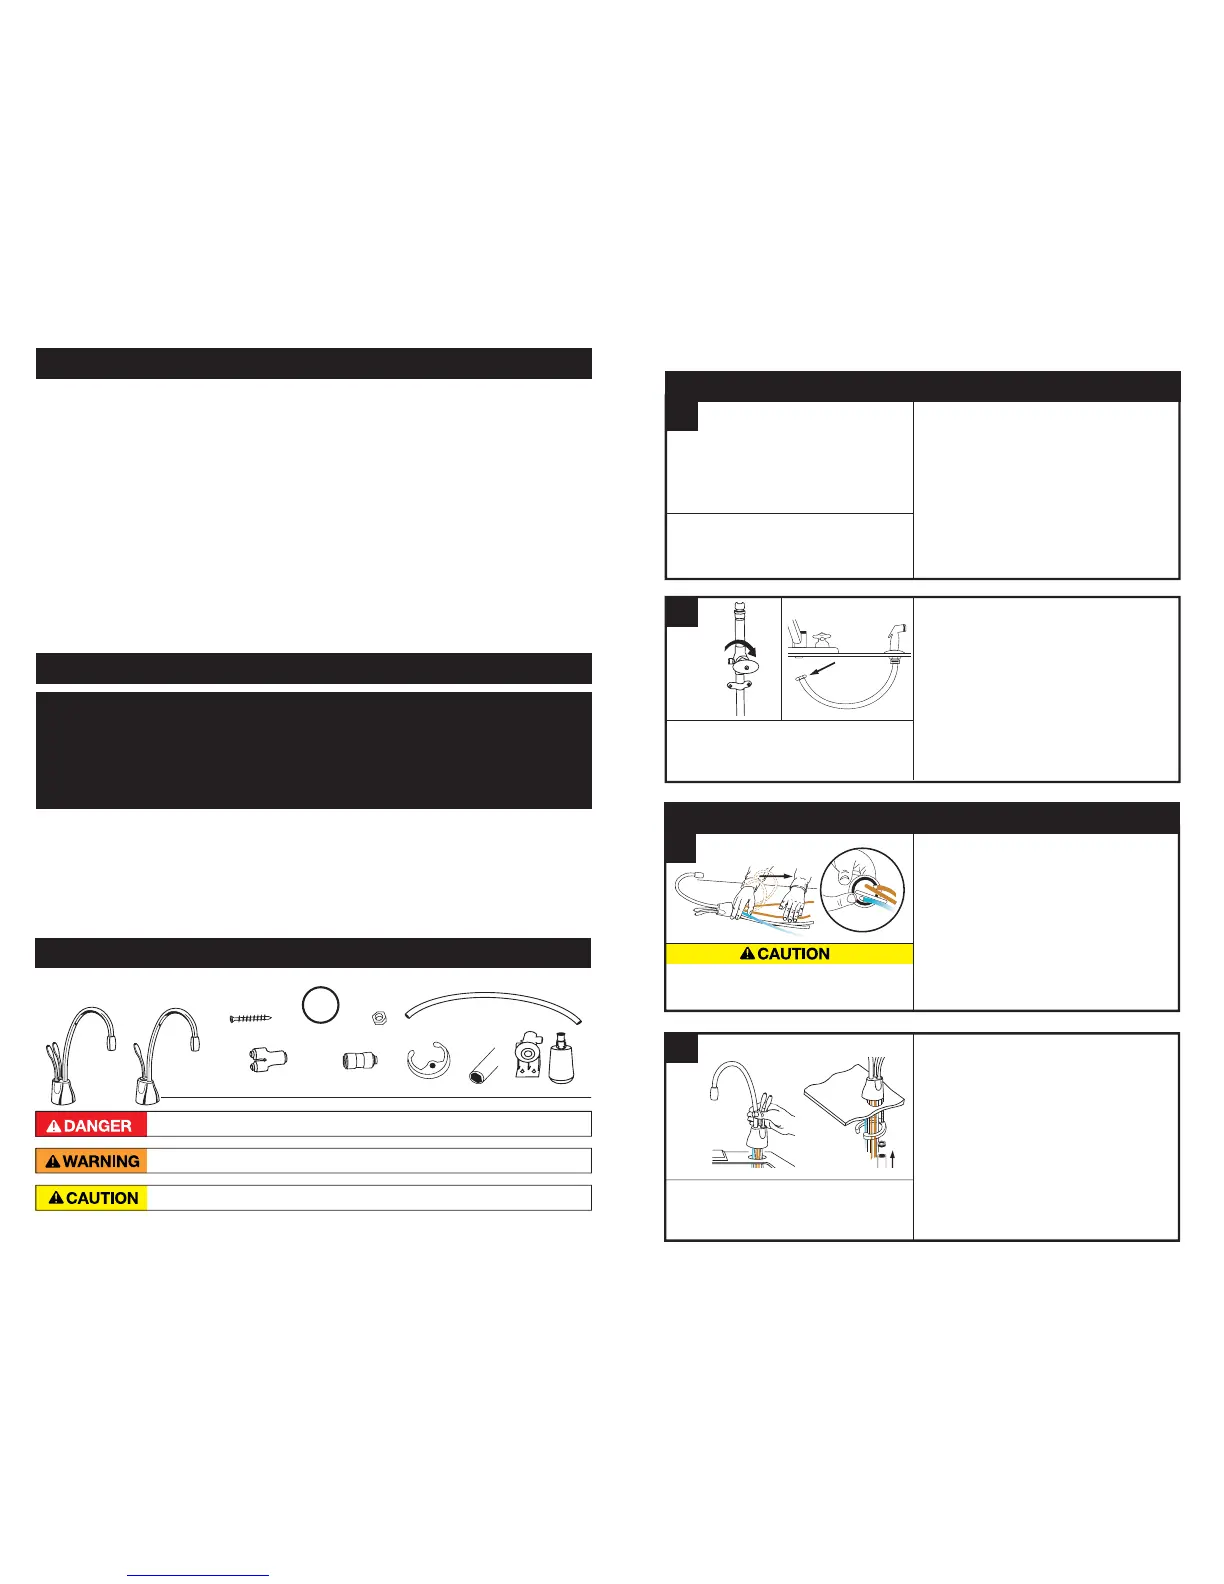
IN THIS PACKAGE
(# '.
NN8IJUF5VCFT
NN4DSFXT
3VCCFS03JOH
i:u2VJDL$POOFDUPS
'JMUFS4ZTUFN
4FNJDJSDVMBS
.PVOUJOH1MBUF
)FY5PPM
2VJDL$POOFDUPST
)FY/VU
GPS)$0OMZ 4VQQMJFE
■ For your satisfaction and safety, read all instructions, cautions, warnings and dangers before installing
or using this steaming hot water tap.
■ This particular unit is not intended for commercial use.
■ Make sure that all electrical wiring and connections conform to local codes.
■ A standard, earth (grounded) electrical outlet is required under the sink for the tap’s electrical power.
■ The wall outlet powering your tap must have electrical power supplied to it continuously.
■ This outlet must be fused and should not be controlled by the same wall switch that operates the
food waste disposer. Fuse/circuit breaker required is 10 amp for 230 volt and 15 amp for 120 volt.
■ To ensure proper operation, this unit is not intended to be flushed with chlorine. If you suspect elevated
levels of chlorine in your water, it is recommended to use our water filtration system.
■ To prevent damage or unit not operating properly, the water pressure must be between 172 kPa - 862 kPa
(1.7 bar - 8.6 bar; 25 psi - 125 psi). Ambient (room) temperature between 1ºC and 38ºC.
■ Moving parts inside the tank causing a rattling noise is normal.
■ If the supply cord is damaged, it must be replaced by the manufacturer, its service agent or similarly
qualified persons in order to avoid a hazard.
WHAT YOU SHOULD KNOW BEFORE YOU BEGIN
■ Phillips and flat blade screwdrivers
■ Pencil
■ Tape Measure
■ Level
Equipment You May Need:
Equipment Required:
■ Drill
■ Compression fitting,
T-fitting or saddle valve
■ Adjustable wrench
■ Hole punch
If you intend to use the sprayer hole in the sink for the hot water tap, you may need a 3.18mm plug or a
6.35mm cap (not supplied) for the sink spray hose line. See Step 1-B. If you need to cut a mounting hole in the
stainless steel sink, you may need a hole punch or a 35mm - 38mm hole saw made for cutting stainless steel.
WHAT YOU NEED TO GET STARTED
Property Damage: Do not pinch or break copper
tubing. Do not distort the last 25mm of tubing.
■ Feed tubes down through the hole
in the sink or countertop until the
base is at rest.
■ From under the sink, place the
semi-circular mounting plate and hex
nut onto the threaded stud. Ensure
tap head is at desired angle.
■ Insert screwdriver into hole on side of
hex tool (creating a “T”), and use tool
to tighten nut and secure tap.
■
Unpack hot water tap components.
■
On a firm, flat surface, carefully
straighten the copper tubing.
■ Ensure that the black O-ring is
properly seated in the base of
the tap head (the groove on the
underside of the tap).
B
An assistant may be needed to hold the tap
in place while securing.
2
A
INSTALLING THE TAP
PREPARATION
START HERE
PROPER INSTALLATION SHOULD TAKE ABOUT 2-4 HOURS
■ Identify locations for the tap, tank
and filter (if applicable).
■ Check to make sure there is proper
clearance (see chart at left) for tap
handles to be fully opened.
■ Check to make sure counter is not
too thick (see chart at left).
■ Make sure there is an earth (grounded)
electrical outlet under the sink.
■ If using the sink sprayer hose hole,
remove nut that connects sprayer
hose at bottom of tap.
■ Using adjustable wrench, remove nut
connecting sprayer washer flange in
sprayer hole.
■ Close hose opening with either a
plug or a cap (not supplied).
1
The wall outlet for the tap must have power
supplied to it continuously and must be fused.
It should not be controlled by the same wall
switch that operates the food waste disposer.
HC1100 ...... 100mm ...............76mm
GN1100 ...... 110mm ...............76mm
If you have to drill through sink or
countertop, you may need to rent or
purchase the appropriate tools.
Required minimum from
center of hole to wall
Maximum counter
thickness (depth)
2
A
■ Phillips and flat blade screwdrivers
■ Pencil
■ Tape Measure
■ Level