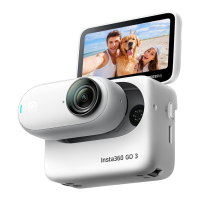
GO 3 User Manual
Place GO 3 camera inside the Action Pod and connect the charging cable to the Action Pod. While
charging, both the camera and the Action Pod's indicator light will be solid red. The corresponding
indicator light will turn off when the device is fully charged. Once both indicator lights turn off, both
devices are fully charged.
Note: It is recommended to use a dedicated charger for GO 3. If it's connected to a USB port on a
computer or other portable power source, there may be an insufficient power supply to charge the camera
and Action Pod simultaneously.
Activation
You need to activate GO 3 in the Insta360 app before using it for the first time.
Steps:
1. Click here to download the Insta360 app. Alternatively, search "Insta360" in the App Store or Google
Play Store to download the Insta360 app.
2. Press the Power Button to turn on GO 3.
3. Enable Wi-Fi and Bluetooth on your smartphone.
4. Open the Insta360 app and click the camera icon at the bottom of the page [icon]. Select the device
you want to connect to in the pop-up window, then follow the on-screen instructions to complete the
connection. The name of your camera is "GO 3 ******" by default, where ****** is the last six digits of the
serial number on the box your GO 3 came in. The first time you connect to GO 3, you will need to confirm
the connection on the Action Pod screen.
5. After successfully connecting the camera, follow the on-screen instructions to activate your camera.
The app will prompt you to update the firmware if there is a new version available. Please follow the
on-screen prompts to update the firmware of GO 3 and the Action Pod.