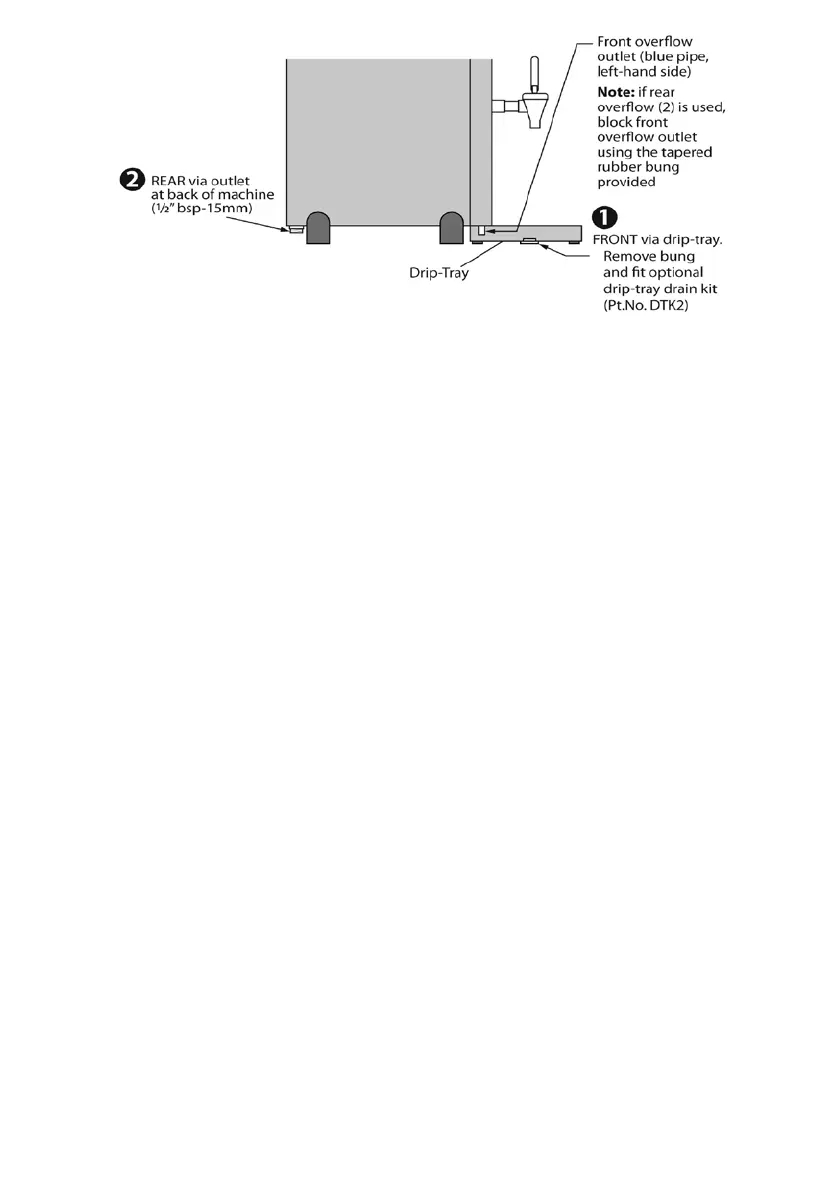
IMPORTANT: Whichever overow connection
is chosen, the diameter of the pipe used must
be no less than 15mm.
Failure to connect the overow-outlet to
a permanent waste or drain, could lead to
property damage from ooding.
If in all circumstances, it is absolutely not
possible to direct the boiler overow-outlet to a
permanent waste or drain, then the mains water
supply to the boiler should be isolated and the
unit switched o whenever it is left unattended
for long periods (e.g. overnight).
Whilst every reasonable precaution is taken
to prevent an overflow, Instanta cannot be
held responsible for any damage caused as a
result of incorrect installation or blockage of
the overflow or failure to direct the overflow
to a safe outlet.
Operation
First use (once water and electrical connections
have been made);
• Switch boiler on. The screen will light up red
and will run through an initial self-diagnostic
check before starting to ll with water
(screen reads; “NOT READY FILLING”).
• Once primed with water, the boiler will
begin to heat (screen reads; “NOT READY
HEATING”).
• When the correct temperature has been
reached, the display will change from Red to
White and will simply read “READY”.
• The boiler will then continue in a heat/ll
cycle until the tank is at full capacity.
(During the heat/ll cycle, small amounts of
water are added to ensure the water at the
tap is always at the correct temperature).
IMPORTANT NOTE: In normal daily use, the
boiler may be used as soon as the “READY”
message is displayed, but on rst install, wait at
least 15 minutes before starting to use.
• Drain o approximately 10 litres of water
(to ush the new lter cartridge through).
• The boiler is now ready for use.
Set Clock Time (24h) & Day:
• Enter USER set-up menu by rst switching
boiler o.
• Press & hold ON/OFF button for
approximately 7 seconds (display will
illuminate Yellow and screen will read
“USER PROG”, before showing “HOUR”.
• Press & hold ON/OFF button (long push)
so screen displays hour.
• To change the hour setting, press ON/OFF
button (short pushes) until correct hour is
displayed.
• To save, press ECO button (short push
& release).
• Press ON/OFF button again to advance
screen to “MIN”. Again press & hold button
(long push) so screen displays minutes.
• Set “minutes” using short pushes of button
as above and save by pressing ECO button.
4