The technical characteristics must correspond to those indicated in the paragraph on the
technical specification of the machine. The use of heavier batteries could seriously
jeopardise manoeuvrability and lead to the brush motor overheating. Batteries with a
lower capacity and weight will require recharging more frequently.
They must be kept charged, dry and clean and the connections must be tight.
i INFORMATION
Follow the instructions below to set the type of battery installed on the machine's logic
board.
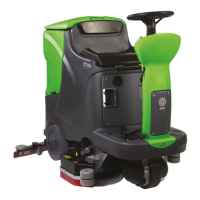
1. Switch off the machine by turning the key switch (fig. A, ref. 1) to the 0 position.
2. Press the emergency button (fig. A ref. 10) (red light on).
3. Hold the buttons (fig. A, ref. 2) down and simultaneously press the emergency
button (fig. A, ref. 10) (red light off). Keep the buttons pressed (fig. A, ref. 2) until
"tip A", "tip G" appears on the display.
4. Use the button (fig. A, ref. 3) to select the type of batteries installed: "tip A" wet
batteries, "tip G" gel batteries.
5. Memorise the parameter by pressing the emergency button (fig. A ref. 10).
5.4.1. Batteries: preparation
! DANGER
During installation of the batteries or any type of battery maintenance, the operator
must be provided with the necessary personal protection devices (gloves, goggles
overalls, etc) to limit the risk of accident. Keep away from naked flames, avoid
short circuiting the battery poles, avoid sparks and do not smoke.
The batteries are normally supplied filled with acid and ready for use.
If the batteries are dry, before mounting them on the machine, proceed as follows:
• remove the caps and fill all elements with specific sulphuric acid solution until the
plates are entirely covered (this requires at least a couple of passes for each element);
• leave for 4-5 hours to allow the air bubbles to come to the surface and the plates to
absorb the electrolyte;
• make sure the level of electrolyte is still above the plates and if necessary top up with
sulphuric acid solution;
• close the caps;
• mount the batteries on the machine (following the procedure described below).
Before starting up the machine for the first time, charge the batteries as follows.
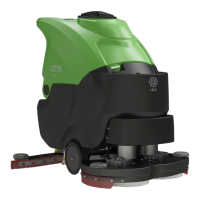
5.4.2. Batteries: installation and connection
! DANGER
Check that all switches on the control panel are in the "0" (off) position.
Make sure you connect the terminals marked with a "+" to the positive poles of the
battery. Do not check the battery charge by sparking.
Meticulously follow the instructions given below as short circuiting the batteries
could cause them to explode.
1) Make sure the two tanks are empty (if necessary, empty them. See the relevant
paragraph).
2) Raise the solution tank and tilt it backwards ACCOMPANYING IT through about 90°.
This provides access to the battery compartment from above.
3) Place the batteries in the battery compartment.
IMPORTANT
Mount the batteries on the machine using means suitable for their weight.
The positive and negative poles have different diameters.