Page 10 of 16 IRIS Touch Quick Installation & Maintenance Guide Version 1.1
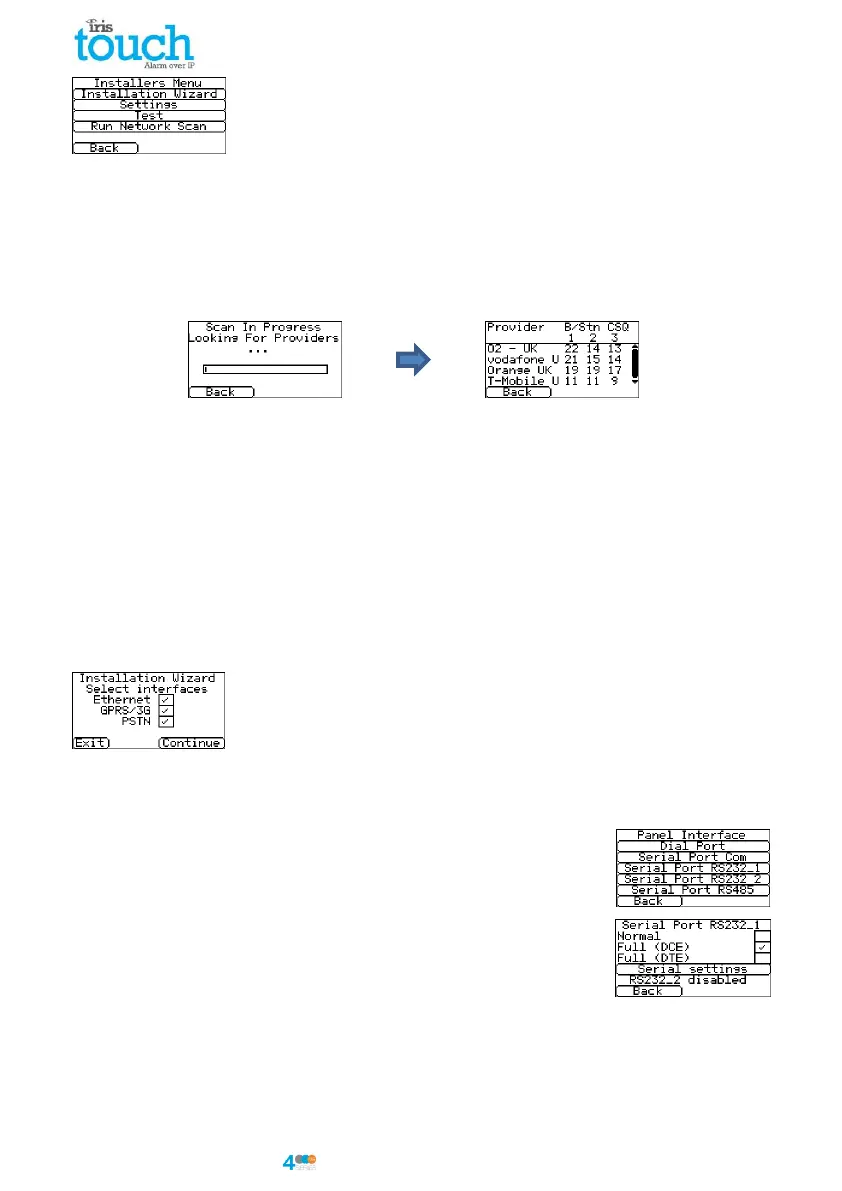
The Main Menu is displayed.
IRIS Touch 400NG or 440NG with GPRS/3G connection:
GPRS/3G Network Scan
Select the ‘Run Network Scan’.
The scan must be carried out without the SIM card fitted.
The dialler listens for every base station in range, requests operator name and records the signal strength.
This will take a few minutes to complete.
For a reliable GPRS/3G connection it is recommended that for the chosen network (SIM card) used there
should be at least two base stations with signal strength (CSQ) of 10 or more.
If the signal strength is below or close to minimum then try to reposition the antenna/IRIS Touch dialler in
different location or you can use an external building or high gain antenna (if necessary), and rerun the
network scan to check signal strength.
Once you have the required GPRS/3G signal strength power down the dialler and insert the SIM card into
the SIM card holder, then power the dialler back up.
Go back into the ‘Installers Menu’ and enter in the installer code that you had setup beforehand and then
select the Installation Wizard as indicated next.
IRIS Touch 420NG or 440NG without GPRS/3G or after network scan completed:
Installation Wizard
Select the Installation Wizard and follow the on screen prompts.
Once you have completed the Installation Wizard and setup any additional panel
interface configuration via the settings menu you will need to check / configure
the panel for the connection method you are using:
Panel Interface
RS232 DCE
Using the RS232 DCE header to connect to the SPC panel for an
upload/download connection then perform the following:
Go into the ‘Installers Menu’ and enter in the installer code that you had setup
beforehand and then select the ‘Settings’ Menu.
Then scroll down till you see the option for ‘Panel Interface’ and select this
option, you will see the following screen:
Now select the option for ‘Serial Port RS232_1’ then ‘Configuration’ and select
‘Full (DCE)’.
Note: You will need to ensure that the Monitoring station (ARC) have setup the correct account details
using a Remote Service Template with the correct Panel Config for SPC. Please contact Chiron Technical
support for more information if needed.