Do you have a question about the iRobot CREATE and is the answer not in the manual?
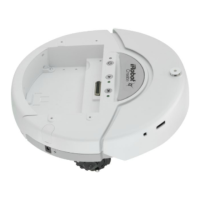
Diagram illustrating the top components and features of the iRobot Create.
Overview of the robot's physical buttons and indicator lights.
Diagram showing the underside components like cliff sensors and battery access.
Details and beep patterns for ten built-in robot behavior demonstrations.
Instructions on how to start demos using the Open Interface serial protocol.
Details on connecting and sending commands to the robot via a PC serial connection.
Explanation of how to load scripts onto iRobot Create using command 152.
Instructions for executing loaded scripts on iRobot Create using command 153.
Details on the Virtual Wall accessory and its use in demos like Home and Tag.
The iRobot Create is a comprehensive robot development kit designed for users to program new robot behaviors without the complexities of mechanical assembly or low-level coding. It provides an Open Interface (OI) with a set of commands, including "drive," demo, song, and sensor commands, encouraging user inventiveness. This allows for the development of new behaviors and the integration of third-party electronics, all while maintaining mechanical robustness and low-level control.
The iRobot Create serves as a programmable robotic platform. It can be controlled via a serial connection from a PC or a microprocessor, such as the iRobot Command Module. Users can attach and control various external hardware and electronic devices, including robotic arms, light displays, or ranging sensors. The device can also function as a musical instrument, allowing users to write and save up to 16 songs using the Song command. The Open Interface (OI) provides a serial protocol for controlling the robot and reading its sensors, encompassing demo, driving, song, sensor, cargo bay connector, and scripting commands.
The iRobot Create is designed for indoor use. It comes with ten built-in demos to inspire programming ideas. To select a demo, users press the Advance button, and the robot beeps the demo number (one long, low beep equals five short, high beeps). The Advance LED blinks in the same pattern while a demo is running or paused. Pressing the Play button starts the selected demo, and pressing it again or the Advance button stops it.
The robot can be powered by an included alkaline battery pack (requiring 12 non-rechargeable "AA" batteries) or iRobot rechargeable batteries (available for purchase separately). The power light indicates the battery charge state: green for fully charged/new, gradually turning red as batteries discharge. Slow pulsing orange indicates charging, fast pulsing orange indicates reconditioning charge, amber for partially discharged, red for almost fully discharged, and flashing red for fully discharged. It's crucial to use only alkaline batteries in the alkaline pack and iRobot rechargeable batteries with their respective chargers to avoid damage.
The iRobot Create features wheel clips that hold its main wheels in a Retracted position for greater stability, especially with payloads. Removing these clips places the wheels in a Released position for increased mobility over uneven surfaces. An additional unattached fourth wheel can be added for enhanced stability and to prevent dragging when payloads are attached. This wheel slides into grooves at the back of the robot and clicks into place. The robot also includes a tailgate where users can add weight (e.g., pennies) to adjust the center of gravity, which is useful when carrying payloads.
The Cargo Bay Connector, located at the front middle of the cargo bay, provides 25 labeled pins for attaching external electronics and peripheral devices like sensors, lights, or motors. These pins offer digital inputs, an analog input, digital outputs, low-side driver outputs, a charging indicator, power toggle, serial Tx and Rx, a 5V reference, battery ground, and battery voltage.
Users can send OI commands from a PC by connecting the serial cable between the iRobot Create and the PC's serial port, then using a serial terminal program (like RealTerm). Serial settings should be configured to 57600 baud, 8 data bits, 1 stop bit, and no flow control. Commands can also be sent from a microprocessor, such as the iRobot Command Module, which plugs into the Cargo Bay Connector and allows for C or C++ programming to control the robot and read sensor data. The Command Module also offers four DB-9 expansion ports for custom hardware.
The iRobot Create supports a simple scripting language, allowing users to create sequences of commands, including drive commands and commands that wait for events (button press, elapsed time, sensor trigger). Scripts are loaded using the Script command (152) followed by the number of bytes and the command series. Once loaded, the Play Script command (153) executes the script.
The iRobot Create has built-in safety sensors to prevent falls down stairs and collisions with walls. Users are advised not to disable these sensors. For battery maintenance, always remove the battery before long-term storage or transportation. Charge the device indoors using only the manufacturer-supplied charger and a standard U.S. (120V AC) outlet. Avoid using power converters, as they will void the warranty. The power supply may be protected with a surge protector during electrical storms. Never handle chargers with wet hands.
Troubleshooting guidance is provided for common issues indicated by blinking Play and Advance lights and specific beep patterns. For instance, if a wheel is stuck, the robot will beep "uh-oh" with no subsequent beeps, prompting the user to pick up the robot and place it securely on the floor. If cliff sensors fail or are blocked, users are instructed to turn the robot over and clear debris. For optimal battery performance with rechargeable batteries, charge them overnight before first use, and keep the robot powered off, plugged in, or charging on the Home Base when not in use. A special 16-hour reconditioning charge cycle is initiated if the robot is left off and not charging for an extended period, indicated by a quickly pulsing power light.
| Battery Type | NiMH |
|---|---|
| Charging Time | 3 hours |
| Power Source | Rechargeable Battery |
| Communication | Serial Port |
| Sensors | Bump Sensors, Cliff Sensors |
| Programmability | Yes |
| Battery Life | 1.5 hours |
| Connectivity | Serial Cable |
| Operating System Compatibility | Platform independent (requires serial communication) |