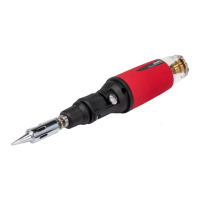
1. RemoveTipAssembly
2. UnscrewNozzle Assembly (A) fromtheTorch Body (C).
(Fig.10)Pliersmaybeusedtolightlygrasptheshankinorderto
loosenit.DonotgraspandturntheCeramic Head. (D)
3.CarefullyremoveOrice connector (B)byliftingitoutofthe
torchbody.NotethattheshortersideofOriceConnectorts
intotheTorchBody.
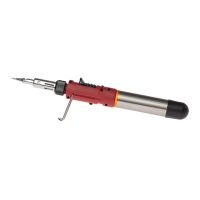
CHANGING TIPS
12
1. Besurethetiphascooledbefore
removal.
2. UnscrewTipAssemblywitha
counterclockwisemotion.(Fig.9)Pliers
mayberequiredtolightlygraspthe
Knurled Nutinordertoloosenthetip.
3. Replacewithdesiredtip.Becarefulnot
toovertightenasthiscoulddamagethe
threadinthecap.
Fig.9
Fig.10
13
Nozzle Assembly
CHANGING TIPS
Knurled
Nut
WARNING: The catalyst inside the
soldering tip is very delicate and
will not sustain mechanical abuse
without serious damage.
CLEANING OR
REPLACING NOZZLE
ASSEMBLY