Do you have a question about the Jabra PRO 9465 DUO and is the answer not in the manual?
Lists necessary Jabra Link, DHSG cable, and Aastra phone firmware for connection.
Details plugging RJ9 and RJ45 connectors from Aastra DHSG cord into headset socket and expansion module, and connecting cables to RJ45 adapter.
Explains connecting the DHSG cable's split end to the Jabra base's phone and AUX sockets.
Guides through the Jabra touch screen setup: selecting Phone settings and Connect to desk phone.
Details selecting 'Manual' setup and 'DHSG' adapter type on the Jabra device interface.
Covers setting the phone setup switch to 'A' and recommended microphone volume.
Explains configuring audio path via setup server and setting audio mode to Headset/Speaker.
Describes activating DHSG mode via configuration files and notes about remote call control limitations.
This document outlines the connection and setup procedure for the Jabra Pro 9465 Duo headset with Aastra 6753i, 6755i, and 6757i series phones. The primary function of this setup is to enable remote call control and integrated audio for users of these specific Aastra phone models, enhancing productivity and communication flexibility.
The core functionality revolves around the Digital Headset Signaling Group (DHSG) standard, which allows the headset to communicate directly with the phone for functions like answering/ending calls, adjusting volume, and muting the microphone, all without needing to physically interact with the phone itself. This integration provides a seamless user experience, particularly for professionals who spend significant time on calls.
To achieve this integration, specific components are required: the Jabra Link 14201-10 cable and a DHSG connection cable from Aastra. The Aastra phones must also be running firmware version 2.5.1.2000 or later to ensure compatibility with the DHSG functionality.
The connection process begins by physically linking the Aastra DHSG cord to the Jabra headset base and the Aastra phone. The DHSG cord has a split end with two connectors: an RJ9 connector (typically green) and an RJ45 connector (typically yellow). The RJ9 connector plugs into the headset socket on the Aastra phone, while the RJ45 connector plugs into the socket designated for the expansion module on the phone. This establishes the initial physical connection between the headset and the phone's signaling system.
Next, the single end of the Aastra DHSG cord (usually blue) connects to an RJ45 adapter. The Jabra Link 14201-10 cable (also typically blue) then plugs into the remaining free socket on the same RJ45 adapter. This adapter acts as a bridge, consolidating the connections from both the Aastra DHSG cord and the Jabra Link cable into a single interface that connects to the Jabra device base.
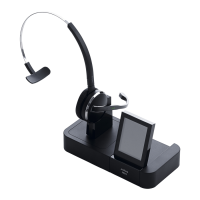
Once the physical connections are established, the setup proceeds to the Jabra device base. The split end of the DHSG cable connects to the Jabra base. Specifically, the RJ9 connector plugs into the socket marked with a "phone" symbol, indicating its role in handling call audio and control signals. The RJ45 connector, on the other hand, plugs into the socket labeled "AUX," which typically handles auxiliary data or control signals. This completes the physical wiring, creating a complete circuit between the Aastra phone, the Jabra Link cable, and the Jabra headset base.
Following the physical setup, the user must configure the Jabra device through its touch screen interface. This involves navigating through a series of menu options to ensure the headset is correctly recognized and configured for the specific phone system. The first step on the touch screen is to select "Phone settings," which leads to options related to phone integration. Within these settings, the user then selects "Connect to a desk phone," indicating the intention to pair the headset with a traditional desk phone rather than a softphone or other communication device.
The next step in the touch screen configuration is to choose "Manual" setup. While a "guided" option might be available, selecting "Manual" allows for precise control over the setup parameters, which is crucial for ensuring optimal performance with specific phone models and configurations. After selecting "Manual," the user is prompted to select the adapter type. Here, "DHSG" must be chosen, confirming that the headset will communicate with the phone using the Digital Headset Signaling Group protocol. This selection is critical for enabling features like remote call control.
A crucial part of the setup involves setting the phone setup switch on the Jabra base to position "A." This physical switch often adjusts the electrical signaling to match different phone systems, and setting it to the correct position is essential for proper operation and clear audio. Incorrect switch settings can lead to issues like no dial tone, distorted audio, or inability to control calls remotely.
Finally, the microphone volume needs to be adjusted. The document recommends setting the microphone volume to "7 out of 13." This is a suggested starting point, and users may need to fine-tune this setting based on their environment, speaking volume, and the preferences of the people they communicate with. Proper microphone volume ensures that the user's voice is transmitted clearly without being too loud or too soft.
Beyond the initial setup, the document also highlights additional configuration steps and important notes. For optimal audio path configuration, users can dial into their local Jabra setup server. This server can automatically configure the audio path, simplifying the process. If the server is unavailable, users are advised to contact their local Jabra Support team for assistance.
For Aastra phones running firmware version 2.5.1.2000, a specific command is required to activate DHSG mode, as it is deactivated by default. Users need to use "Aastra.cfg" or "mac.cfg" and issue the command "dhsg:1" to enable this functionality. This command ensures that the phone is ready to send and receive DHSG signals, allowing the headset to function correctly.
Another important setting on the Aastra phone is to set the Audio mode to "Headset/Speaker." This is typically found under "Options > Default settings > Audio settings > Audio mode." By selecting "Headset/Speaker," the phone prioritizes audio output to the connected headset when in use, ensuring that calls are routed correctly.
A significant note is that there is no option for remote call control when using an expansion keypad. This limitation means that while the headset provides remote control capabilities for the primary phone functions, these capabilities do not extend to any additional features or lines managed by an expansion keypad. Users should be aware of this limitation when planning their communication setup.
In terms of maintenance, the primary focus is on ensuring the correct physical connections remain secure and that the firmware on the Aastra phone is up to date. Regular checks of the cables for wear and tear can prevent connection issues. Keeping the phone firmware updated ensures compatibility with the latest headset features and bug fixes. The Jabra device itself is designed for durability, and its touch screen interface provides clear guidance for any necessary adjustments or troubleshooting. The recommendation to contact Jabra Support for server issues also points to a robust support system for maintaining optimal performance.
The overall usage features emphasize convenience and efficiency. Remote call control allows users to move freely around their workspace while on calls, improving flexibility. The integrated audio ensures clear communication, and the ability to adjust microphone volume directly from the headset or base provides immediate control over the user's outgoing voice. The step-by-step instructions, both for physical connection and touch screen configuration, are designed to guide the user through the setup process, minimizing potential errors. The specific requirements for firmware and adapter types underscore the precision needed for successful integration.
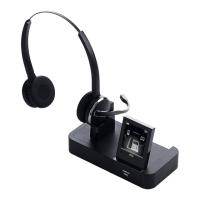
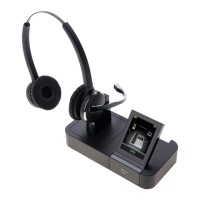
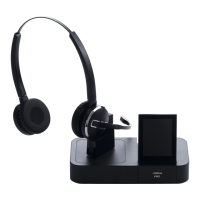
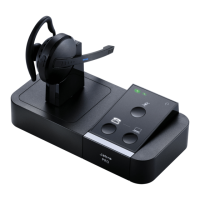
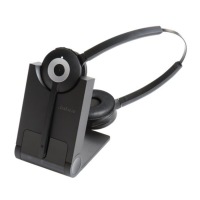
| Headset type | Binaural |
|---|---|
| Product type | Headset |
| Product color | Black |
| Wearing style | Head-band |
| Recommended usage | Office/Call center |
| Wireless range | 137 m |
| Connectivity technology | Wireless |
| Impedance | - Ω |
| Magnet type | - |
| Ear coupling | Supraaural |
| Headphone frequency | - Hz |