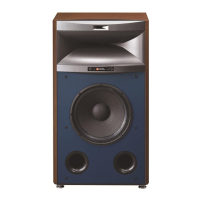
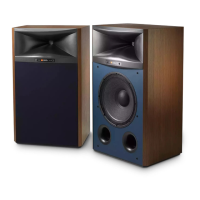
oport
bracket
is
secured
with
a
clamp to the front-to-rear brace
;he
4350 enclosure. Removal is accomplished by
unbolting
j clamp
from
the enclosure brace, taking out the four
screws
'•ng
through
the baffle panel to the horn flange,
and
lifting
^.ver/horn/bracket assembly
from
the enclosure The horn
d bracket can then be unbolted
from
the compression
ver
Caution
To
avoid the possibility of personal injury, be sure
oroperiy support the dnver/horn/bracket assembly while
noving the
mounting
screws
holding the horn to the baffle
iei.
since the assembly weighs approximately l3HKg [30 lb)
*o convert the 4350 to right-hand configuration, toe high
quercy dnve'/horn/bracket assembly
wilt
have to be
archanged
with
its corresponding cover plate on the
right
of
baffle panel. (The 2405 ultra-high frequency driver w:li also
/e
to be interchanged
with
its respective cover plate, as
scribed
in the
following
paragraphs) The cover plate is
;ured behind the baffle
panel
by four machine
screws
threaded
•>
T-nuts.
The
support bracket must be
taken
off thednver/horn
;embly. rotated t80°and reattached to the rear flange of the
m using the original hardware (lockwasners are used under
heads
ol tne two oolts that secure the ©racket} The entire
;emoiy can then be insta'iec on the baffie panel and the
jport
bracket clamp
bolted
to the internal brace on the
right
e
of the
enclosure.
Finally, install the cover plate behind the
•n cutout on the
left
side of the baffle panei using the
screws
t heid it in its original location.
"-High
Frequency-The
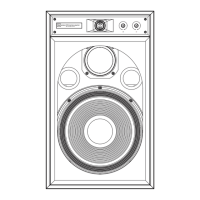
2405 ultra-high frequency driver is
,d
through
the baffle panel
from
inside the enclosure and
leld in place by four machine
screws.
To
achieve
tne desired
persion pattern the
unit
must be positioned so that the
raction slot is oriented vertically.
Vhen
moving the 2405 to the right-hand configuration the
responding cover plate on the
right
side of the baffie panel
st
be removed and reinstalled behind the opening originally
:upied by the ultra-nigh freauency driver The cover plate is
d m place
with
tour
machine
screws
threaded nto
T-nuts
The
ne
mounting
screws
are to be used to install the cover plate
the
left
side of the baffie pane!.
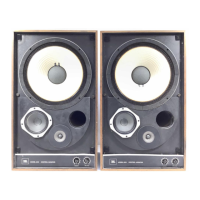
iding Network-Remove the transducers as previously
icribed.
pull
the lead wires
from
the midrange sub-chamber
]
disconnect the
input
leads to the dividing network at the tab
inectors attached to the
input
terminals on the back panel,
de the enclosure. The ultra-high frequency ieve
i
control is
unted on a sub-panel secured to tne back of the enclosure
fie panel by
two
machine
screws
extending
through
the panel
)
threaded fasteners
To
gam
access
to tne contro
.
carefully
j| oft the
serialized
foil
namepiate. remove the
mounting
ews
and place tne control assembly on the
bottom
of the
:losure.
The network itself is mounted on the
bottom
pane; of
encosure
and is held in place by six machine
screws
and
After removing the
mounting
screws,
the networK ano
mol assembly can oe
lifted
out of the enclosure
through
er
of the low freauency loudspeaker openings
e:
Malfunction of the
networK
is highly unlikely.
Since
the
namepiate generally is destroyed ir removal, tt ;s not recom-
mended that the network be removed simply for the purpose
of inspection
Replacement-
Reverse
the remova: procedure to replace the
system
components.
Mounting
screws
for all
devices
should be
tightened evenly and iust
tight
enough to prevent air leaks
Although JBL loudspeakers are extremely rugged, the cone and other
moving parts are subject to accidental damage.
Exercise
extreme
caution whenever
using
a screwdriver or other tools In their immediate
vicinity. Whenever the horn is removed from the
compression
driver,
the mouth of the driver
should
be covered with
plastic
tape. An intense
magnetic field exists in the mouth ol the driver, and It is extremely
Important that foreign objects
such
as Iron
chips,
other metallic
contaminants,
mounting hardware or tools be kept from the area.
Maintenance
The
grille cloth is a double-knit polyester fabric selected for
acoustic
transparency,
beauty, physica' strength, color
fastness
and sod
resisiance
It can be cleaned by gently dusting it
with
a
vacuum
cleaner Stains can be removed by using aerosol
cieaners.
such as
Texize
K2r Goddard's Dry
Clean,
or Pen
Champ
Quick
'n
Easy
according to eacn manufacturers
instructions.
Warning: Cleaning fluids or other
solvents
should
not be
used.
Although
they may appear to remove a stain, liquid cleaners will dissolve the
base
paint on the grille frame beneath the
cloth,
resulting in permanent
discoloration
of the material.
Occasional
dusting
with
a
clean,
soft cloth will maintan the
finish of the enclosure
Since
both
the textured gray and oiled
wainut
surfaces
are moisture
resistant,
a damp
c<oth
will remove
most stains
Mild
detergent may be used on the gray finish to
remove smudges or more persistent
stains.
Conventional
furniture
waxes
or polishes should not be
used;
tne oiled walnut
enclosure,
however, may be treated
with
wax specifically
formulated for such surfaces
The
walnut finish may appear to
age.
or dry out as the oil
penetrates deeper and deeper
into
the veneer it may, therefore
be desirable to re-oil the enclosure surface
from
time to time.
With each application, the oeauty of the finish will become more
obvious, and a warm, rich patina wiil eventual y be obtained
To
re-oil a
JBL
oiled walnut finisn use any one of me
severa
clear
oil finishing preparations available
through
furniture or
hardware outlets. Apply a liberal amount of the oreparation over
the entire finished surface of the enclosure. In ten to fifteen
minutes wipe off the remaining oil
with
a soft,
clean,
dry cloth
Sma/
surface
scratches
can
usually be removed by gently
rubbing them
witn
very fine sieel wool (4/0 grade) anc applying
oil to the entire panel
Very
deep
scratches,
dents or other serious
damage should oe repaired only oy
a
Qualified furniture refmtsner
Caution:
Improper storage of wiping rags could result In spontaneous
combustion.
They should be thrown away or spread out to dry in a
well-ventilated area before storage or
disposal.

 Loading...