38
4. While supporting the weight of the magazine-waveguide assembly, release the tilt-mechanism , allowing the
waveguide to move slowly until it rests on the rear of the grille.
5. Using the Allen Screwdriver, remove the six bolts that attach the Magazine to the Waveguide. You may need to
use a flat Pry-Bar to gently separate the Magazine from the Waveguide. Be careful not to damage the foam
gasket on the front face of the Magazine. Make sure the Magazine is loose from the frame.
6. Slide the magazine toward the HF Driver until the tilt-mechanism separates. Lift the portion of the tilt-
mechanism that is attached to the frame. Begin sliding the Magazine away from the HF Driver.
7. Remove the Magazine from the Spaceframe by tilting it up at the end nearest the HF Driver and sliding it
through the opening in the bottom of the Spaceframe. It should fit easily, without binding on the Spaceframe
as you remove it. If it appears to bind, try adjusting the angle at which you are tilting it.
8. Once the Magazine is free of the Spaceframe, be careful not to damage either of the drivers, as the cones are
now exposed.
Replacement of 2251J (mid) or 2254J (low) Drivers in the Magazine
1. Place the Magazine on its Back, on a clean table or other working surface, with the drivers facing up.
2. Remove the four machine screws holding the Driver in place.
3. Remove the driver by reaching under the Magazine and pushing upwards on the magnet assembly. Disconnect
the two wires from the Driver, noting the color and placement of each.
4. Carefully remove the front gasket and put it aside. If you do not have a new front gasket, you will need to take
care not to stretch the existing one.
5. Carefully place a new front gasket on the rear portion of the front flange of the replacement Driver. Avoid
stretching it, as this could cause air leaks. Make sure that it fits snugly around the driver.
6. Begin placing the Driver into the Magazine, attaching the wires in the same manner as they were removed.
Polarity and wire dressing are both important. The wrong polarity will significantly degrade the overall
performance of the system. Wire dressing is important. If a wire gets under a gasket it could cause air leaks. If
a wire is stretched too tight it could come loose (either now or at some point in the future).
7. Continue placing the Driver into the Magazine. Make certain that the gasket is in place. Replace the four
machine screws and tighten all four equally, in steps, so that the Driver seats properly. Do not over-tighten as
this may strip the threads.
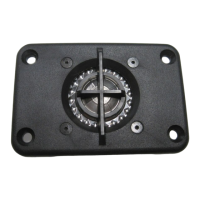
8. Before replacing the Magazine into the Spaceframe, verify the proper operation of each of the drivers. Use a
battery to verify the polarity. Refer to the legend on the connector plate for pinouts.