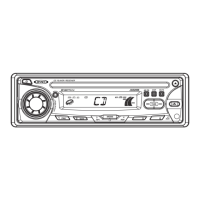
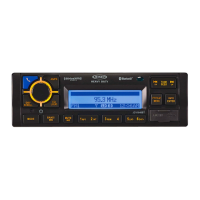
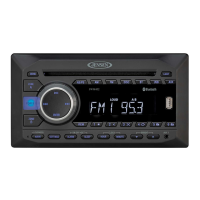
The JCR311 is an AM-FM/Bluetooth/CD/USB receiver designed for in-car entertainment, offering a variety of audio sources and connectivity options. It serves as a central hub for playing music from CDs, USB devices, and auxiliary inputs, as well as providing AM/FM radio and Bluetooth streaming and hands-free calling.
Installation and Setup:
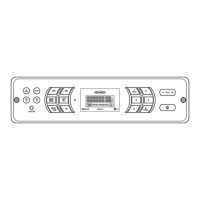
Before installation, it's crucial to disconnect the negative battery terminal to prevent electrical issues. The unit is designed for a typical front-load DIN mounting method. This involves removing the trim ring and two transit screws from the top of the unit, then using supplied keys to slide the unit out of its mounting sleeve. The sleeve is then installed into the vehicle's opening and secured by bending tabs. After connecting the wiring harness and antenna, the unit is tested for correct operation before being slid into the mounting sleeve. Certain vehicles may require an additional installation kit or wiring harness adapter, which are sold separately. The wiring diagram provides clear instructions for connecting the remote turn-on, ground, accessory, and memory wires, as well as the left/right front and rear speaker wires. It also highlights the location of the 10 amp ATC fuse, emphasizing the importance of using the correct fuse type and amperage to avoid damaging the radio.
General Operation:
The JCR311 can be turned on by pressing the power button or any other button except EJECT, and turned off by pressing the power button. The MODE button allows users to switch between AM/FM, CD player, auxiliary, USB, and Bluetooth modes. CD and USB modes only appear when a CD is inserted or a USB device is connected. The unit features a 3.5mm auxiliary input port on the front panel for connecting external audio devices like MP3 players. Volume is adjusted using the volume knob, which offers a range from 00 to 46. The DISP button shows the clock and, during MP3 playback, rotates ID3 tag information, elapsed time, track number, and file/folder names. A reset hole, located under the volume knob, is available for initial installation or in case of abnormal operation. The clock can be set by pressing and holding DISP until it flashes, then using the TUNE buttons to adjust hours and minutes. The clock supports both 12-hour AM/PM time (USA frequency spacing) and 24-hour time (European frequency spacing).
Audio controls are accessed by momentarily pressing the volume knob, cycling through Bass, Treble, Balance, Fader, EQ, Loud, and Source Level. Each setting can be adjusted by rotating the volume knob left or right. Bass and Treble can be adjusted from -6 to +6. Balance adjusts between left and right speakers (BAL 7L - BAL 7R), with BAL EVEN for equal balance. Fader adjusts between front and rear speakers (FAD 7R - FAD 7F), with FAD EVEN for equal fader. The EQ setting allows selection from USER, ROCK, BEAT, CLASSICS, JAZZ, POP, and FLAT presets. Loudness can be toggled ON/OFF, and Source Level adjusts the current source volume from -6 to +6.
The setup menu is accessed by pressing and holding the volume knob for more than 3 seconds. Users can navigate through options by momentarily pressing the volume knob and adjust settings by rotating it. Options include Auto Station Store (which uses DISP to seek and save 6 strong stations in the current band), Local/Distance Tuning (to activate local or distance tuning), Tuner Frequency Spacing (for USA or European spacing), Auxiliary Input (to enable/disable the front panel 3.5mm input), Beep Confirmation (to enable/disable the confirmation beep), Programmable Turn On Volume (to set a specific turn-on volume or keep it off), Power On Message (to enable/disable messages like "GOOD MORNING"), and Scrolling Option (to control how information scrolls on the display, with options for 15-second intervals, once, continuously, or off). A demonstration mode can also be enabled or disabled. Bluetooth functionality can be toggled ON/OFF, and Auto Answer for phone calls can be set to automatic or manual.
AM/FM Tuner Operation:
For radio operation, the TUNE buttons are used for seek tuning (press and hold) or manual tuning (momentarily press for single steps, press and hold to advance quickly). The BAND button cycles through FM1, FM2, FM3, AM1, and AM2 bands. Up to 18 FM and 12 AM stations can be stored as presets by selecting the desired station and holding a preset button (1-6) for over 2 seconds. The preset number will appear on the display once stored. Stations can be recalled by pressing the corresponding preset button. An auto store feature allows the unit to automatically store the 6 strongest stations in the current band by pressing and holding the volume knob for more than 3 seconds until "auto store" appears, then pressing the volume knob again.
CD Player Operation:
To play a CD, insert it with the label facing up into the CD slot. Playback begins automatically. The EJECT button ejects the CD; if not removed within 10 seconds, the disc will reload. The unit does not need to be on to eject a CD. Track selection is done using the TRACK buttons: forward to skip to the next track, backward to return to the beginning of the current track, and pressing backward again to skip to the previous track. Fast forward/reverse is achieved by pressing and holding the TRACK buttons. Playback can be paused or resumed using the PLAY/PAUSE button. The INT (Intro) menu offers options to play the first 10 seconds of each track (ALL) or tracks within a folder (FOLDER), or to cancel the INT function (OFF). The RPT (Repeat) menu allows continuous repetition of all tracks (ALL), the selected track (TRACK), or all files in a selected folder (FOLDER). The RDM (Random) menu enables playback of all tracks in random order (ALL) or tracks within a folder in random order (FOLDER), or cancels the RDM function (OFF).
The JCR311 is compatible with CD-ROM (ISO), CD-R, CD-RW, CD-DA, and MP3 data discs. It does not support discs recorded with Track At Once or packet writing, MP3 PRO format, MP3 playlists, or WAV format. MP3 playback order is based on the recorded order of files, starting from the root folder. Empty folders or folders without MP3 files are skipped. The unit supports ISO9660 levels 1 and 2, Yellow Book MODE 1 and 2 FORM 1, and Multi session discs, with maximums of 999 files, 255 folders, and 8 folder levels. It also supports MPEG-1/2/2.5 Audio Layer-3. File and folder names should use letters A-Z (all caps), numbers 0-9, and underscores for proper display.
For MP3 files, "DISC READ" appears upon insertion. Display information includes song title, artist, file name, folder name, track number, and clock/elapsed time. "NO ARTIST" or "NO TITLE" is displayed if ID3 tag information is absent. "ROOT" is displayed for unlabeled root folders. Icons illuminate to indicate what information is currently displayed. The unit supports ID3 tags Version 1.0 to 2.4, but not Version 2.4 or greater. Recommended MP3 burning settings for best results are 128kbps or higher constant bit rate and 44.1kHz or higher sampling frequency.
USB Operation:
The USB port (sold separately) allows playback of MP3 files from most USB mass storage devices. Upon connection, "USB READ" appears, and playback begins. If no valid MP3 files are detected, "NO FILE" is displayed, and the unit reverts to the previous mode. Track selection, fast forward/reverse, and pause/resume functions are similar to CD operation. A file search mode is available by pressing SELECT, displaying a list of folders (with "ROOT" for files in the root directory). The volume knob cycles through folders and files, and SELECT chooses the desired item. Pressing GO BACK returns to the previous menu or exits search mode. Due to varying USB device transfer speeds, it's recommended to limit folders to less than 30 songs.
USB display information includes clock and elapsed time, song title, artist, file name, and folder name. Icons illuminate to indicate the displayed information. Folder access is available using the forward/backward buttons. Repeat and Random functions are similar to CD operation, with random mode retained in memory across mode changes or power cycles. The Intro menu also functions similarly. USB character support, media compatibility, playback order, and playback capacity are detailed, with warnings about exceeding maximum file/folder limits and the requirement for USB devices to be 'mass storage class' and formatted to FAT or FAT32. Only MP3 files with the .mp3 extension are played, and invalid ID3 tag versions will display "NO SUPPORT."
Bluetooth® Operation:
Before using Bluetooth, a device must be paired and connected. The unit broadcasts its pairing signal when no devices are connected. The device name is "JENSEN JCR311" and the passcode is "1234." The unit can be in any mode during pairing. If a device is already connected, the user must press and hold the Bluetooth button to disconnect it before pairing a new device. Most Bluetooth devices support auto-connect. If a previously paired device doesn't connect automatically, users can press and hold the Bluetooth button from Bluetooth mode to reconnect. To connect a device not recently connected, disconnect any current devices, then press and hold the Bluetooth button again. The paired device name will appear, and the volume knob can cycle through a list of devices. The volume knob can also cycle through recent calls to dial a number. To disconnect a device, press and hold the Bluetooth button for 3 seconds.
For phone calls, incoming calls appear on the display with a ring tone. The volume of the ring tone depends on the unit's volume level. Press the Bluetooth button to receive a call, or press and hold to refuse it. If Auto Answer is ON in the setup menu, calls are received automatically. During an active call, pressing the Bluetooth button ends the call, and the unit resumes the previous mode if music was playing. The unit supports A2DP (advanced audio distribution profile) for wireless streaming audio and AVRCP (audio video remote control profile) for controlling music from the head unit. Streaming audio must be enabled on the mobile device. Playback controls include skipping tracks (forward/backward buttons) and play/pause (PLAY/PAUSE button).
Maintenance and Troubleshooting:
The manual includes a troubleshooting guide to address common issues. If the unit doesn't turn on, check connections for proper voltage (yellow and red wires), ground connection (black wire), and the fuse. If there's power but no sound, check speaker wire connections and ensure no bare wires are touching each other or the chassis ground. If the unit blows fuses, verify that the yellow or red wires aren't pinched, speaker wires aren't pinched, and the fuse rating is correct. Excessive skipping during CD playback could indicate a physical defect in the media, improper mounting, or an insecure backstrap. Disc read errors or discs inserted upside down can also cause issues. "ERR FILE" or "NO FILE" messages on the display suggest unplayable MP3 files or no valid MP3 files on the device. If a CD won't accept a disc, check for CD mechanism misalignment or if the transit screws are still in place. "NO SUPPORT" for ID3 tags indicates an invalid ID3 tag version (only 1.0 to 2.0 are supported).