EasyManua.ls Logo

Jensen JHD12 - User Manual

Jensen JHD12
3 pages
Print Icon
To Next Page IconTo Next Page
Loading...
Cr
1
F_N_s·f
,-
N~
JHD12
Ill
0
~
...
C:
0
u
~
cu
C:
:I
I-
~
LL.
--
~
ct
0
~
...
C:
0
u
~
cu
C:
:I
1-
"C
C:
IQ
.Q
~
cu
.c
...
IQ
cu
3:
HEAVY
DUTY
MODE/PAIR
:
Press
to
cycle
through
source
mode.
Press
and
hold
to
begin
Bluetooth
pairing.
POWER:
Press
to
tum
ON
.
Press
again
to
switch
Dimmer
(On/Off)
.
Press
and
hold
to
tum
off
and
enter
standby
mode
.
VOLUME
:
Press
the
VOLUME
UP
button
to
increase
volume
.
Press
the
VOLUME
DOWN
button
to
decrease
volume.
PLAY
/
PAUSE
:
Press
to
Mute
/
Pause
audio
,
press
aga
in
to
resume
audio
volume
.
VOLUME
:
Press
the
VOLUME
UP
button
to
increase
volume
.
Press
the
VOLUME
DOWN
button
to
decrease
volume
.
MUTE:
Press
to
MUTE
volume
.
Press
again
to
resume
volume
.
QUICK
REFERENCE
GUIDE
AUDIO/SETTINGS
:
Press
to
bring
up
AUDIO
MENU
options
:
LOUDNESS
(On
/
Off)
,
BASS
,
TREBLE
&
BALANCE
(Left
to
Right),
Press
and
hold
to
bring
up
SETTING
MENU
options
:
Dimmer
,
Bluetooth
Devices
,
Clock
Set
,
Low
Voltage
Alarm
,
Low
Voltage
Auto
Off
,
Preset-Only
Tuning
,
Tuning
Region
,
Key
Beep
,
System
Reset
&
System
Info
.
Pre
ss
VOLUM
E-'+•
and
'.!'
buttons
to
select
each
MENU
option
except
for
'RESET
,
TUNE/SEEK
:
Press
H
or
H
buttons
to
seek
to
the
next
strongest
station
.
~----
Press
and
hold
Hor
H
to
start
manual
tune
mode
,
the
frequency
displayed
will
flash
,
press
H
or
H
to
manually
tune
while
in
manual
tune
mode.
The
manual
tune
mode
will
automatically
end
after
5
seconds
of
inactivity.
BAND/SCROLL:
Press
to
Select
_____
__.
AS/PS
:
Press
to
SCAN
through
currently
stored
presets
.
Press
&
hold
to
STORE
strongest
broadcast
stations
in
your
area.
preset
group
FM1
,
FM2
,
FM3
,
or
AM1
,
or
AM2
each
with
6
channel
memory
location
.
MODE
:
Press
repeatedly
until
you
reach
Weatherband
.
Not
e:
The
We
ath
e
rband
m
ode
is
only
se
l
ec
table
wh
en the
tune
r
reg
io
n
is
set
to
USA
MUTE
:
Press
to
mute
volume
,
Press
again
to
resume
volume
.
STATION
STORE
BUTTONS
:
Press
to
recall
stored
channel.
Press
&
hold
to
store
current
stat
i
on.
Note
:
Up
to
30
channels
can
be
stored
(6
channels
per
band
FM1
,
FM2, FM3,
AM1,
AM2).
STATION
STORE
BUTTONS
:
Press
to
select
Preset
Weatherband
channels
162
.
550MHz
(CH1)
,
162.400MHz
(CH2)
,
162.475MHz(CH3),
162.425MHz
(CH4)
,
162.450MHz
(CH5)
,
162
.
500MHz
(CH6)
,
hold
H
button
to
manually
tune
to
162
.
525MHz
(CH7),
TUNE/SEEK
:
Press
H
or
H
buttons
to
toggle
through
the
seven
preset
frequency
bands.
TUNER
REGION
SETTING
:
Press
&
hold
to
access
SETTING
MENU.
Press
H
or
H
to
navigate
to
TUNER
REGION
Setup
Menu
option.
Press
VOLUME
"+'
and
·-·
buttons
to
select
region
option
.
Question and Answer IconNeed help?

Do you have a question about the Jensen JHD12 and is the answer not in the manual?

Overview

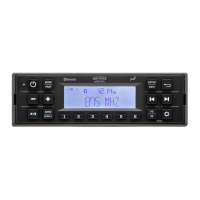
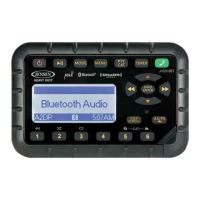
The Jensen JHD12 is a heavy-duty audio system designed for various applications, offering a range of features for audio playback, tuning, and Bluetooth connectivity. This quick reference guide provides essential information on its operation, making it user-friendly for both basic and advanced functions.

Function Description:

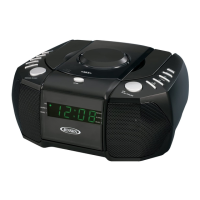
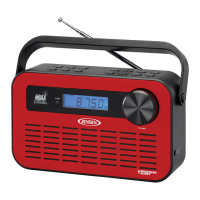
The JHD12 serves as a versatile audio receiver, capable of playing AM/FM radio, Weatherband, and audio via Bluetooth, USB, and auxiliary inputs. It is designed for heavy-duty use, suggesting durability and reliability in challenging environments. The device integrates a clock display, which is always visible at the top of the screen, providing constant time reference.

Important Technical Specifications:

While specific technical specifications like power output, frequency response, or signal-to-noise ratio are not detailed in this quick reference guide, the device supports several key functionalities:

  • Tuner Regions: The tuner region setting is crucial for proper radio operation, especially for Weatherband, which is only selectable when the tuner region is set to USA. This implies different frequency bands and broadcast standards for various geographical locations.
  • Channel Memory: The device can store up to 30 channels, with 6 channels per band (FM1, FM2, FM3, AM1, AM2). For Weatherband, it supports 7 preset frequency bands, including 162.550MHz (CH1), 162.400MHz (CH2), 162.475MHz (CH3), 162.425MHz (CH4), 162.450MHz (CH5), 162.500MHz (CH6), and 162.525MHz (CH7) via manual tuning.
  • Bluetooth Connectivity: The JHD12 supports Bluetooth pairing, allowing users to connect their devices for audio streaming and hands-free communication. It displays the connecting Bluetooth device name and ID3 tag info/track number/elapsed time.
  • Audio Adjustments: Users can adjust audio settings such as Loudness (On/Off), Bass, Treble, and Balance (Left to Right) to customize their listening experience.
  • System Settings: The device includes system settings for Dimmer, Clock Set, Low Voltage Alarm, Low Voltage Auto Off, Preset-Only Tuning, Tuning Region, Key Beep, System Reset, and System Info.

Usage Features:

The JHD12 offers intuitive controls for various operations:

  • Basic Operation:

    • MODE/PAIR: Press to cycle through audio sources (AM/FM/WB/USB/BT/PA/AUX). Press and hold to initiate Bluetooth pairing.
    • POWER: Press to turn ON. Press again to toggle Dimmer (On/Off). Press and hold to turn OFF and enter standby mode.
    • VOLUME UP/DOWN: Buttons to increase or decrease volume.
    • PLAY/PAUSE: Press to mute/pause audio. Press again to resume audio.
    • BACK: Press to exit any setting menu.
    • AUDIO/SETTINGS: Press to access audio menu options (Loudness, Bass, Treble, Balance). Press and hold to access setting menu options (Dimmer, Bluetooth Devices, Clock Set, Low Voltage Alarm, Low Voltage Auto Off, Preset-Only Tuning, Tuning Region, Key Beep, System Reset, System Info). Use VOLUME "+" and "-" buttons to select options.
    • INFO: Press to toggle between ID3 tag info and track number/elapsed time. Press and hold to display the current connecting Bluetooth device name.
    • TUNE/TRACK: Press ">" button to advance to the next track/station. Press "<" button to go to the previous track/station.
  • AM/FM Tuner Controls:

    • TUNE/SEEK: Press ">" or "<" buttons to seek the next strongest station. Press and hold ">" or "<" to enter manual tune mode (frequency flashes), then press ">" or "<" to manually tune. Manual tune mode automatically ends after 5 seconds of inactivity.
    • MUTE: Press to mute volume. Press again to resume volume.
    • BAND/SCROLL: Press to select preset groups (FM1, FM2, FM3, AM1, AM2), each with 6 channel memory locations.
    • STATION STORE BUTTONS (1-6): Press to recall a stored channel. Press and hold to store the current station.
    • AS/PS (Auto Store/Preset Scan): Press to scan through currently stored presets. Press and hold to store the strongest broadcast stations in your area.
  • Weatherband Tuner Control:

    • MODE: Press repeatedly until Weatherband mode is reached. (Note: Weatherband mode is only selectable when the tuner region is set to USA).
    • MUTE: Press to mute volume. Press again to resume volume.
    • TUNE/SEEK: Press ">" or "<" buttons to toggle through the seven preset frequency bands.
    • STATION STORE BUTTONS (1-6): Press to select Preset Weatherband channels (CH1-CH6). Hold button 1 to manually tune to 162.525MHz (CH7).
    • TUNER REGION SETTING: Press and hold to access the SETTING MENU. Press ">" or "<" to navigate to TUNER REGION Setup Menu option. Press VOLUME "+" and "-" buttons to select the region option.
  • Bluetooth Operation:

    • PAIR DEVICE VIA BLUETOOTH: Ensure the device to be paired is ON and Bluetooth is enabled. Press and hold MODE/PAIR to start the pairing process. "Pairing" will display for 2 minutes. "JHD12" should appear as an available device in Bluetooth settings; tap to connect.
    • RECEIVING A PHONE CALL: When a call is answered, BT AUDIO will automatically pause. After hanging up, BT AUDIO will resume playback. If not, press PLAY/PAUSE to resume.
    • PLAY/PAUSE: Press to suspend playback. Press again to resume current track.
  • Clock Operation:

    • CLOCK SETTING MENU: Press and hold to enter the menu. Press ">" or "<" to navigate to CLOCK SET. Press ENTER to select. Press ">" or "<" again to navigate HOUR, MINUTE, or 12/24 HOURS FORMAT. Press "+" or "-" buttons to adjust the setting.

Maintenance Features:

The quick reference guide does not explicitly detail maintenance features. However, the "System Reset" option in the SETTING MENU suggests a way to restore the device to its default factory settings, which can be a form of troubleshooting or maintenance for software-related issues. The "Low Voltage Alarm" and "Low Voltage Auto Off" features indicate built-in protection mechanisms that help prevent damage to the device or battery due to low power conditions, contributing to its longevity.

For a comprehensive understanding and detailed maintenance instructions, the user is directed to the owner's manual available at http://www.asaelectronics.com/manuals-guides or via a QR code. This suggests that more in-depth information on care, troubleshooting, and specific technical details would be found in the full manual.

Jensen JHD12 Specifications

General IconGeneral
BrandJensen
ModelJHD12
CategoryRadio
LanguageEnglish

Related product manuals