EasyManua.ls Logo

Jio JioExtender JMB43 - User Manual

Jio JioExtender JMB43
14 pages
Print Icon
To Next Page IconTo Next Page
Loading...
Welcome to the
Digital World of Jio.
Reach us at
Visit us www.jio.com
Email us JioFiberCare@jio.com
Toll Free Number 1800 896 9999
Warranty Terms and Conditions www.jio.com
Question and Answer IconNeed help?

Do you have a question about the Jio JioExtender JMB43 and is the answer not in the manual?

Summary

Introduction

Product Specifications

Setup JioExtender6 Controller

Setup JioExtender6 Agent

Guidelines for Placement

LED Indicators

Interfaces and Product Label

Reset Button

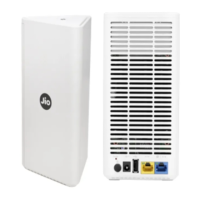
Resets the JioExtender6 to restart or factory default settings.

Power Button

Allows powering the JioExtender6 on or off.

Power Port

Connects the power supply to the JioExtender6.

USB Port

Optional USB port reserved for future use.

Ethernet LAN Port

Connects to JioFiber HomeGateway or acts as a second LAN port.

Ethernet WAN;LAN Port

Connects to JioFiber HomeGateway or acts as a second LAN port.

Product Label

Contains default network name and wireless key.

WPS Button and Status LED

Used for pairing devices and indicates device status.

Device Management

JioHome App Download

Instructions to download the JioHome app via QR code or app stores.

Connecting Your Devices

WPS Pairing Method

Steps to pair Wi-Fi devices using the WPS button.

Manual Wi-Fi Configuration

Configure devices using SSID and wireless key if WPS is not supported.

Ethernet Device Connection

Connect wired devices like Set-Top Box or computer via LAN port.

Troubleshooting

Unresponsive Device Repair

Guidance on restarting or resetting an unresponsive JioExtender6.

Setup Issue Resolution

Troubleshooting steps for JioExtender6 setup problems.

Reattempt Installation

Procedure to reset and reattempt JioExtender6 installation.

Force Restart and Reset

Turn OFF Mesh Support

Configure JioExtender6

Accessing Web Interface

Steps to access and use the JioExtender6 web interface.

Configuring Controller Mode

Instructions to set the JioExtender6 to controller mode.

Configuring Network Name and Password

Steps to change SSID, security mode, and WiFi password.

Overview

The JioExtender6 is a wireless networking device designed to enhance your in-home Wi-Fi experience by improving latency, providing faster throughputs, better performance, and optimal link stability. It leverages the latest Wi-Fi 6 (IEEE802.11ax) technology to deliver a robust and efficient network.

Function Description

The primary function of the JioExtender6 is to extend and optimize your Wi-Fi coverage through an EasyMesh system. It can operate in two modes: Controller and Agent. In a typical setup, one JioExtender6 unit acts as a Controller, connecting to your JioFiber HomeGateway, while other JioExtender6 units function as Agents, wirelessly or wired, to expand the network's reach. This creates a unified intelligent Wi-Fi environment throughout your home, eliminating dead zones and ensuring consistent connectivity.

The device is equipped with two 5 GHz Wi-Fi 6 interfaces, which offer superior data transfer rates and are less susceptible to interference, making them ideal for high-bandwidth activities. Additionally, it includes one 2.4 GHz Wi-Fi 6 interface, ensuring compatibility with older Wi-Fi devices that may not support 5 GHz Wi-Fi.

Usage Features

Setup and Configuration:

The JioExtender6 is designed for straightforward setup, primarily guided by the JioHome Mobile app's "My Network" feature. This app assists in preparing the HomeGateway and configuring the JioExtender6 for your home Wi-Fi network.

Controller Setup:

To set up a JioExtender6 as a Controller:

  1. Connect one end of the included LAN cable to the blue WAN/LAN port on the back of the JioExtender6 and the other end to a LAN port on your JioFiber HomeGateway.
  2. Plug the power adapter into the JioExtender6 and a nearby power outlet.
  3. Press the power button on the back of the JioExtender6. The Status LED will initially be solid yellow, then flash yellow.
  4. Once the Status LED flashes yellow every second, you can configure it to Controller mode using the JioHome App's "MyNetwork" feature or its webUI.
  5. Wait for the Status LED to turn solid green before connecting your Wi-Fi devices.

Agent Setup:

To set up a JioExtender6 as an Agent (ensure it's in factory reset state and not already joined to an EasyMesh network):

  1. Connect one end of a LAN cable to a LAN port on the back of the Agent JioExtender6 and the other end to a LAN port on your Controller JioExtender6.
  2. Plug in the power supply to the Agent JioExtender6 and a power outlet.
  3. Press the power button. The Status LED will be solid yellow, then flash yellow every second when ready for onboarding.
  4. During EasyMesh onboarding, the Status LED will indicate the process:
    • Flashing green & yellow (1 second each): Onboarding started and ongoing.
    • Flashing green (3 seconds) & yellow (1 second): Onboarding failed.
    • Flashing green (1 second) & yellow (3 seconds): No EasyMesh network found.
    • Solid Green: Onboarding successful, Agent paired with the Controller.
  5. After successful pairing, you can disconnect the LAN cable, and the Agent will automatically switch to wireless backhaul to remain connected to the Controller, allowing flexible placement to extend Wi-Fi coverage.

LED Indicators:

The JioExtender6 features LED indicators that provide visual feedback on its status and connectivity, aiding in optimal placement.

  • Yellow On: Power on – bootloader phase.
  • Yellow Flash (0.25s ON/0.25s OFF): Power on – wireless not ready.
  • Yellow Flash (1s ON/1s OFF): Device unpaired.
  • Red Flash (1s ON/1s OFF): Resetting to factory default.
  • Green Flash (1s ON/1s OFF): Firmware upgrading.
  • Green/Yellow Flash (Green 1s/Yellow 1s): Pairing with a new network.
  • Green On: ETH or Wi-Fi good connection (optimal link quality).
  • Yellow On: Fair Wi-Fi link quality (acceptable, but not optimal).
  • Red On: Poor Wi-Fi link quality (bad connection).
  • Red Flash (0.25s ON/0.25s OFF): WPS Error.

For optimal performance, the LED indicator should always be solid green.

Placement Guidelines:

Proper placement is crucial for maximizing Wi-Fi coverage and performance:

  • Place the JioExtender6 on a table, approximately three to four feet from the ground, avoiding corners.
  • Do not place it close to the floor, too high up, very close to the home ceiling, or under low roof conditions.
  • Avoid placing the device in cabinets, closed areas, or crammed spaces, especially near other wireless or electrical devices.
  • Do not place it in corridors connecting living rooms and bedrooms.
  • Maintain a line of sight between the Controller and Agent units, or minimize obstacles between them.
  • Keep the JioExtender6 away from metal objects like home appliances or metal doors.

Connecting Wi-Fi Devices:

  • WPS-enabled devices: Briefly press the WPS button on the JioExtender6. The Status LED will blink green. Within two minutes, start WPS on your Wi-Fi device. The LED will return to its previous solid state (green, yellow, or red) once the connection is established.
  • Non-WPS devices: Configure them using the Wi-Fi network name (SSID) and wireless key found on the product label at the bottom of the JioExtender6.

Connecting Ethernet Devices:

The yellow LAN port on the JioExtender6 can be used to connect Ethernet devices such as a Set-Top Box, NAS drive, or computer to your home network. The Ethernet WAN/LAN port can also function as a second Ethernet LAN port if free.

Device Management:

The JioHome App's "My Network" feature allows you to set up and manage your home Wi-Fi, prepare the HomeGateway, and optimize the Mesh Network during JioExtender6 setup. You can download the app from Google Play or the iOS App Store.

Web Interface Access:

The JioExtender6 also has a web user interface for configuration:

  1. Find the IP address of your JioExtender6 via your JioFiber HomeGateway's web interface.
  2. Browse to the JioExtender6's IP address from a computer or device connected to it (wired or Wi-Fi).
  3. Use the default credentials: Login admin, Password Jiocentrum.

Configuring Controller Mode (via webUI):

  1. Access the JioExtender6 web interface.
  2. Click the "EasyMesh" menu to open the EasyMesh page.
  3. Select "Controller" from the device role option.
  4. Click "Save" and close the webUI.

Configuring Network Name and Password (via webUI, Controller Mode only):

  1. Access the JioExtender6 Controller's web interface.
  2. Go to "Networking" -> "AP" page.
  3. You can change the SSID, Security Mode, and Wi-Fi password.

Maintenance Features

Troubleshooting:

  • Connectivity Status: Always check the Status LED. Solid Green indicates good connectivity.
  • Controller Setup Issue: If the Status LED flashes yellow every second on a device intended to be a Controller, it means it's not in Controller mode. Follow the Controller setup steps.
  • Agent Pairing Issue: If the Status LED flashes yellow every second on an Agent, pair it with the Controller.
  • Poor Link Quality: If the Status LED is solid red, reposition the Agent closer to the Controller or another connected Agent to improve the signal.
  • Internet Issues: If internet problems persist, verify that your JioFiber HomeGateway has an active internet connection.

Repairing an Unresponsive JioExtender6:

  • Force Restart: Briefly press the recessed Reset button (less than 5 seconds) on the back of the JioExtender6. This will restart the device, returning it to its last known working condition and configuration.
  • Factory Reset: Press and hold the recessed Reset button for at least 10 seconds. This will reset the JioExtender6 to its factory default configuration, unpairing it from any EasyMesh network and erasing all Wi-Fi and EasyMesh settings. You will need to pair it again.

JioExtender6 Setup Issue:

If the Status LED is not solid green after setup, check if EasyMesh is disabled on your HomeGateway. If so, disable EasyMesh on the HomeGateway (refer to section 10.2) and reattempt the installation.

Reattempting Installation:

Power on the JioExtender6 and perform a factory reset. Then, follow the steps for "Setup JioExtender6 Controller" or "Setup JioExtender6 Agent" and adhere to the "Guidelines for placement."

Turning OFF Mesh Support in JioFiber HomeGateway (via web GUI):

  1. Log in to your JioFiber HomeGateway's web GUI using your credentials (default IP address: 192.168.29.1).
  2. Navigate to "Status" -> "Mesh Network option" -> "Mesh Configuration."
  3. Turn OFF "Mesh Enable."
  4. Click "Save."
  5. The HomeGateway will reboot, and Mesh will be disabled. Verify the status by revisiting the web GUI; the "Mesh Enable" switch should be OFF.

The JioExtender6 is a comprehensive solution for expanding and optimizing your home Wi-Fi, offering both ease of use through its app and detailed control via its web interface, along with clear indicators for status and troubleshooting.

Jio JioExtender JMB43 Specifications

General IconGeneral
CategoryExtender
TypeWi-Fi Range Extender
WPS ButtonYes
Weight150g
Frequency Band2.4 GHz
Maximum Speed300 Mbps
Ethernet Ports1
Operating Temperature0°C to 40°C
ModelJMB43