Do you have a question about the JML easy STITCH and is the answer not in the manual?
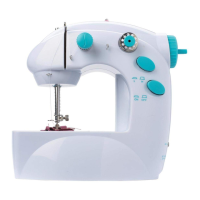
Diagram labeling key components like spindle, thread clamp, adjust nut, hand wheel, and power switch.
Lists essential accessories: foot pedal, threader, bobbins, empty bobbins, and spare needle.
Guidelines for safe operation: power off for changes, keep away from children, and proper shut down.
Details on using 4 'AA' batteries, correct alignment, and safe handling practices.
Instruction to run thread through the first guide eye (15A) before the thread clamps.
Guide thread through the take up lever (12) and third guide eye (15C).
Place bobbin clockwise in the magnetised compartment to begin bottom threading.
Turn hand wheel to bring bottom thread up through the foot plate (19).
Steps to raise the foot lever, place fabric, and begin sewing with speed selection.
Guidance on fixing straight line stitches by adjusting thread clamp tightness.
Instructions for preparing and winding thread onto an empty bobbin using the spindle.
Procedure to loosen clamp, remove old needle, and insert new needle correctly.
Connect foot pedal to jack for hands-free sewing control.
How to connect the 6V DC adaptor, ensuring the switch is OFF.
Addresses problems like machine not working, no sewing, or sudden stops with possible causes.
| Brand | JML |
|---|---|
| Model | easy STITCH |
| Category | Sewing Machine |
| Language | English |