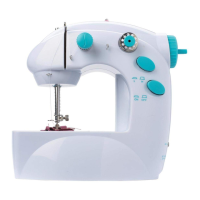
10 - Easy Stitch
1. Switch off the machine and remove the power lead and
batteries.
2. Loosen the needle clamp screw (21) and turn anti clockwise.
3. Pull the needle (20) downwards to remove.
4. Insert new needle into needle holder pole (13) from the bottom
with the flat edge away from you.
5. Replace needle clamp screw (21) back into the original position and
tighten the screw firmly, turning it clockwise (make sure this is as tight
as possible to avoid any problems when sewing).
Insert the foot pedal into the foot control jack (23). This can be used instead
of the power switch (1), allowing you to sew using both hands. Make sure to
unplug the switch after use.
ES_Inst.indd 10
14/11/07 09:12:12