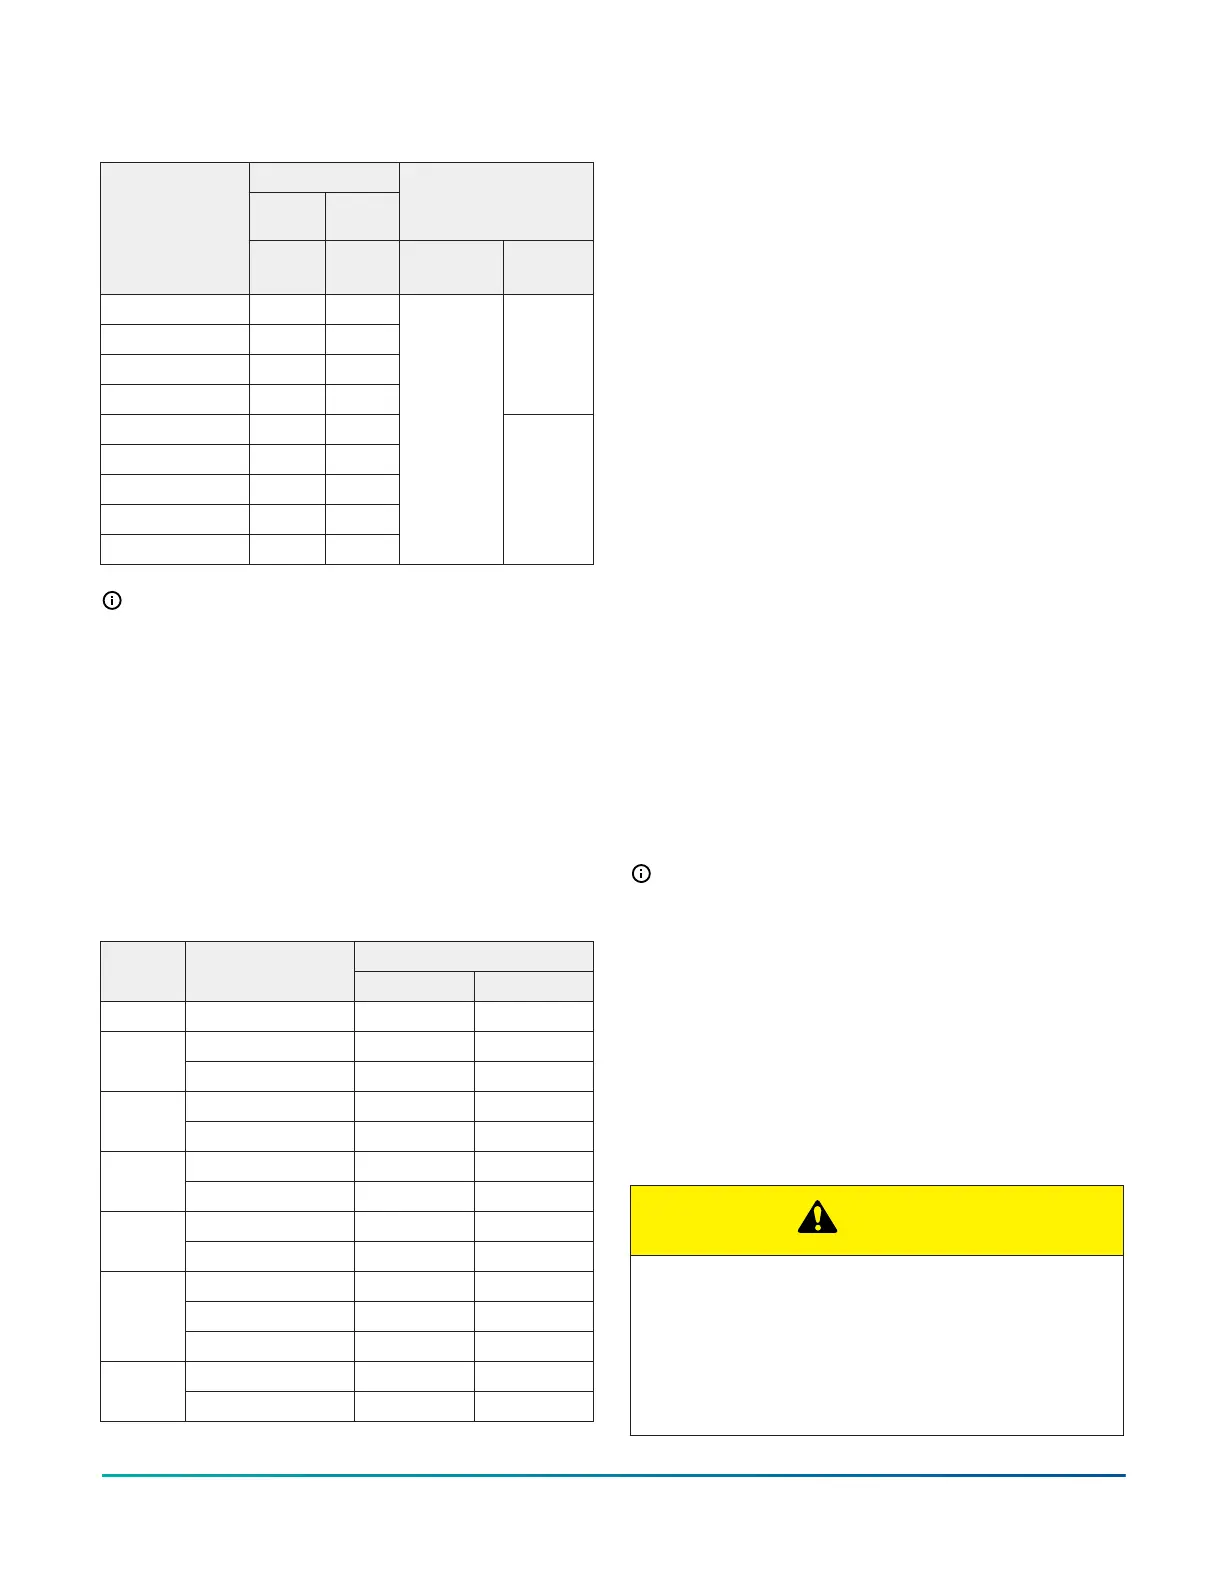
Table 3: Dimensions - XAU uncased upflow or
downflow coil
Dimensions
Height Width
Refrigerant
connections
line size
Models
A (in.) B (in.)
Liquid
(in.)
Vapor
(in.)
XAUA18AXXN1 16 5/8 13
XAUA24BXXN1 18 3/4 13
XAUB30CXXN1 21 1/4 16
XAUB36DXXN1 21 1/2 16
3/4
XAUC42EXXN1 23 19 1/2
XAUC48FXXN1 25 19 1/2
XAUC60GXXN1 29 1/4 19 1/2
XAUD60GXXN1 28 3/4 23
XAUD60HXXN1 33 23
3/8
7/8
Note:
• Refrigerant line sizes may require larger lines
for extended line lengths. Refer to application
data part number 247077.
• The adapter fitting must be field installed for
any refrigeration piping sizes not shown in the
table.
• Refer to the Technical Guide for the outdoor unit
for the proper refrigeration piping size.
Limitations
Install the coil in accordance with all national and local
safety codes. See Table 4.
Table 4: Coil airflow limits
CFM limits
Coil size
Outdoor
unit (ton)
Minimum Maximum
18 1 1/2 525 675
1 1/2 525 675
24
2 700 900
2 700 900
30
2 1/2 875 1125
2 1/2 875 1125
36
3 1050 1350
3 1050 1350
42
3 1/2 1225 1575
3 1050 1350
3 1/2 1225 157548
4 1400 1800
4 1600 1800
60
5 1750 2250
Installation overview
1. Before installation, review the installation aids
available in Installation verification. During
installation, use the installation aids to verify that
tasks are completed as required. See Figure 7 for an
overview of components and their location.
2. Install the coil metering device as required. See
Using a coil metering device.
3. Install the coil. See Installing the coil: XAF and XAH
coils or Installing the coil: XAU coils.
4. Connect the duct system. See Connecting the duct
system.
5. Connect the condensate drain lines. See Connecting
the condensate drain.
6. Connect the refrigerant lines. See Connecting
refrigerant lines.
7. Clean the coil. See Cleaning the coil.
8. Check and adjust airflow as required. See Adjusting
the air system.
9. Instruct the homeowner as needed. See Instructing
the homeowner.
Using a coil metering device
You must install a piston or TXV (flex coil models) in the
field, unless you are using a coil with a factory installed
TXV or a coil equipped with an electronic expansion valve
(EEV). See Using a coil equipped with an EEV: XAF and XAH
coils. Refer to the Technical Guide for outdoor units for
information on the piston or TXV required for the indoor
coil. It is best practice to install the piston or TXV kit before
installing the coil and brazing the refrigeration piping.
Note: Do not install the TXV sensing bulb until you
have completed the brazing and the piping has
cooled.
For TXV installation, refer to the Installation Manual
provided with the TXV kit and see Installing a TXV.
For piston installation, see Installing a piston. The piston
and the Schrader valve core are supplied with the outdoor
unit if applicable. Some outdoor sections require a TXV. If
using a piston instead of a TXV, install the Schrader valve
core in the suction line equalizer connection port and cap
the Schrader valve core with the plastic cap supplied. Do
not install the Schrader valve core if a TXV is installed,
because the TXV equalizer line attaches to the equalizer
connection port or suction line port.
CAUTION
COIL UNDER PRESSURE
Verify that pressure has been released by depressing
Schrader valve core shown in Figure 1 and Figure
2. The coil requires a metering device to be added.
Refer to outdoor unit documentation for correct TXV
or piston to be used.
Installation Manual: XAF, XAH, and XAU Series - Full Cased and Uncased Coils for Cooling and Heat Pumps12
Johnson Controls Ducted Systems
 Loading...