EasyManua.ls Logo

Johnson LDM85 User Manual

Johnson LDM85
2 pages
To Next Page IconTo Next Page
Page #1 background imageLoading...
Page #1 background image
Thank you for purchasing this Johnson 85’ Laser
Distance Meter - the fastest way to measure your
jobsite.
ATTENTION:
• Read all instructions before operating this tool. Do not
remove any labels from the tool.
• Do not project the laser into the eyes of others.
• Do not set up laser tool at eye level, or operate the tool
near reflective surfaces, as the beam can be projected
into your eyes or the eyes of others.
• Do not place the laser tool in a manner that may cause
someone to unintentionally look into the laser beam.
Serious eye injury may result.
• Do not operate the tool in explosive environments, (i.e.,
in the presence of gases or flammable liquids).
• Keep the laser tool out of the reach of children and
other untrained persons.
• Do not attempt to view the laser beam through optical
tools such as telescopes - serious eye injury may result.
• Always turn o the laser tool when not in use or when
left unattended for any period of time.
• Disassembly or repair by unqualified persons will void
the warranty.
Power on the LDM85 by pressing or .
Set your desired operating units by holding
until the desired unit is reached, then release.
Set the measurement reference by pressing
and simultaneously. The tool will indicate the
current reference position:
Set your operating mode by pressing . See
the TAKING MEASUREMENTS section for more
information on the dierent operating modes.
Take your measurements by pressing .
When completed, power o the tool by holding
. The tool will auto-power o in 5 minutes.
LDM85 Operator’s Manual
Download this manual at
www.johnsonlevel.com/manuals
Press to take a measurement. Hold
to adjust units.
Press to power on. Press to adjust
operating mode. Hold to power o.
Press both buttons to adjust
measurement reference.
SAFETY INFORMATION
The LDM85 uses two “AAA” batteries that last for
up to 10,000 measurements, depending on usage.
To insert batteries:
Depress the knurled area of the
battery door, and slide the battery
door o the tool.
Insert 2xAAA batteries according
to the indicated polarity, and
replace the cover.
The tool will indicate remaining power at startup:
0-10% 50-75%10-50% 75-100%
NOTE: When storing the tool for more than three
months, remove the batteries to prevent corrosion.
MAIN COMPONENTS
LCD OVERVIEW
INSTALLING BATTERIES
BUTTON OVERVIEW
GETTING STARTED
EN 60825-1:2007 & EN 60825-1:2014
650nm / Power < 1mW
CLASS 2 LASER PRODUCT
AVOID EXPOSURE
Laser radiation is emitted
from this APERTURE
Complies with 21
CFR 1040.10 and
1040.11 except for
deviations pursuant
to Laser Notice No.
50, dated June 24,
2007.
+
This Class II laser tool complies with CRF 21 parts 1040.10
and 1040.11, IEC 285, and EMC Tests EN61000-6-3;
2001+A11:2004, EN6100-6-1:2011, EN6100-4-2, EN61000-
4-3, EN 60825 & FCC Test Part 15.
LASER EMITTING WINDOW
LCD
MEASURE BUTTON
POWER BUTTON
LASER INDICATOR
REFERENCE INDICATOR
BATTERY STATUS
UNIT DISPLAY
SUB DISPLAY
MAIN DISPLAY
LASER RECEIVING WINDOW
FRONT EDGE REFERENCE
REAR EDGE REFERENCE
THIS TOOL EMITS LASER RADIATION. DO NOT
STARE INTO BEAM. AVOID DIRECT EYE EXPOSURE.
SAFETY LABEL LOCATION
MEASURE
POWER
REF
Question and Answer IconNeed help?

Do you have a question about the Johnson LDM85 and is the answer not in the manual?

Johnson LDM85 Specifications

General IconGeneral
BrandJohnson
ModelLDM85
CategoryMeasuring Instruments
LanguageEnglish

Summary

Safety Information

Laser Safety Warnings

Direct warning about laser emission and avoiding eye exposure.

General Operating Precautions

Guidelines for safe operation, including avoiding eye projection, safe environments, and child safety.

Main Components and LCD Overview

Component Identification

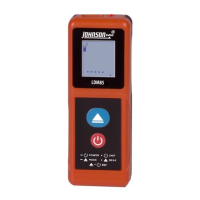
Identifies key physical components of the LDM85, including windows, LCD, and buttons.

LCD Display Elements

Details the elements of the LCD screen, including main and sub displays, status indicators, and unit display.

Installing Batteries

Getting Started

Button Functions

Taking Measurements

Measurement Modes

Explains how to select and use modes like Length, Area, Volume, and Continuous measurement.

Pro Tips for Measurement

Provides advice on holding the tool steady, bright light conditions, and checking references.

Troubleshooting

Error Codes Explained

Details common error codes (Err01-Err06) and their meanings, including signal issues and range limits.

Specifications

Product Registration and Warranty

Product Registration

Instructions and benefits for registering the product within 30 days of purchase.

Product Warranty Information

Details the two-year limited warranty, service center information, and required proof of purchase.

Related product manuals