Do you have a question about the JONATHAN Y JYL6105A and is the answer not in the manual?
Inspect item for damage or defects before installation. Do not install if damaged. Installed items are non-returnable.
Unplug before cleaning. Use soft cloths, feather dusters, or vacuum attachments. Avoid chemical cleaners.
Verify all parts, assemble on a soft surface, follow electrical safety, polarized plug, and cord handling guidelines.
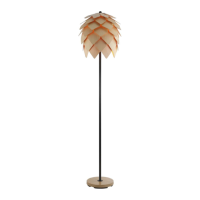
Model JYL6105A with product dimensions D16" x 60"H.
Lists components A (Lamp base), B (Lamp Body), C (shade), and D (Bulb) with quantities.
Ensure all parts are present and compare with the contents list before assembly.
Align parts, screw lamp body sections together and onto the base, being careful not to twist the power cord.
Insert the specified bulb (D) into the socket.
Place the lamp on a level surface to ensure it is stable.
This document provides a comprehensive guide for the assembly, use, and maintenance of a JONATHAN Y floor lamp, model JYL6105A. The lamp is designed for indoor use and features a unique aesthetic with a D16" X 60"H dimension.
The JYL6105A is a portable floor lamp primarily designed to provide ambient or task lighting in a room. It operates by illuminating a bulb housed within a decorative shade, casting light upwards and outwards. The lamp is equipped with a power cord and a polarized plug, ensuring safe electrical connection. Its assembly involves connecting several body segments and a base, topped with a shade, to form a stable lighting fixture.
The lamp is designed for straightforward assembly and operation. Users are instructed to ensure all parts are present and undamaged before beginning assembly. The assembly process is estimated to take approximately 20 minutes and should be performed on a soft surface to prevent scratching the finish.
The assembly sequence involves:
A critical safety feature of this lamp is its polarized plug. One blade of the plug is wider than the other, serving as a safety mechanism to reduce the risk of electric shock. Users are advised that the plug will fit into a polarized outlet only one way. If it does not fit fully, the plug should be reversed. If it still does not fit, a qualified electrician should be contacted. The manual explicitly warns against using the lamp with an extension cord unless the plug can be fully inserted, and against attempting to bypass this safety feature.
Proper care and maintenance are outlined to ensure the longevity and appearance of the lamp.
The manual also includes a "Part List and Hardware List" with corresponding pictures and quantities for each component (Lamp base, Lamp Body, Shade, and Bulb), which aids in verifying that all necessary parts are present before assembly. This detailed breakdown supports efficient and correct assembly, contributing to the overall usability and safety of the product.
| Material | Metal |
|---|---|
| Finish | Black |
| Bulb Type | LED |
| Style | Modern |
| Voltage | 120V |
| Model Number | JYL6105A |
| Brand | JONATHAN Y |
| Type | Wall Lantern |
| Product Type | Outdoor Light |