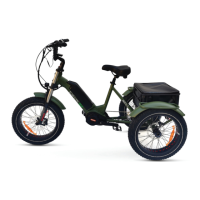
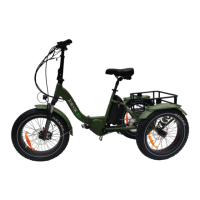
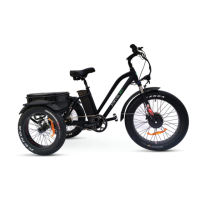
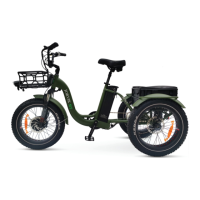
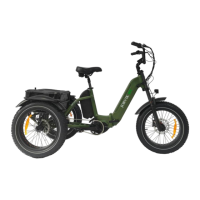
The Jorvik JMT7 Electric Mountain Trike is an eco-friendly electric tricycle designed for versatile use, offering both effortless transportation and the benefits of physical activity. It is built with a "go anywhere" mentality, featuring three fat mountain trike tires for stability, encouraging riders to explore off-road tracks.
Function Description:
The Jorvik JMT7 is an electric mountain trike that combines the stability of a tricycle with the power of an electric motor. It is designed to provide an efficient and enjoyable riding experience, whether on paved roads or challenging off-road terrain. The electric motor assists the rider, making pedaling easier and allowing for longer rides with less effort. The trike is equipped with a 7-speed nexus hub gear system, allowing riders to adjust the pedaling difficulty for various terrains, from uphill climbs to flat or downhill stretches. The electric assist can be controlled via an LCD display and a throttle mechanism.
Important Technical Specifications:
- Gears: 7-speed nexus hub gear driven system.
- Motor: Available in 250W and 500W models.
- Battery: Lithium-ion battery.
- Charging Time: A fully depleted battery charges in 6-8 hours.
- Brakes: Disc brakes on all wheels for maximum reliability and stopping power.
- Weight Capacity: Maximum weight capacity of 133kg.
- Suspension: Front suspension shock.
- Wheels: Fat mountain trike tires.
- Display: LCD display (C18 display manual provides programming details).
Usage Features:
- Assembly: The trike comes pre-assembled, requiring a few simple steps for readiness, including installing the front wheel, handlebars, pedals, and adjusting the seat.
- Front Wheel Installation: Involves lining up the disc brake, placing the fork onto the front wheel, inserting the quick release skewer, and tightening the adjusting nut until the lever can be closed with significant force.
- Handlebar Adjustment: Handlebars can be mounted onto the front fork stem, and their height can be adjusted by loosening/tightening an adjuster bolt.
- Braking System: Equipped with disc brakes. Riders should apply the rear brake before or simultaneously with the front brake for safe stopping. Even pressure on both levers is recommended. Disc brake rotors can get hot during use, and wet weather requires longer stopping distances.
- New Brakes Bed-in Procedure: Before the first ride, new brakes require a "bed-in" procedure involving moderate-speed braking repetitions to ensure consistent and powerful braking.
- Seat Adjustment: The seat height can be adjusted using a quick-release clamp. The seat must be tight enough to prevent twisting.
- Pedal Installation: Pedals are marked "L" for left and "R" for right. The left pedal is tightened counterclockwise, and the right pedal clockwise, using a 15mm spanner. Greasing the pedal thread first is recommended.
- Front Suspension Travel and Sag Guide: Sag, the amount of suspension fork travel with the rider stationary, should be between 15% and 30% of the fork's maximum travel, depending on use and preferences.
- Gear Shifting: The 7-speed nexus hub gear system allows for easy pedaling (gear '1') or maximum speed (gear '7'). Gears should only be changed while pedaling. Rapid changes from first to last gear or vice versa should be avoided.
- Battery Operation: The battery is locked into place with a key. The key must be in the "unlock" position for removal/insertion and in the "on" position to secure the battery for riding. The battery should be removed when transporting the trike on a rack.
- Starting the Trike: Switch the power button on the battery to 'on'.
- LCD Display Usage: Hold the power button on the handlebars to turn the display on/off. Use 'up' and 'down' buttons to change pedal assistance levels. The display can be programmed for various functions (refer to the C18 display manual).
- Throttle Control: For 250W models, the throttle/walk mode is activated by holding down the (-) button on the control unit. For 500W models, it's controlled by pushing a thumb lever; harder pressure provides more assist.
- Safety: Always wear an approved helmet. Perform a mechanical safety check before every ride, ensuring all parts are tight, tires are correctly inflated, and brakes function properly. A qualified mechanic should service the trike after 100 miles (160 km) of riding to account for cable stretch and component "break-in."
- Riding Stability: First rides may feel unstable, as tricycles can feel different from two-wheeled bikes. Practice is recommended in a safe, hazard-free area.
- Passenger Limit: The JMT7 is designed for one rider only; no additional passengers should be carried.
- Weight Limit: Exceeding the 133kg weight limit can damage the trike and cause injury.
- Environmental Usage: Not recommended for use in rain, as battery, motor, or controller can be damaged. Avoid cleaning with high-pressure water. The trike must be turned on when standstill to prevent short-circuits.
- Load Carrying: Carrying loads requires practice, as it can decrease braking power and increase stopping distance. Ensure loads are secure and stable, and do not obstruct wheels or spokes.
- Children: Children are not recommended to ride Jorvik Tricycles electric tricycles due to safety concerns.
Maintenance Features:
- General Cleaning: Periodically clean the trike with a damp cloth. Avoid spraying with a water hose to prevent electrical issues.
- Storage: Store the trike in a dry, sheltered area away from direct sunlight and wet/damp environments.
- Drivetrain: Apply chain lube to the drivetrain when cleaning or wiping down to maintain good running condition.
- Monthly Checks: Clean the drivetrain, inspect the chain for wear, re-apply lubricant, check wheels for loose spokes (tighten if necessary), check tightness of stationary and moving parts (crank arms, pedals, stem bolts, axle nuts), and inspect the braking system (levers and calipers). Replace damaged or worn parts.
- Battery Care: Recharge the battery after every use and at least once a month when not in use. Avoid high temperatures and complete discharge. Never store the battery in a discharged state.
- Battery Charger: Use only the specified charger. Do not disassemble or alter the battery or charger. Keep away from fire, corrosive substances, liquids, and extreme weather. Do not operate if damaged.
- Battery Fuse: The fuse protects the battery. If it blows, there will be no power to electrical components. Contact Jorvik Tricycles for advice if needed.
- Tires and Inner Tubes: Check tire air pressure before every ride using a reliable gauge. Inspect tires for excessive wear and cracks, replacing if necessary.
- Professional Service: Seek assistance from a qualified technician for service, repairs, or maintenance, as the manual is not intended for detailed service.
- Frame Inspection: If any cracks or bends are noticed in the bike, stems, forks, or bars, stop riding immediately and have a local bike shop inspect it.
Warranty:
Jorvik Tricycles offers a full 12-month parts warranty from the date of purchase. This covers defective parts, with the customer responsible for returning parts for inspection and subsequent shipping costs. The warranty does not cover brake pads, worn tires, punctures, worn batteries, worn bearings, worn brakes, general wear and tear, damage due to abuse or misuse, labor or servicing by third parties, damage from accidents, neglect, or general wear and tear (including lithium batteries), damage from non-covered parts, rust, or weather damage. Any parts or complete tricycles replaced under warranty receive an additional 90 days of cover after the original warranty period. Warranties are not transferable.