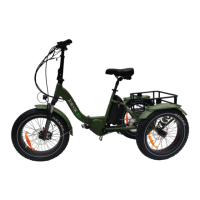
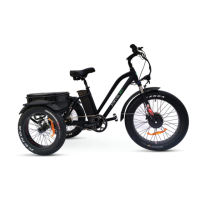
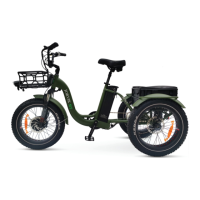
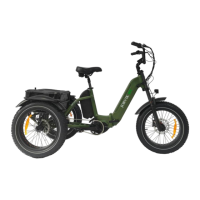
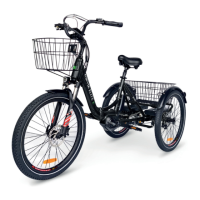
The Jorvik JMT9 Mid Drive Folding Electric Mountain Trike is an electric tricycle designed for versatile use, offering an eco-friendly mode of transportation with the added benefit of physical activity. This trike is built with a "go anywhere" mentality, featuring three fat mountain trike tires for stability, making it suitable for both paved and unbeaten tracks.
Function Description:
The Jorvik JMT9 is a mid-drive folding electric mountain trike. It combines the stability of a tricycle with the power of an electric motor, allowing riders to travel effortlessly and efficiently. The trike is designed to provide a healthy body and mind experience. Its folding mechanism enhances portability and storage convenience. The electric assist system, controlled via a left-hand side throttle and an LCD display, provides adjustable power to aid pedaling.
Important Technical Specifications:
- Motor: Mid-drive electric motor.
- Gears: 7-speed Nexus hub gear driven system. Gear '1' is for easier uphill pedaling, while gear '7' is for maximum speed on level or downhill terrain.
- Brakes: Disc brakes on all wheels for maximum reliability and stopping power.
- Battery: Lithium-ion battery.
- Charging Time: 6-8 hours for a fully depleted battery.
- Charging Indicator: Red light when charging, green light when fully charged.
- Fuse: Designed to protect the battery; if it blows, there will be no power to electrical components.
- Weight Capacity: Maximum 133kg (including rider and cargo).
- Suspension: Front suspension shock with adjustable sag (15-30% of fork's max travel recommended).
- Wheels: Equipped with fat mountain trike tires (e.g., Kenda Krusade 20x4.0).
- Handlebars: Adjustable height and foldable.
- Seat: Adjustable height with a quick-release adjuster.
Usage Features:
- Assembly: The trike comes pre-assembled, requiring a few simple steps for readiness, including installing the front wheel, handlebars, pedals, and fenders/front light.
- Front Wheel Installation: Align the disc brake and place the fork onto the front wheel. Tighten the quick-release skewer until the lever requires significant force to close.
- Handlebar Adjustment: Lift the chrome safety clasp, open the quick-release lever, mount the handlebar, and tighten the stem bolt with a 6mm Allen key. Adjust height by opening the quick-release lever, setting the desired height, and closing it firmly.
- Folding Handlebars: Lift the chrome safety clasp, open the quick-release lever, collapse the handlebars, and reverse the procedure to raise and lock them.
- Pedal Installation: Grease pedal threads, then attach the left pedal (marked "L") by turning counterclockwise and the right pedal (marked "R") by turning clockwise using a 15mm spanner. Ensure they are tightly attached.
- Fender and Front Light: Attach the front fender and front light using the bolt/bracket located at the rear of the forks or in the hardware box.
- Seat Adjustment: Pull the seat clamp handle away, slide the seat to the desired height, and push the handle inward to secure it. Ensure the seat post is not set above the vertical maximum height marks.
- Braking: Apply even pressure to both brake levers. The rear brake should always be applied before and while the front brake is applied.
- Brake Bed-in Procedure: Perform a bed-in procedure before the first ride:
- Accelerate to moderate speed, then firmly squeeze brakes until walking speed (repeat 20 times).
- Accelerate to faster speed, then firmly squeeze brakes until walking speed (repeat 10 times).
- Important Note: Do not lock up the wheels during this procedure.
- Electric Assist System:
- Power On/Off: Hold the power button on the handlebars until the display turns on/off.
- Pedal Assistance: Change assistance level using the 'up' and 'down' buttons on the LCD display. Pedal assist mode '0' disengages pedal assist, but the throttle still works.
- Throttle Control: Operated on the left-hand side. Push with the thumb; more pressure releases more power. Release to slow down and apply brakes.
- Lights: To turn lights on/off, press and hold the '+' button for 2 seconds.
- Battery Usage:
- Removal/Insertion: Turn the key 180 degrees counterclockwise to unlock and remove; slide back into position and turn 180 degrees clockwise to lock.
- Charging: Can be charged on or off the trike. Plug the charger into an AC outlet, then into the battery's charging port.
- Safety:
- Always wear an approved helmet.
- Familiarize yourself with local laws regarding trike use.
- Perform a mechanical safety check before every ride: check nuts, bolts, accessories, front axle, handlebar stem, tire pressure, and brake operations.
- Get the trike serviced by a qualified mechanic after 100 miles (160 km) for cable stretching and component break-in, including spoke tensioning.
- The first ride may feel unstable; practice is needed.
- Designed for one rider only; do not carry additional passengers.
- Do not exceed the maximum weight capacity of 133kg.
- Avoid using in rain or cleaning with high-pressure water to prevent damage to electrical components.
- Turn the trike on when standstill to prevent short-circuits.
- Practice maneuvering and braking with and without a load in a safe, traffic-free area.
- Ensure no straps or items can get caught in the wheels or spokes.
- Regularly check for cracks or bends in the frame or components.
Maintenance Features:
- Cleaning: Periodically clean with a damp cloth. Avoid spraying with a water hose.
- Storage: Store in a dry shelter, away from direct sunlight and damp environments.
- Drivetrain: Apply chain lube regularly.
- Monthly Checks:
- Clean drivetrain and inspect chain for wear; re-apply lubricant.
- Check wheels for loose spokes; tighten if necessary.
- Check tightness of stationary and moving parts (crank arms, pedals, stem bolts, axle nuts).
- Inspect braking system (levers, calipers) for safety. Replace damaged or worn parts (cables, brake pads).
- Battery Care:
- Recharge after every use.
- Fully charge at least once a month when not in use.
- Avoid high temperatures and complete discharge.
- Never store in a discharged state.
- Do not disassemble, alter, or expose to fire, corrosive substances, liquids, or extreme weather.
- Only use the manufacturer-specified charger and on Jorvik Tricycles approved products.
- Replace if it no longer holds a sufficient charge.
- Tires and Inner Tubes:
- Check inflation with a reliable pressure gauge before every ride.
- Inspect for excessive wear and cracks; replace if necessary.
Warranty:
- Parts Warranty: Full 12-month parts warranty from the date of purchase.
- Exclusions: Losses from product malfunction, accidental damage, brake pads, worn tires, punctures, worn batteries, worn bearings, worn brakes, general wear & tear, damage from abuse/misuse, labor/servicing by external parties, damage from accidents/neglect, rust/weather damage, or damage from non-regular maintenance.
- Defective Parts: Must be returned for inspection at the buyer's cost.
- Extended Warranty: Runs from the final day of the current warranty; original terms apply.
- Replacement Parts/Tricycles: Subject to an additional 90 days cover after the original warranty period.