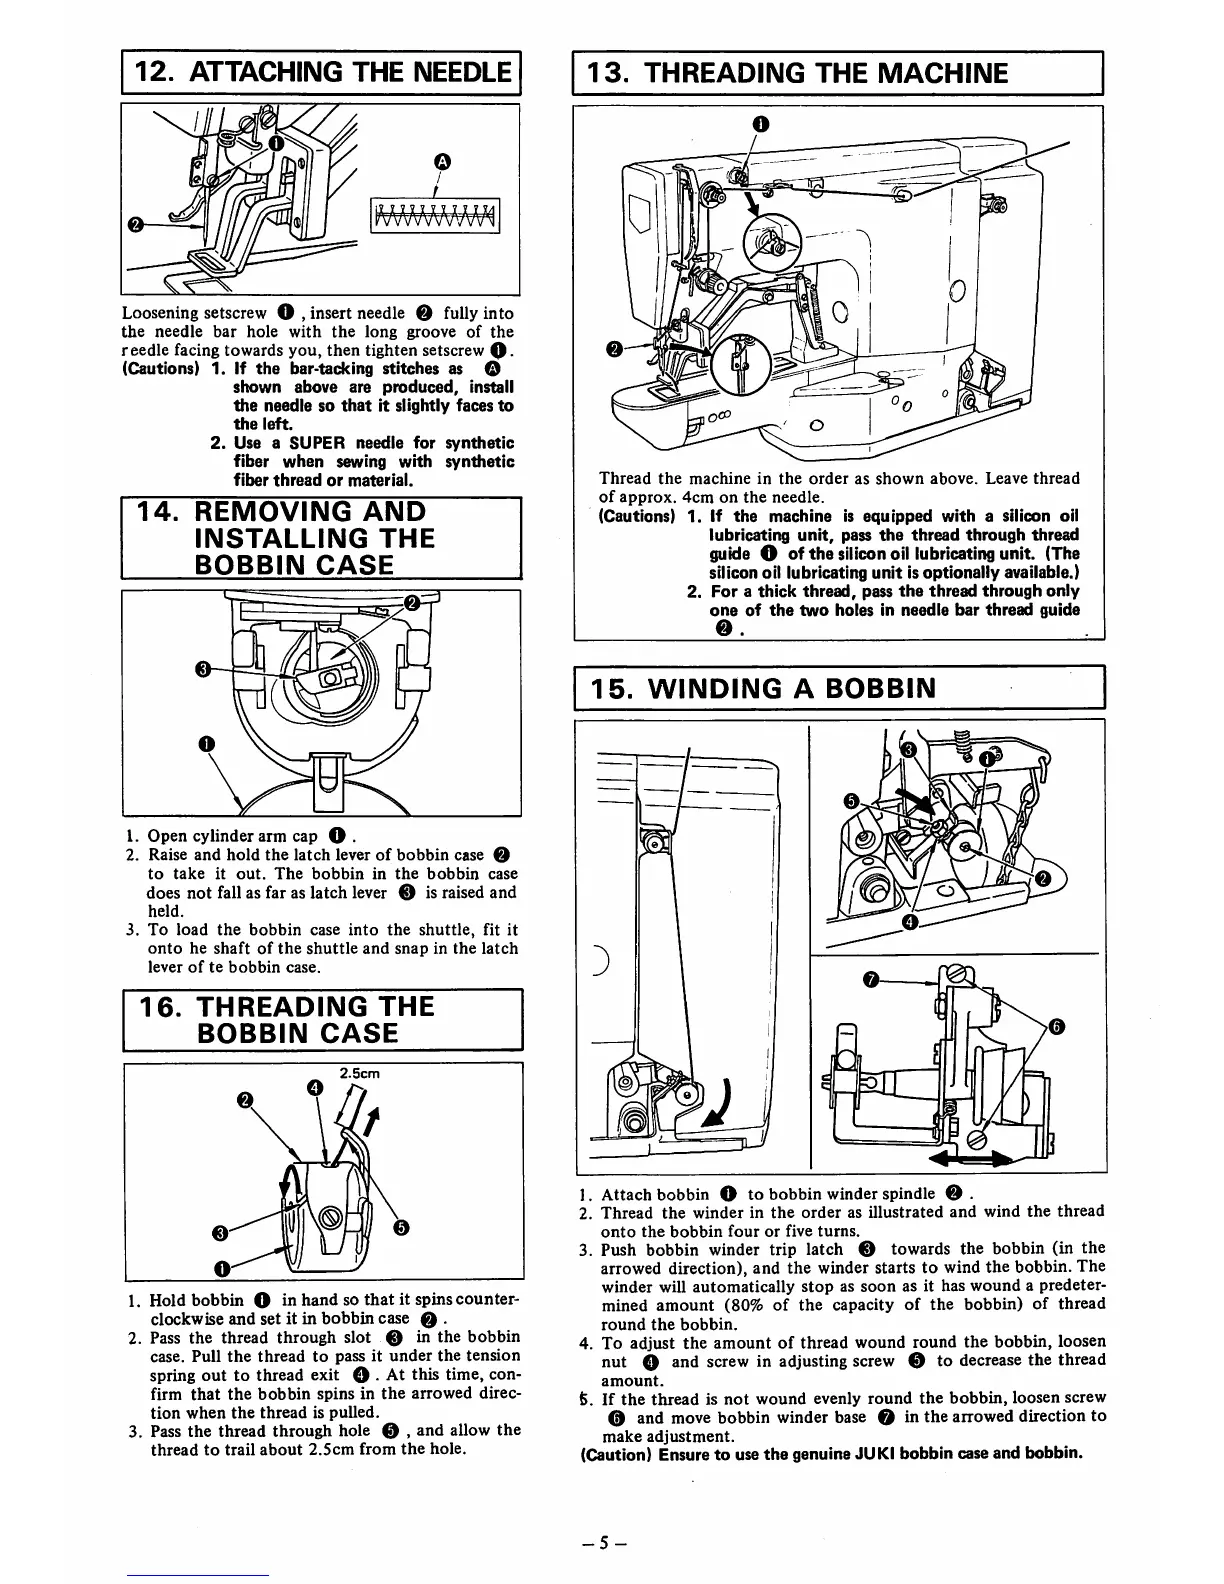
12.
ATTACHING
THE
NEEDLE
Loosening setscrew O , insert needle 0 fully into
the
needle
bar
hole
with
the
long
groove
of
the
reedle facing towards you, then tighten setscrew
0.
(Cautions) 1. If
the
bar-tacking stitches as O
shown
above
are
produced,
install
the
needle
so
that
It
slightly
faces
to
the
left.
2.
Use a
SUPER
needle
for
synthetic
fiber
when
sewing
with
synthetic
fiber
thread
or
material.
14.
REMOVING
AND
INSTALLING
THE
BOBBIN
CASE
1. Open cylinder arm cap O .
2.
Raise
and
hold
the
latch
lever
of
bobbin
case
to
take
it
out.
The
bobbin
in
the
bobbin
case
does
not
fall as
far
as
latch
lever 0 is raised
and
held.
3.
To
load
the
bobbin
case
into
the
shuttle,
fit
it
onto
he
shaft
of
the
shuttle
and
snap
in
the
latch
lever
of
te
bobbin
case.
16.
THREADING
THE
BOBBIN
CASE
2.5cm
1.
Hold
bobbin
O in
hand
so
that
it
spins
counter
clockwise and set it in
bobbin
case 0
2. Pass
the
thread
through
slot
0 in
the
bobbin
case.
Pull
the
thread
to
pass it
under
the
tension
spring
out
to thread exit O . At this time, con
firm
that
the
bobbin
spins
in
the
arrowed
direc
tion
when
the
thread
is
pulled.
3. Pass
the
thread
through
hole 0 ,
and
allow
the
thread
to
trail
about
2.5cm
from
the
hole.
13.
THREADING
THE
MACHINE
Thread
the
machine
in
the
order
as
shown
above.
Leave
thread
of
approx.
4cm
on
the
needle.
(Cautions) 1. If
the
machine is equipped with a silicon oil
lubricating
unit,
pass
the
thread
through
thread
guide O of
the
silicon oil lubricating unit. (The
silicon oil lubricating
unit
is optionally available.)
2.
For
a
thick
thread,
pass
the
thread
through
only
one
of
the
two
holes
in
needle
bar
thread
guide
0.
15.
WINDING
A
BOBBIN
1. Attach bobbin O to bobbin winder spindle 0 .
2.
Thread
the
winder
in
the
order
as
illustrated
and
wind
the
thread
onto
the
bobbin
four
or
five
turns.
3. Push bobbin winder trip latch 0 towards the bobbin (in
the
arrowed direction), and
the
winder starts
to
wind
the
bobbin. The
winder will automatically
stop
as
soon
as it has
wound
a
predeter
mined
amount
(80%
of
the
capacity
of
the
bobbin)
of
thread
round
the
bobbin.
4. To
adjust
the
amount
of
thread
wound
round
the
bobbin,
loosen
nut o and screw in adjusting screw 0 to decrease the thread
amount.
6.
If
the
thread
is
not
wound
evenly
round
the
bobbin,
loosen
screw
0 and move bobbin winder base 0 in the arrowed direction to
make
adjustment.
(Caution) Ensure
to
use
the
genuine JUKI
bobbin
case and bobbin.
-5-

 Loading...