EasyManua.ls Logo

JUKI LU-2860 User Manual

JUKI LU-2860
37 pages
To Next Page IconTo Next Page
Page #1 background imageLoading...
Page #1 background image
LU-2810, 2810-7, 2860, 2860-7
INSTRUCTION MANUAL

Other manuals for JUKI LU-2860

Question and Answer IconNeed help?

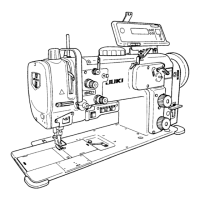
Do you have a question about the JUKI LU-2860 and is the answer not in the manual?

JUKI LU-2860 Specifications

General IconGeneral
TypeIndustrial Sewing Machine
Stitch TypeLockstitch
Max Stitch Length5 mm
Needle SystemDB x 1
LubricationAutomatic
Hook TypeRotary hook
Motor TypeClutch motor
Stitch Length5 mm
Maximum Sewing Speed2500 SPM

Summary

BEFORE OPERATION

1. SPECIFICATIONS

2. INSTALLATION

Do not put protruding articles

Caution against placing protruding items where the sewing machine is positioned.

Attaching the hinge seats and support rubbers

Instructions for attaching hinge seats and support rubbers to the table.

Attaching the oil pan

Procedure for attaching the oil pan to the table using wood screws.

Attach a filter

Attaching a filter to the oil pan as shown in the figure.

Install hinge on the bed with screw

Installing the hinge onto the bed with a screw and rubber hinge.

Securely attach head support rod

Securing the head support rod to the table.

Put reflux pipe in oil reservoir

Placing the reflux pipe into the oil reservoir of the oil pan.

Fix filter and filter clamp

Securing the filter and filter clamp with a fitting.

Mount spacers

Mounting spacers onto the machine head frame.

Install bracket on CP panel

Installing a bracket onto the CP panel using screws.

Install bracket on spacer

Installing a bracket onto a spacer with screws and washers.

3. ADJUSTING THE BELT TENSION

4. ATTACHING THE BELT COVER

5. INSTALLING THE OIL SHIELD

6. PNEUMATIC COMPONENTS

Adjusting the air pressure

Adjusting the operating air pressure using the regulating knob.

Exhaust tube

Routing the exhaust tube through the table.

7. INSTALLING THE THREAD STAND

8. LUBRICATION

Cleaning the oil filter

Procedure for cleaning the oil filter and oil reservoir.

Adjusting the oil quantity in the hook

Method for adjusting the oil amount in the hook.

9. ATTACHING THE NEEDLE

10. ATTACHING AND REMOVING THE BOBBIN

11. THREADING THE HOOK

12. INSTALLING THE THREAD GUIDE PIN

13. WINDING A BOBBIN

14. THREADING THE MACHINE HEAD

15. ADJUSTING THE STITCH LENGTH

Reverse feed stitchng

How to perform reverse feed stitching using the control lever.

Manual one-touch reverse feed stitching

Performing reverse feed stitching with the touch-back switch.

Changing over the stitching pitch

Adjusting stitch length for specific models using a changeover switch.

16. THREAD TENSION

Adjusting the needle thread tension

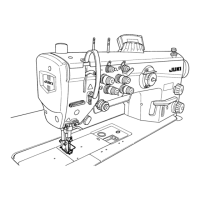
Instructions for adjusting the tension of the needle thread.

Adjusting the bobbin thread tension

Instructions for adjusting the tension of the bobbin thread.

17. THREAD TAKE-UP SPRING

When you want to change the stroke of the thread take-up spring

Adjusting the stroke of the thread take-up spring.

When you want to change the tension of the thread take-up spring

Adjusting the tension of the thread take-up spring.

18. HAND LIFTER

19. ADJUSTING THE PRESSURE OF THE PRESSER FOOT

20. NEEDLE-TO-HOOK RELATION

21. ADJUSTING THE HOOK NEEDLE GUARD

22. ADJUSTING THE BOBBIN CASE OPENING LEVER

23. POSITION OF THE COUNTER KNIFE AND ADJUSTMENT OF THE KNIFE PRESSURE

24. ADJUSTING THE AMOUNT OF THE ALTERNATING VERTICAL MOVEMENT OF THE WALKING FOOT AND THE PRESSER FOOT

25. SEWING SPEED TABLE

26. RESETTING THE SAFETY CLUTCH

27. ADJUSTING THE AUTOMATIC PRESSER FOOT LIFTER

28. FIXING THE FEED ADJUSTING DIAL

29. NORMAL-/REVERSE-FEED STITCH NEEDLE ENTRY POINTS ALIGNMENT AT THE TIME OF AUTOMATIC REVERSE FEED STITCHING

30. OPERATION SWITCHES

Alternating vertical movement amount change-over switch

Switch to maximize alternating vertical movement of walking foot and presser foot.

Automatic reverse feed stitching cancellation/addition switch

Switch to cancel or add automatic reverse feed stitching.

Needle lifting switch

Switch to move the machine from needle-down to needle-up stop position.

2P switch

Switch to change stitch length based on the 2P feed adjusting dial.

Needle thread tension changeover switch

Switch to select double tension function for needle thread.

31. KNEE SWITCH

Installation of the knee switch

Steps for installing the knee switch mounting plate and switch.

Functions of the knee switch

How the knee switch maximizes vertical movement or acts as a presser lifting switch.

Function setting of the knee switch

Configuring the knee switch function via the control panel settings.

32. MOTOR PULLEY AND V-BELT

33. TROUBLES IN SEWING AND CORRECTIVE MEASURES

Related product manuals