Do you have a question about the JUKI LU-2868-7 and is the answer not in the manual?
Steps for installing the sewing machine on a table, including safety precautions.
Instructions for installing the belt cover and belt, with safety warnings.
Detailed steps for filling the oil tank and performing initial lubrication.
Step-by-step guide on how to attach the needle, including types and precautions.
Procedure for adjusting the machine head using the CP-18 control panel.
Procedure for adjusting the machine head using the CP-180 control panel.
How to adjust stitch length using feed adjusting dials and touch-back switch.
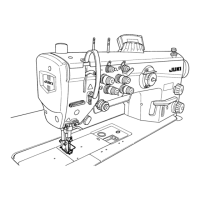
Instructions for adjusting needle thread and bobbin thread tension.
Steps to adjust the alignment between the needle and the hook for proper sewing.
Adjusting counter knife, knife pressure, and clamp pressure for thread trimming.
Procedure to reset the safety clutch after an excessive load condition.
Common causes and corrective measures for thread breakage or fraying.
Causes and corrective actions for stitch skipping issues.
Causes and corrective measures for loose stitches in sewing.
| Type | Lockstitch |
|---|---|
| Max Stitch Length | 5 mm |
| Needle | DB x 1 |
| Lubrication | Automatic |
| Motor Type | Servo Motor |
| Weight | 55 kg |
| Motor | Servo Motor |
| Max Sewing Speed | 3000 SPM |
| Lubricating Oil | JUKI Machine Oil |
| Foot Lift | By Knee |
| Sewing Speed | 3, 000sti/min |
| Hook | Rotary |