160 91.3
100
30˚
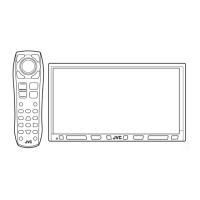
Step 5 / 步驟 5
Dashboard
儀表盤
20
4
Monitor panel
顯示器面板
2
故障排除
• 保險絲燒斷。
* 檢查紅色導線接頭和黑色導線接頭是否接觸正確?
• 電源不能接通。
* 檢查黃色導線接頭是否接上?
• 揚聲器沒有聲訊。
* 檢查揚聲器輸出導線接頭是否短路?
• 聲訊失真。
* 檢查揚聲器輸出端子是否接地?
* 檢查揚聲器的左 (L) ,右 (R) 端子的負極“–”是否共同接地?
• 噪音干擾音響。
* 後接地端子與車身是否使用較短和較厚的電線連接?
• 本機發熱。
* 檢查揚聲器輸出端子是否接地?
* 檢查揚聲器的左 (L) ,右 (R) 端子的負極“–”是否共同接地?
• 本機完全不能正確操作。
* 您有沒有重置本機?
INSTALLATION (IN-DASH MOUNTING)
The following illustration shows a typical installation. However, you should make adjustments
corresponding to your specific car. If you have any questions or require information regarding installation
kits, consult your JVC car audio dealer or a company supplying kits.
• If you are not sure how to install this unit correctly, have it installed by a qualified technician.
Before installing the unit
• When mounting the unit, be sure to use the screws provided, as instructed. If other screws are used,
parts could become loose or damaged.
• When tightening screws or bolts, be careful not to pinch any connection cord.
• Make sure not to block the fan on the rear to maintain proper ventilation when installing the unit.
1 Remove the audio system originally installed in the car, together with its mounting brackets.
Note: Be sure to keep all the screws and parts removed from your car for future use.
2 Attach the mounting brackets (removed from the car) to this unit (see below).
3 Do the required electrical connections.
• See pages 3 and 4.
4 Install this unit using the screws removed in step 1.
5 Attach the monitor panel (see below).
The following example is for installation in a Toyota car. For more details, consult your JVC car audio
dealer.
If necessary, restore the protruding tabs.
若有必要,請重新裝上凸緣。
Supplied screws
配備螺絲
Note : When installing the unit on the mounting bracket, make sure to use the supplied screws
(M5 x 8 mm). If longer screws are used, they could damage the unit.
注意: 安裝本機進裝配架時,請務必使用配備的螺絲(M5 x 8 mm)。若使用比較長的螺絲,
有關螺絲可能會損壞本機。
安裝 (裝設、固定在儀表板內)
下面的圖解表示了典型的安裝程序。但是在實際安裝時,您應該根據您的汽車作適當的調整。如果
您有問題,或需要有關配套元件的資料,請向JVC汽車音響分銷商或配套元件供應公司詢問。
• 如果您不能確定如何正確地安裝本機,應請合格的技術人員來安裝。
安裝本機之前
• 當裝上本機時,必須按照指示使用配備的螺絲釘。如果使用其它的螺絲釘,相關零件可能會鬆
脫或損壞。
• 當鎖緊螺絲釘或螺栓時,切記不要壓擠到任何連接電線。
• 當安裝上後,切記不要阻擋到後面板的風扇以維持適當的通風。
1 拆卸原本安裝在汽車內的音響系統,以及其裝配架。
注意: 請務必保留所有從您汽車拆卸的螺絲和零件做日後使用。
2 將(從汽車拆卸的) 裝配架安上本機(參閱下圖)。
3 執行必要的電路連接。
• 參閱第3 和4頁。
4 使用在步驟1 拆卸的螺絲安裝本機。
5 安裝顯示器面板(參閱下列內容)。
以下以豐田(Toyota) 汽車安裝為例。請聯絡您的JVC 汽車音響分銷商有關更多細節。
TROUBLESHOOTING
• The fuse blows.
* Are the red and black leads connected correctly?
• Power cannot be turned on.
* Is the yellow lead connected?
• No sound from the speakers.
* Is the speaker output lead short-circuited?
• Sound is distorted.
* Is the speaker output lead grounded?
* Are the “–” terminals of L and R speakers grounded in common?
• Noise interfere with sounds.
* Is the rear ground terminal connected to the car’s chassis using shorter and thicker cords?
• Unit becomes hot.
* Is the speaker output lead grounded?
* Are the “–” terminals of L and R speakers grounded in common?
• This unit does not work at all.
* Have you reset your unit?
When installing the unit in a Nissan car
當安裝本機於日產汽車時
Install the unit at an angle of less than 30˚, taking it into
account that the monitor would eject when in use.
將本機安裝在少於 30˚ 的角度,您必須考慮到屏幕可
以在使用時退出。
Required space for installation and the monitor ejection
安裝和顯示器退出所需的空間
Unit: mm
單位: mm (毫米)
Mounting bracket removed from the car
從汽車拆卸的裝配架
Screws removed from the car in step
1
在步驟1 從汽車拆卸的螺絲
Supplied screws
配備螺絲
Select the appropriate type fitting to your
audio system space.
選擇適合您的音響系統安裝空間的型
號。
Mounting bracket removed from the car
從汽車拆卸的裝配架
Plate for use with a Nissan car
用於日產汽車的框
Instal_KW-AVX820[U_UT]_2.indb 2Instal_KW-AVX820[U_UT]_2.indb 2 09.2.9 0:09:08 PM09.2.9 0:09:08 PM
 Loading...