Setting the [Preset Temp.] or [Alternative
Temp.]
Values
You can change both the color temperature
settings in the Preset mode in the menu.
1
Open the [Preset Temp.] or [Alternative
Temp.]
menu.
0
Select [Main Menu]
B
[Camera Process]
B
[White Balance]
B
[Preset Temp.] and
[Alternative Temp.], and press the Set button
(
R
).
0
The Color Temperature setting screen
appears.
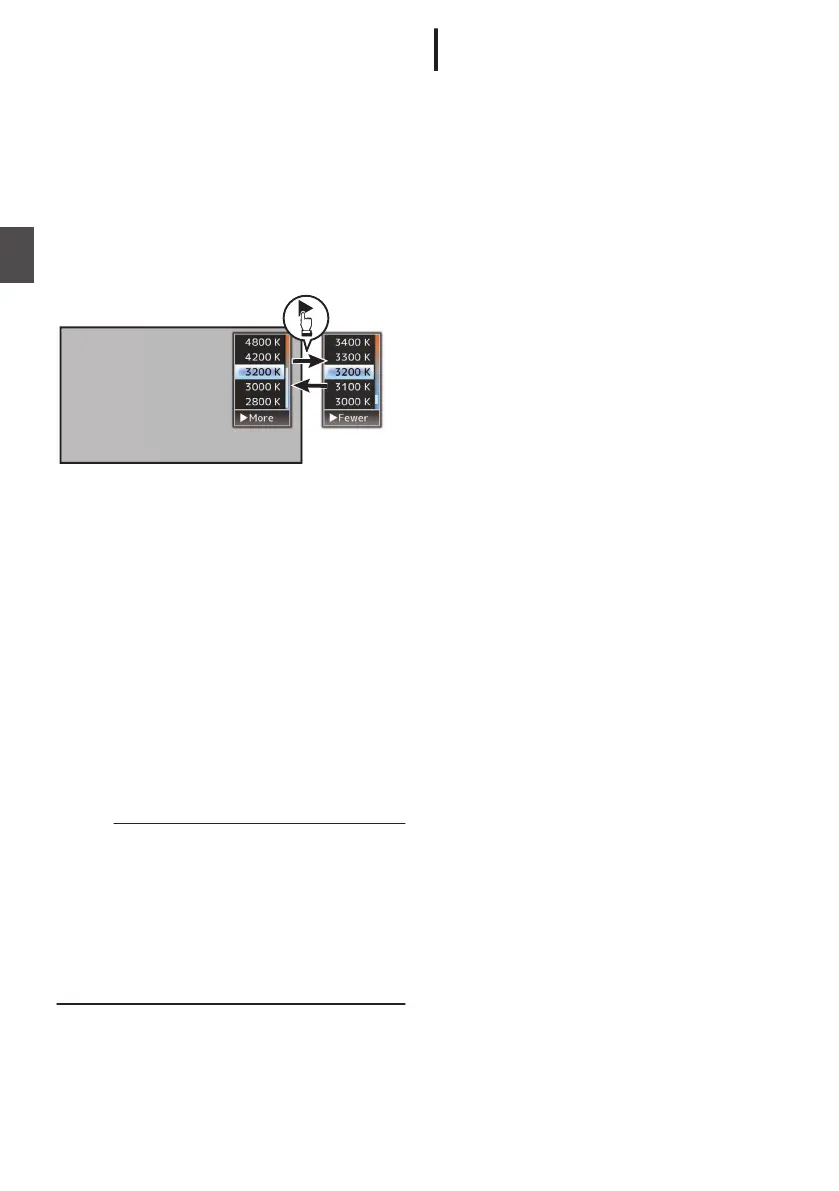
.
Color Temperature
Detailed Selection
Screen
Color Temperature Selection Screen
2
Select the color temperature.
0
When selecting from a setting value (Color
Temperature Selection screen), use the
cross-shaped
button (JK) to select the color
temperature.
[Setting Values: 7500K, 6500K, 5600K,
5200K, 4800K, 4200K, 3200K, 3000K,
2800K]
0
To select detailed values (Color
Temperature Detailed Selection screen)
0
Press the cross-shaped button (I) to
display the Color Temperature Detailed
Selection screen.
0
Use the cross-shaped button (JK) to
select a color temperature.
[Setting Values: 2300K to 15000K (in
100K increments)]
Memo :
0
Use the cross-shaped button (I) to switch
between the Color Temperature Selection
screen and the Color Temperature Detailed
Selection screen.
0
If [White Balance] is assigned to the user button,
pressing the assigned user button will display
the Color Temperature Selection screen.
(A P39
[Assignment of Functions to User
Buttons] )
Memory A Mode (A), Memory B Mode
(B)
0
Set to the white balance saved in Memory A or
Memory B.
0
When
the [WHT.BAL B/A/PRST] switch is set to
“A” or “B”, press the [AWB/9] button to execute
white balance. The white balance will be
automatically adjusted and the adjusted value
will be saved in Memory A or Memory B.
* You can also use the user button assigned with
[AWB] instead of the [AWB/9] button.
(A P
98 [User Switch Set Item] )
1
Prepare the camera recorder.
A
Set the [POWER ON/OFF] switch to “ON”.
B
Press the [IRIS] button to set to the Auto mode.
C
Press and hold the [FULL AUTO] button to set to
“OFF”.
2
Set the [ND FILTER] switch according to the
lighting.
(A P59 [Setting the ND Filter] )
3
Set the [WHT.BAL B/A/PRST] switch to “A” or
“B”.
4
Locate a place with similar lighting conditions
as the object to be shot, place a white object
near the center of the screen and zoom in to
fill the screen with white.
5
Press the [AWB/9] button.
0
The white detection frame appears when Auto
White Balance is activated. Fill the frame with
white completely.
0
While Auto White is starting up, “A<
y
>” or
“B<
y
>” appears on the screen. (
y
mark
appears blinking)
0
After the correct white balance is obtained, an
estimated value of the current color
temperature is displayed.
62
Adjusting the White Balance
Shooting

 Loading...