Do you have a question about the JVC RX-8000VBK and is the answer not in the manual?
Disconnect mains plug to shut off power completely. POWER switch does not disconnect mains.
Match switch position to speaker impedance to protect from overheating.
Equipment tested for Class B digital device, FCC Rules. May cause interference.
Ensure proper airflow around the receiver to prevent overheating and damage.
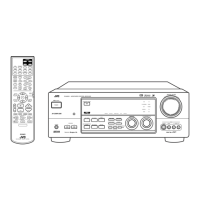
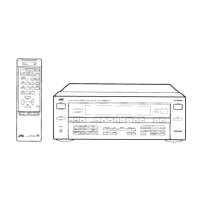
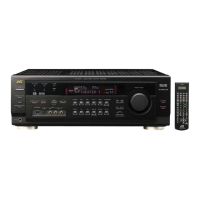
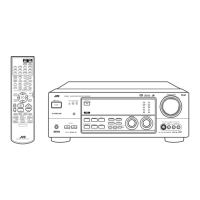
Details and page references for each button on the remote control.
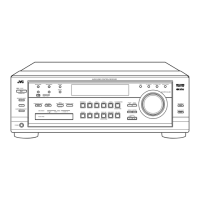
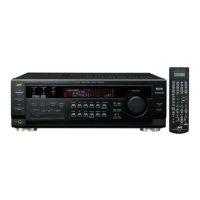
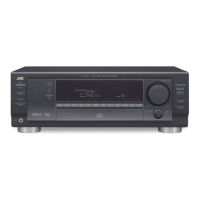
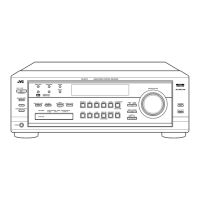
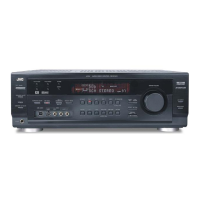
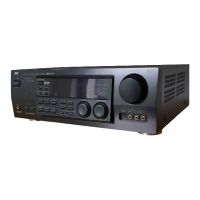
Details and page references for each control on the receiver's front panel.
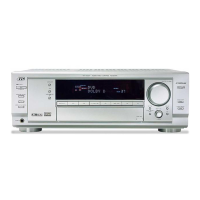
General advice on handling the receiver and checking accessories before installation.
Instructions for connecting the supplied FM antenna or a standard connector.
Instructions for connecting the AM loop antenna or an external wire antenna.
Guides on connecting front, rear, center, and subwoofer speakers.
Connect rear speakers to REAR SPEAKERS terminals and center speaker to CENTER SPEAKER terminals.
Connect powered subwoofer to SUBWOOFER OUT jack using an RCA cable.
Connect audio components using RCA pin plugs for left and right audio jacks.
Connect to TAPE/MD jacks. Use "MD" for MD recorder source name.
Connect to CDR/VCR2 jacks.
Connect S-VHS/VHS VCR using composite or S-video terminals.
Use front panel VIDEO input jacks for convenient connection/disconnection.
Connect stereo or analog discrete outputs to appropriate jacks.
Connect TV to MONITOR OUT. Connect DBS tuner to TV SOUND/DBS jacks.
Four DIGITAL IN terminals (1 coaxial, 3 optical) for various digital equipment.
Connect to DIGITAL OUT terminal for digital-to-digital recording.
Plug the power cord into an AC outlet. Keep away from cables and antenna.
Insert two R6P(SUM-3)/AA batteries, matching polarity.
Use POWER button on front panel or AUDIO POWER on remote.
Use SOURCE SELECTOR or remote buttons to choose audio/video source.
Indicators show incoming signals and speaker status (L, R, C, LS, RS, LFE, SUBWFR).
Use MASTER VOLUME knob or VOLUME +/- buttons on remote.
Press SPEAKERS 1 or SPEAKERS 2 buttons to select active front speaker pair.
Connect headphones to PHONES jack. Press SPEAKERS 1/2 to turn off lamps.
Press MUTING button to mute/unmute sound.
Press BASS BOOST button to activate/deactivate bass boost.
Press INPUT ATT. to reduce input signal level if sound is distorted.
Adjust subwoofer level using MULTI JOG or SUBWOOFER -/+ buttons.
Record analog or digital sources to connected devices.
Adjust left/right speaker balance using BALANCE/SURROUND ADJUST and MULTI JOG.
Rename sources like TAPE to MD or TV SOUND to DBS.
Register if a subwoofer is connected (YES/NO).
Set speaker sizes (LARGE/SMALL/NONE) for optimal DSP surround effect.
Adjust delay time for center speaker to match front speaker distance.
Adjust delay time for rear speakers to match front speaker distance.
Adjust crossover frequency based on small speaker size for bass reallocation.
Reduce low frequency effects (bass) if sound is distorted.
Compress dynamic range for surround sound at night.
Register which component is connected to each DIGITAL IN terminal (1-4).
Select AUTO/PCM, DOLBY DIGITAL, or DTS for digital sources.
Press ANALOG/DIGITAL to cycle through input modes (ANALOG, AUTO/PCM, DOLBY DIGITAL, DTS).
Show disc title or track title on display for CD Text/MD.
Assign and store sound settings for each source, recalled automatically.
Set timer to automatically turn off the receiver after a set time.
Use SOURCE SELECTOR and FM/AM TUNING to tune stations.
Preset up to 30 FM and 15 AM stations for quick tuning.
Switch between AUTO MUTING and MONO for better FM reception.
Assign up to four characters to each preset station name.
Cycle through SEA modes (ROCK, MUSICAL, MOVIE, etc.) using SEA MODE button.
Adjust SEA levels for frequencies and store as USERMODE.
Creates surround effect like Dolby Surround, used for action movies.
Creates realistic "being there" feeling by simulating direct and indirect sounds.
Adjust settings for Dolby Digital and DTS Digital Surround.
Reproduces realistic sound field for Dolby Surround software.
Reproduces analog discrete 5.1 channel output from DVD players.
Lists available DSP modes based on speaker configuration (front only, with center, with rear).
Adjusts the effect level for 3D ACTION and 3D THEATER modes.
Adjusts rear speaker output levels and effect level for DAP modes.
Adjust speaker output levels, center tone, and effect level for Dolby/DTS.
Adjust speaker output levels, center tone, and effect level for JVC Theater Surround.
Adjusts speaker output levels, center tone, and effect level via front panel.
Activate DSP modes like Pro Logic, Dolby Digital, DTS Surround.
Select and play sources for 3D-PHONIC and JVC Theater Surround.
Activate DVD MULTI mode while playing DVD via analog discrete output.
Adjust speaker output levels and center tone using remote control.
Use MENU to select source for playback.
Use MENU to select different video sources for picture and sound.
Use MENU to select and adjust DSP modes.
Use MENU to select analog or digital input mode for digital sources.
Adjust left/right speaker balance using SOUND CONTROL menu.
Adjust subwoofer output level using SOUND CONTROL menu.
Turn bass boost ON/OFF using SOUND CONTROL menu.
Adjust input attenuator mode (ATT ON/NORMAL) using SOUND CONTROL menu.
Adjust DSP modes (e.g., SURROUND LEVEL) using MODE and SOUND CONTROL menus.
Adjust speaker levels, center tone, and effect levels for various DSP modes.
Select preferred SEA mode from SOUND CONTROL menu.
Adjust SEA levels and store as USERMODE via SOUND CONTROL menu.
Configure subwoofer, speaker size, delay times, and crossover frequency.
Tune stations, select bands, and set FM reception modes via TUNER CONTROL menu.
Store tuned stations into preset memory channels.
Assign up to four characters to each preset station name.
Connect JVC audio components via COMPU LINK jacks and RCA cables.
Components turn on/off with the receiver.
Start recording automatically when source playback begins.
Connect CD players/MD recorders via COMPU LINK and TEXT COMPU LINK jacks.
Display disc info, search discs by title/performer, input disc titles.
Press TEXT DISPLAY to show disc info like title, performer, track titles.
Search for discs by performer, disc title, or genre.
Search for CDs by genre using the GENRE SEARCH screen.
Input performer, disc title, and music genre for CD/MD disc memory.
Enter disc title and song titles for MD recorder.
Connect VCR, DVD player, and TV to receiver for AV COMPU LINK control.
Illustrates AV COMPU LINK connections based on S-video terminal availability.
Enjoy video playback by inserting cassette or pressing PLAY.
Enjoy DVD playback by starting playback on DVD player.
Automatically changes TV input mode based on receiver source selection.
TV, VCR 1, DVD player turn on/off with the receiver.
Operate audio components via remote control using COMPU LINK.
Tune FM/AM stations, select FM mode using remote control.
Control SURROUND, SEA, SUBWOOFER, CENTER, REAR, EFFECT, CNTR TONE.
Play, stop, pause, select tracks for CD player using remote.
Control play, stop, pause, disc selection for CD player-changers.
Start and stop turntable playback using remote control.
Control play, fast wind, rewind, pause, record for cassette decks.
Control play, stop, pause, record for MD recorders.
Control play, stop, pause, track selection for CD recorders.
Control VCR 1 power, channels, play, stop, pause, record.
Control DVD player play, stop, pause, and menu operations.
Control TV power, volume, input mode, and channels.
Set manufacturer codes to operate other brands' TVs.
Set manufacturer codes to operate other brands' CATV converters.
Set manufacturer codes to operate other brands' DBS tuners.
Set manufacturer codes to operate other brands' VCRs.
Set manufacturer codes to operate other brands' DVD players.
Check power cord connection.
Check speaker cables and speaker button settings.
Check speaker cables and balance setting.
Check antenna connection or signal strength.
Check antenna connections or ignition noise.
Connect an NTSC TV.
Move speakers away from turntable.
Turn off receiver, stop source, check speaker wiring.
Check remote mode selector and obstructions.
Output power details for stereo and surround operations.
Input sensitivity, output levels, signal-to-noise ratio, frequency response.
Tuning range, sensitivity, signal-to-noise ratio, THD.
Tuning range, sensitivity, signal-to-noise ratio for AM tuner.
Power requirements, consumption, dimensions, and mass.
Video input/output levels, impedance, synchronization, S/N ratio.
Tuning range, sensitivity, signal-to-noise ratio, THD.
Tuning range, sensitivity, signal-to-noise ratio.
Power requirements, consumption, dimensions, and mass.
| Type | Stereo receiver |
|---|---|
| Channels | 2 |
| Tuning range | FM, AM |
| Input sensitivity | 200mV (line) |
| Output | 200mV (line) |
| Video Connections | Composite |
| Signal to noise ratio | 100dB (line) |
| Speaker load impedance | 8Ω (ohms) |
| Inputs | phono |
| Outputs | headphones |
| Power output | 100W per channel (8 ohms, 20Hz-20kHz, 0.08% THD) |